> ## Documentation Index
> Fetch the complete documentation index at: https://docs.crossmint.com/llms.txt
> Use this file to discover all available pages before exploring further.
# Register External Collection
> Import custom and/or third party contracts
Crossmint has a pre-audited library of [smart contracts](/minting/nfts/integrate/create-collections) that serve most use cases. However, if you have custom needs, you can also bring your own.
The Checkout has been battle-tested at scale with Crossmint's collections, and may result in a more reliable
experience than using an untested, imported contract, or at least require less trouble-shooting.
* When you require very custom functionality not supported by Crossmint's contracts.
* If you're developing a marketplace.
* If you have an accesslist.
Secondary markets are platforms where NFTs are traded after their initial mint/primary sale. These are marketplaces where users can buy and sell NFTs from each other.
It requires manual support from Crossmint to import secondary contracts. See our [marketplaces and launchpads guide](/payments/advanced/marketplaces-and-launchpads).
The self-serve option is only available for importing primary contracts for EVM and Solana.
When importing contracts, Crossmint has support to fetch listings from the following secondary marketplaces:
* **Auction House**: Solana's native marketplace protocol
* **Tensor**: High-performance Solana NFT marketplace
* **Magic Eden API**: Popular multi-chain NFT marketplace
* **Hyperspace**: Cross-chain NFT marketplace and aggregator
To add support for a new marketplace, please [contact sales](https://www.crossmint.com/contact/sales?utm_source=devrel\&utm_medium=docs\&utm_campaign=backlinks).
## Quick Navigation
All collection imports start with the same initial steps, then diverge based on your blockchain:
* [Common Steps (All Chains)](#common-steps-all-chains) - Steps 1-4 for all blockchains
* [EVM-Specific Steps](#evm-specific-steps) - Steps for Ethereum, Polygon, etc.
* [Solana-Specific Steps](#solana-specific-steps) - Additional steps for Solana candy machines
## Common Steps (All Chains)
These initial steps are the same whether you're importing an EVM contract or a Solana candy machine:
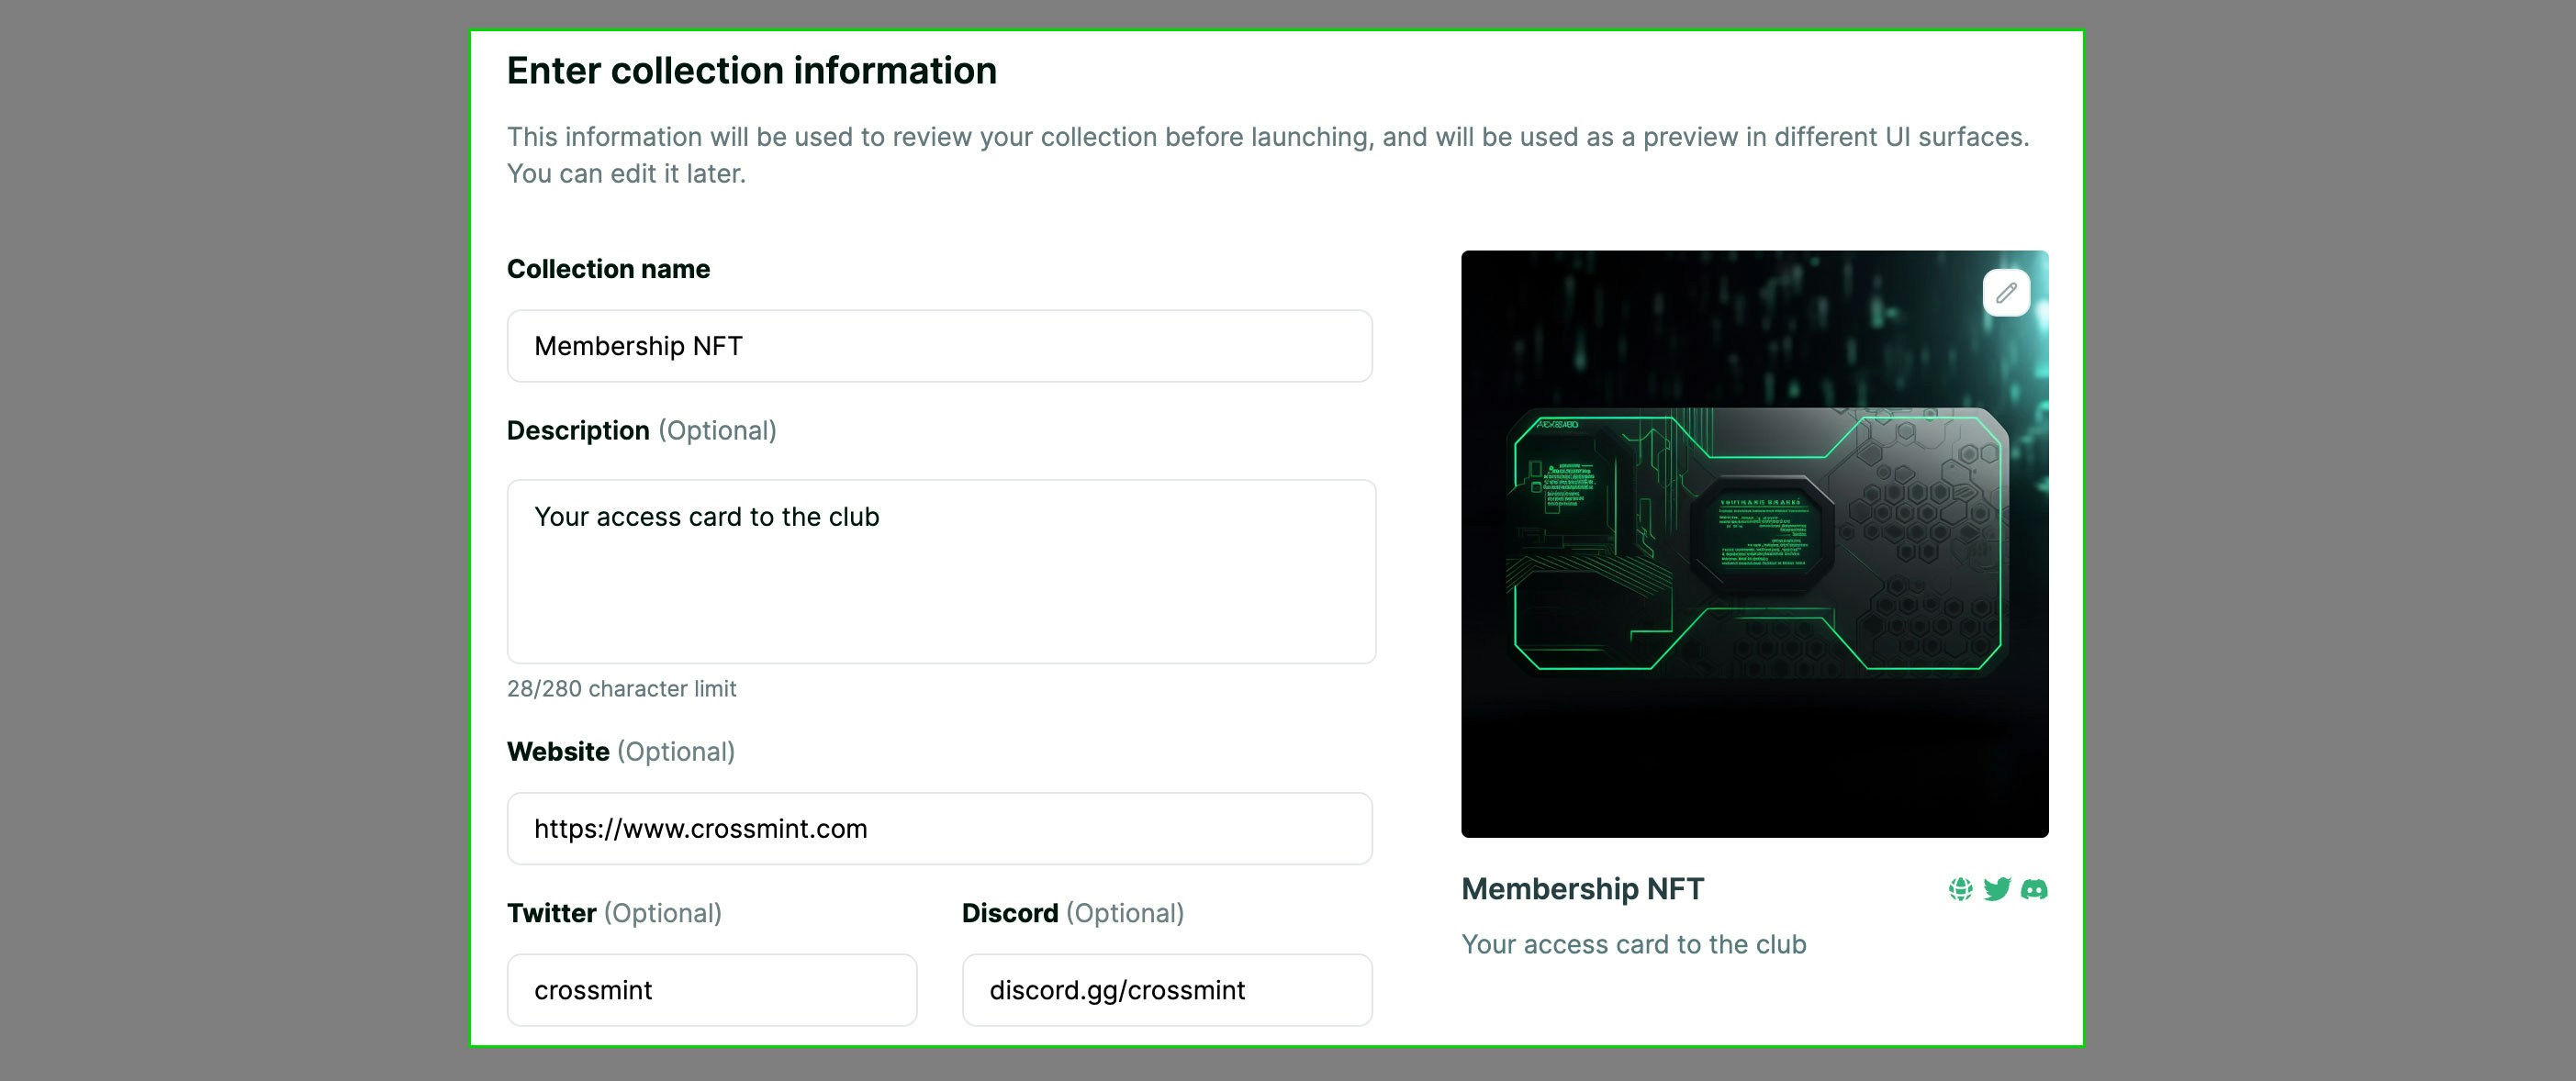
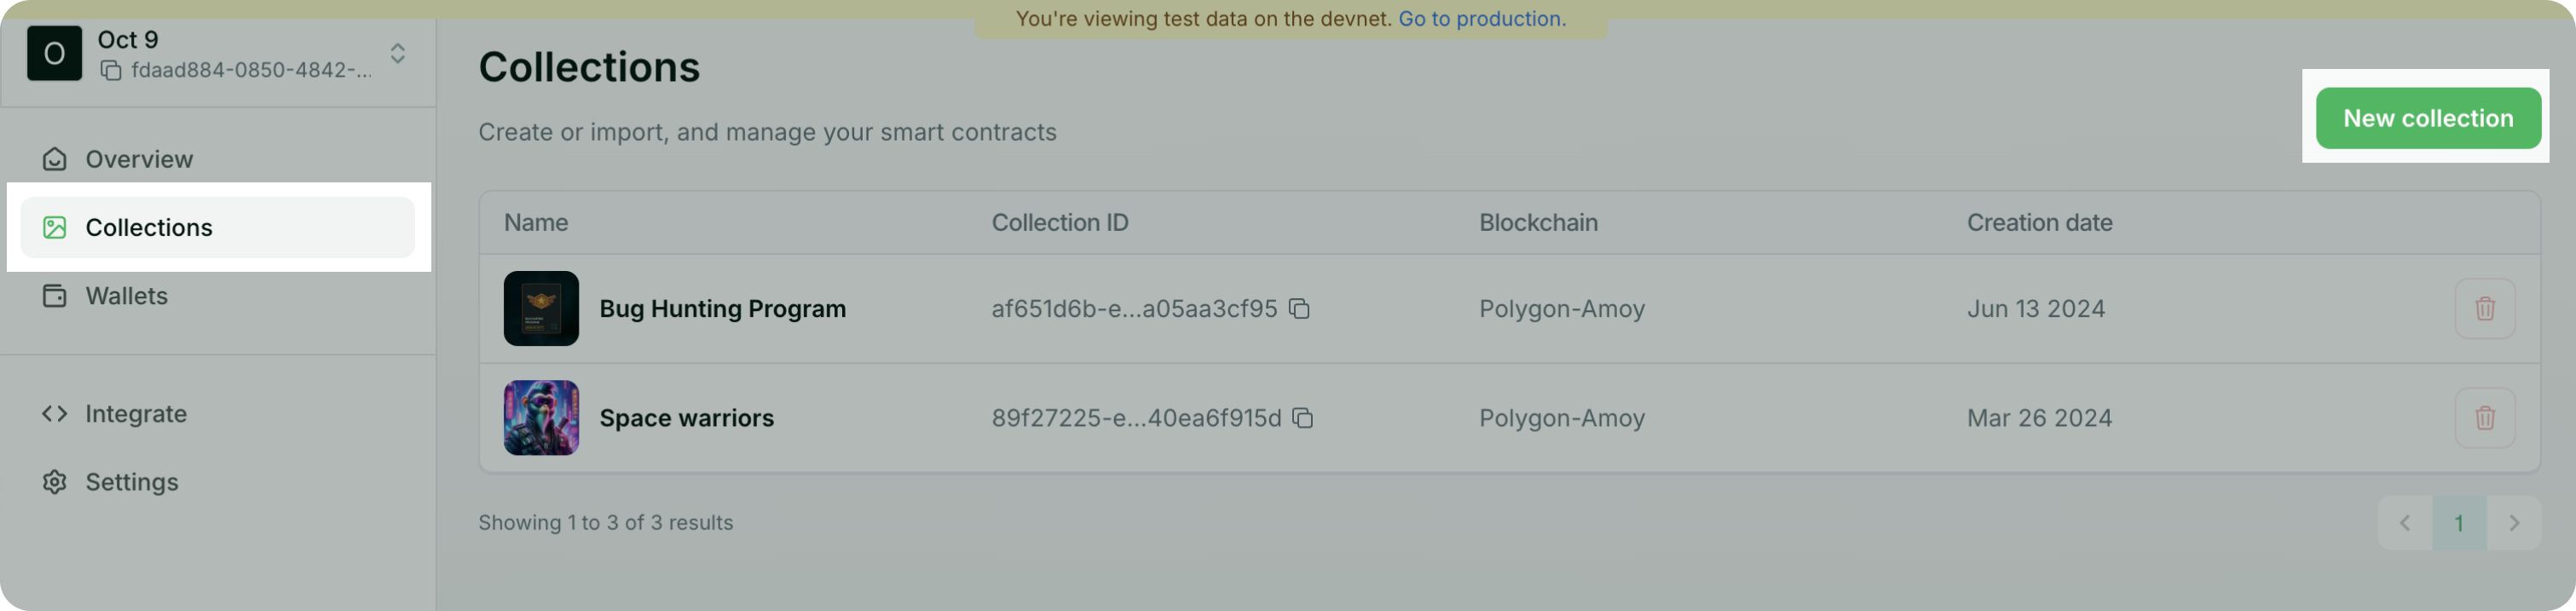 This information is displayed in the Hosted Checkout and Storefront. You can edit it later.
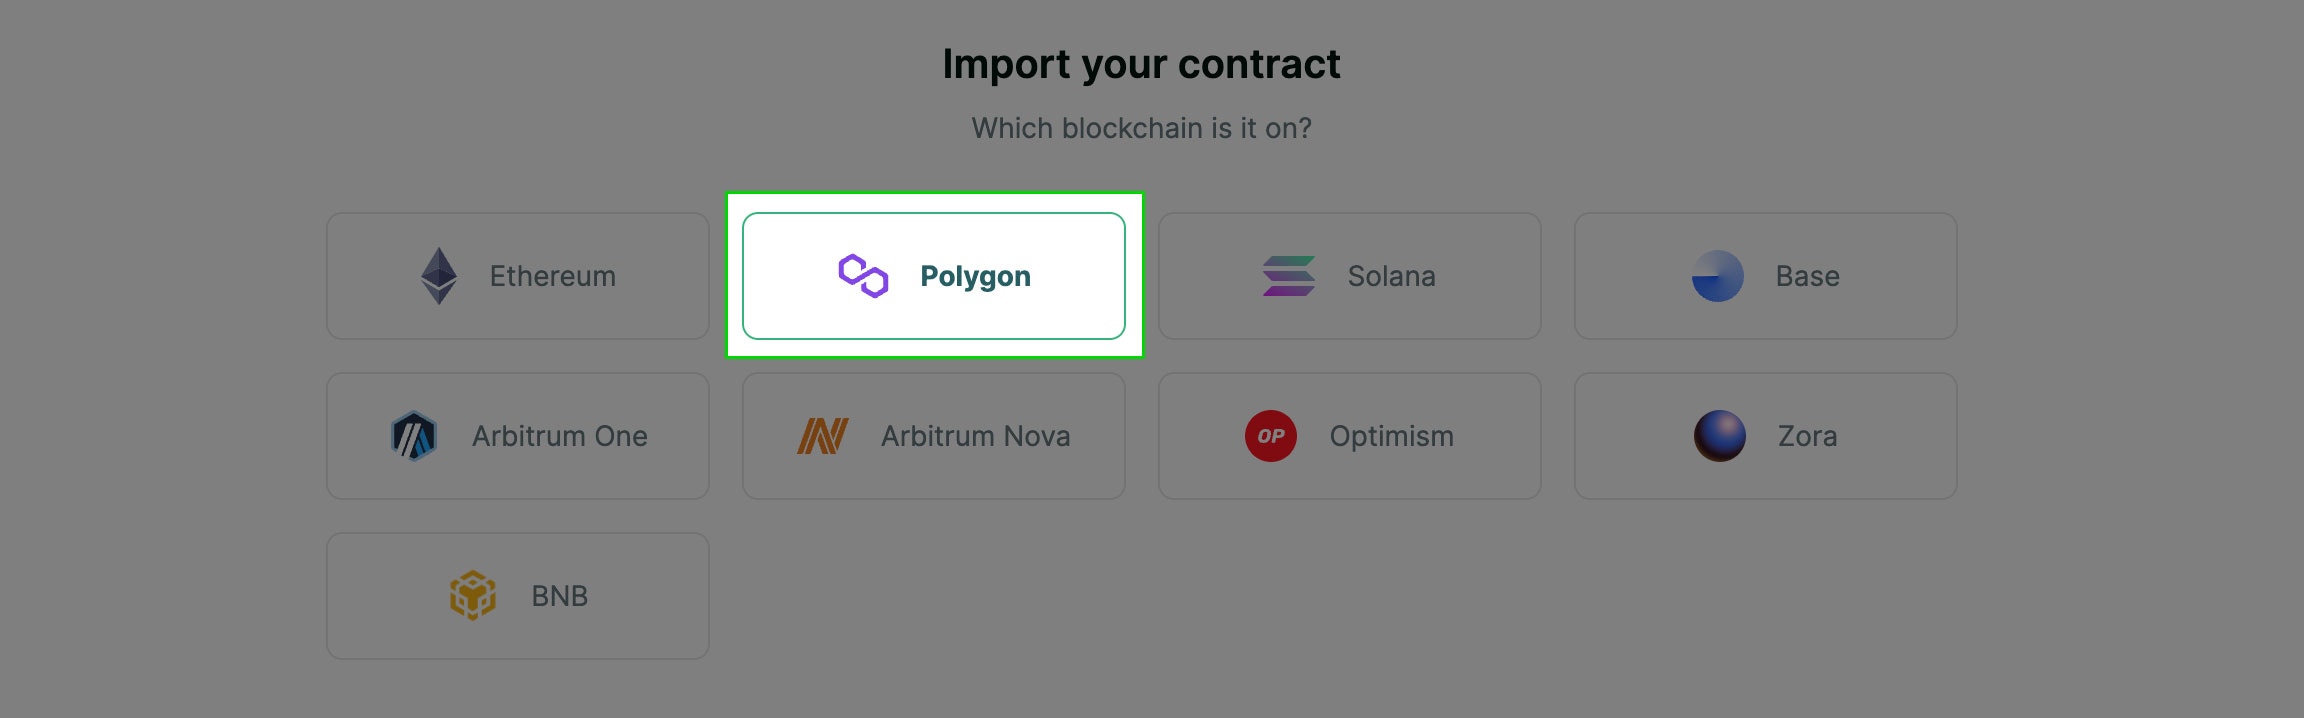
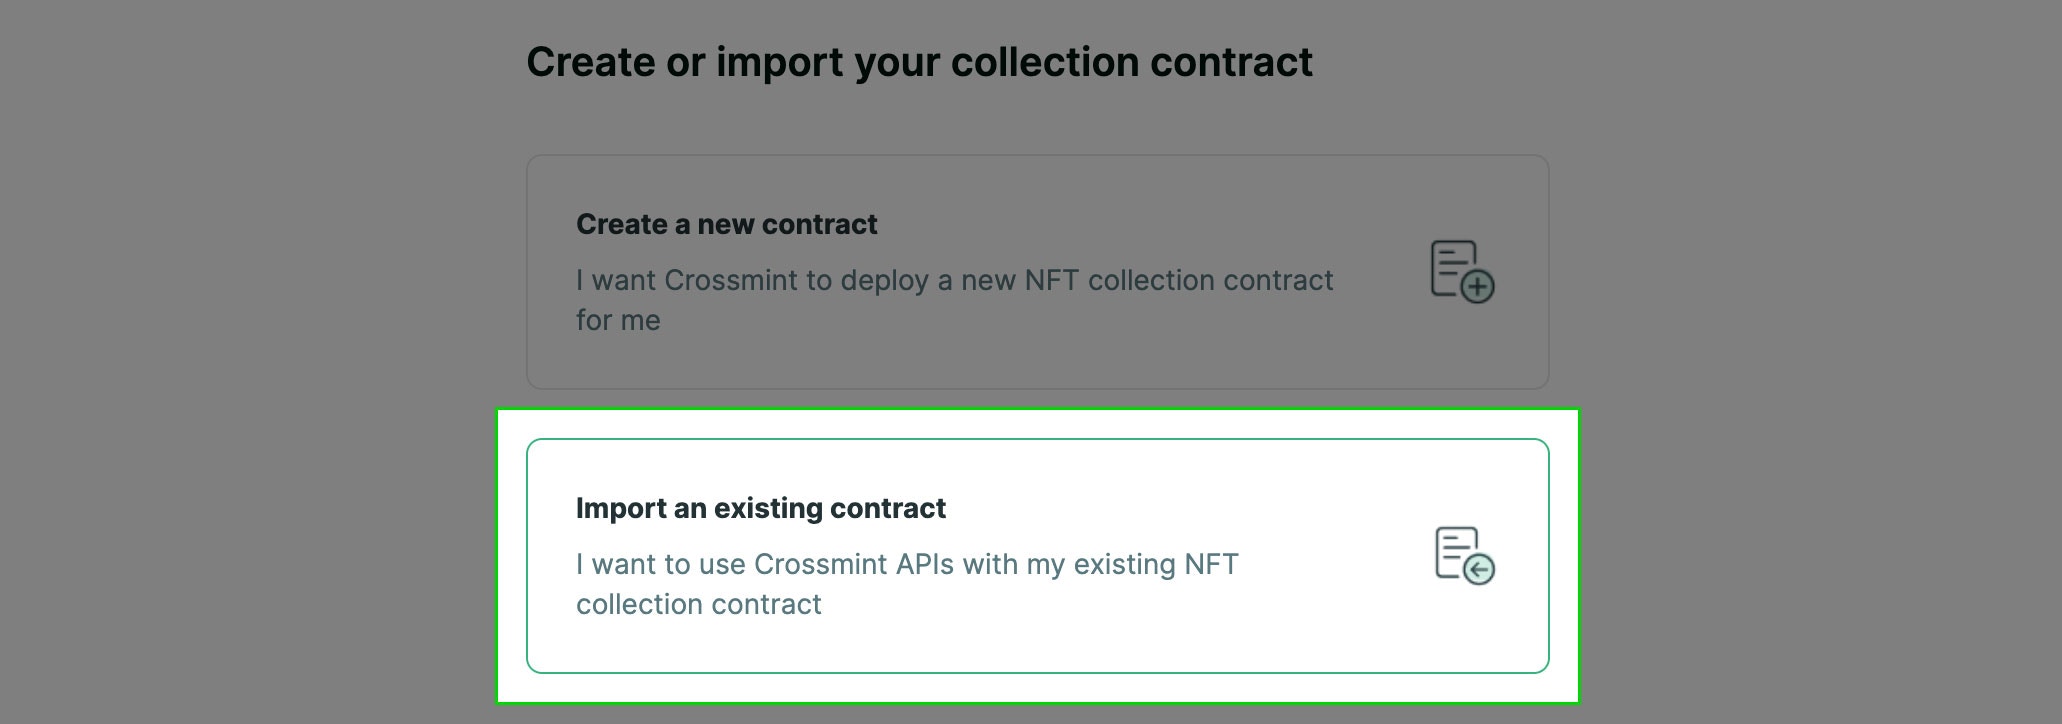 Remember, Crossmint has staging and production [environments](/introduction/platform/staging-vs-production).
When working in the staging environment, choose the mainnet name. For example, if your contract is on the
Polygon Amoy testnet, select Polygon.
Remember, Crossmint has staging and production [environments](/introduction/platform/staging-vs-production).
When working in the staging environment, choose the mainnet name. For example, if your contract is on the
Polygon Amoy testnet, select Polygon.
 After completing these common steps, continue with the blockchain-specific instructions below.
## EVM-Specific Steps
Complete the [Common Steps](#common-steps-all-chains) above first, then continue with these EVM-specific steps:
### Pre-requisites
* Your contract must be ERC-721, ERC-721A, or ERC-1155 compliant.
* The minting function must allow minting directly to an address that is different from the one that invoked the contract. And it must contain at least one parameter that specifies that recipient address.
* A single address must be able to call the mint function unlimited times but does not need to be able to hold unlimited NFTs.
### Contract Registration
You may register contracts manually from the console or via API.
When you compile your smart contract there will be a corresponding abi file with an `.abi` or `.json` extension.
Inside this file, you'll see JSON property named abi, which describes the functions in your smart contract. Here's an example of a very simple abi file. Yours will likely have more function descriptions.
```json theme={null}
// Example generated abi file for smart contract
{
"abi": [
{
"inputs": [],
"stateMutability": "nonpayable",
"type": "constructor"
},
{
"inputs": [
{
"internalType": "address",
"name": "_to",
"type": "address"
}
],
"name": "mintTo",
"outputs": [],
"stateMutability": "payable",
"type": "function"
}
]
}
```
Copy the JSON array object that comes after the string `abi` and paste it into the `Contract ABI` text box in the developer console. The content you paste in should begin with `[` and end with `]`.
Whether your ABI was retrieved automatically or you pasted it in manually, you need to specify the:
* Mint function
* Recipient address parameter name
* \[Optional] Quantity of NFTs to mint parameter name
Crossmint will attempt to automatically select these values for you, but it's important to ensure they are set correctly. Especially if you're setting up a USDC mint function as the list of options will be longer.
Proxy contracts are an advanced feature. You should use this only if you are certain that your contracts adhere to this pattern. This is crucial because Crossmint requires the actual NFT contract address when you register a mint/buy/purchase/claim function in a sales contract or revenue splitter.
If you don't specify the NFT contract address, our system won't be able to extract token URI information or facilitate transfers. Set this up only if it isn't a transparent proxy, which is common for upgradeable contracts.
### EVM Contract Import Steps
After completing these common steps, continue with the blockchain-specific instructions below.
## EVM-Specific Steps
Complete the [Common Steps](#common-steps-all-chains) above first, then continue with these EVM-specific steps:
### Pre-requisites
* Your contract must be ERC-721, ERC-721A, or ERC-1155 compliant.
* The minting function must allow minting directly to an address that is different from the one that invoked the contract. And it must contain at least one parameter that specifies that recipient address.
* A single address must be able to call the mint function unlimited times but does not need to be able to hold unlimited NFTs.
### Contract Registration
You may register contracts manually from the console or via API.
When you compile your smart contract there will be a corresponding abi file with an `.abi` or `.json` extension.
Inside this file, you'll see JSON property named abi, which describes the functions in your smart contract. Here's an example of a very simple abi file. Yours will likely have more function descriptions.
```json theme={null}
// Example generated abi file for smart contract
{
"abi": [
{
"inputs": [],
"stateMutability": "nonpayable",
"type": "constructor"
},
{
"inputs": [
{
"internalType": "address",
"name": "_to",
"type": "address"
}
],
"name": "mintTo",
"outputs": [],
"stateMutability": "payable",
"type": "function"
}
]
}
```
Copy the JSON array object that comes after the string `abi` and paste it into the `Contract ABI` text box in the developer console. The content you paste in should begin with `[` and end with `]`.
Whether your ABI was retrieved automatically or you pasted it in manually, you need to specify the:
* Mint function
* Recipient address parameter name
* \[Optional] Quantity of NFTs to mint parameter name
Crossmint will attempt to automatically select these values for you, but it's important to ensure they are set correctly. Especially if you're setting up a USDC mint function as the list of options will be longer.
Proxy contracts are an advanced feature. You should use this only if you are certain that your contracts adhere to this pattern. This is crucial because Crossmint requires the actual NFT contract address when you register a mint/buy/purchase/claim function in a sales contract or revenue splitter.
If you don't specify the NFT contract address, our system won't be able to extract token URI information or facilitate transfers. Set this up only if it isn't a transparent proxy, which is common for upgradeable contracts.
### EVM Contract Import Steps
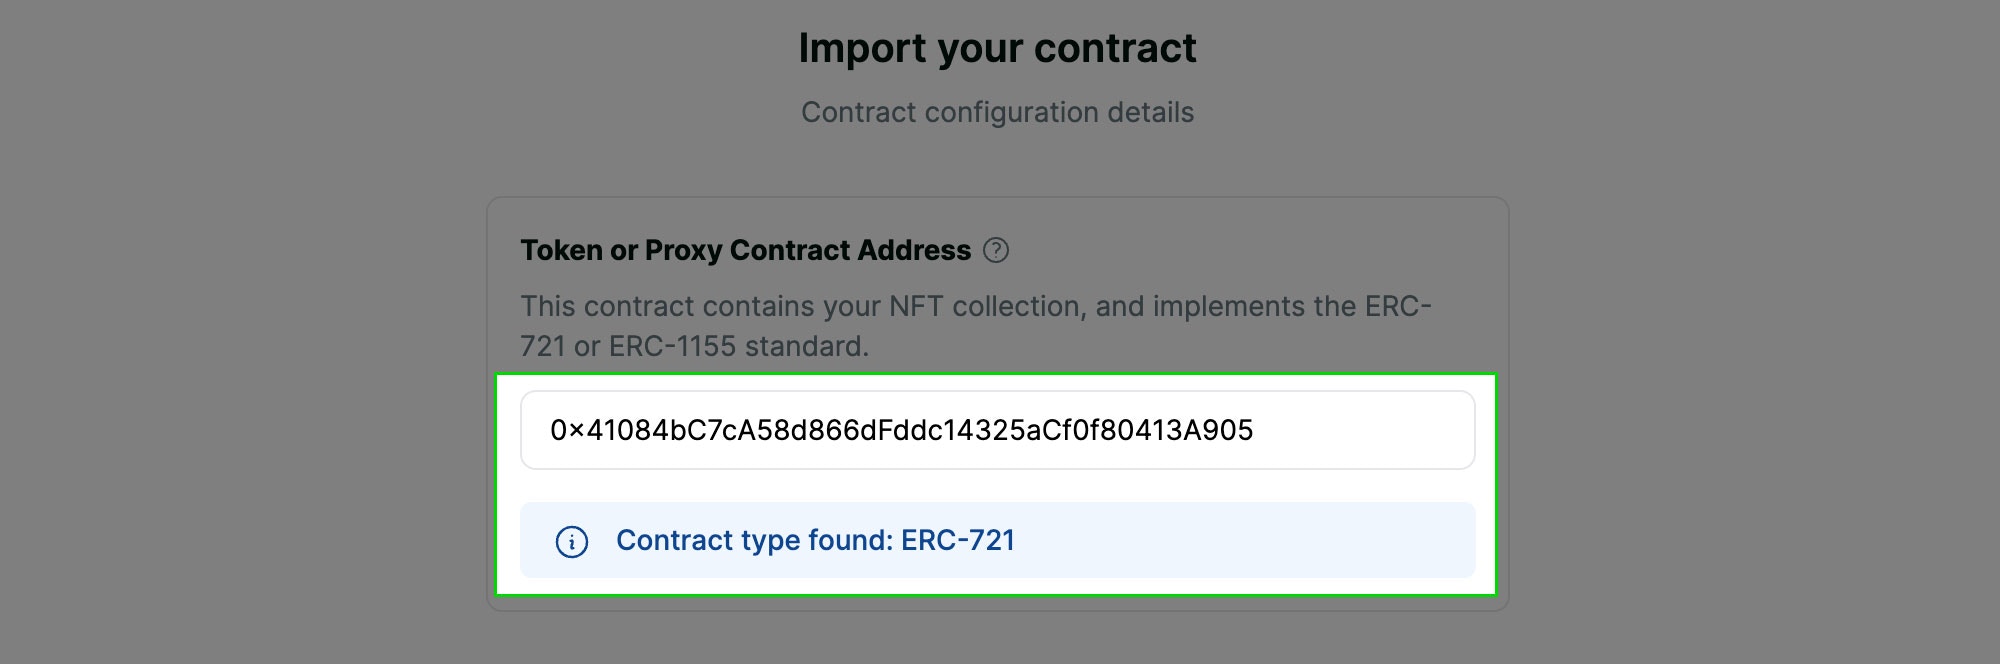
 Enter the address of your contract and the console will determine the contract type automatically.
 Notice in the screenshot that the example has the same contract address that was entered in previous step. This indicates a basic setup where the purchase function is within the registered NFT contract. The only reason to change this is if purchases should be sent to a different contract address that is not the same as the NFT contract.
Most developers do not need to change this. If you are unsure, leave it as is. Transparent upgradeable contracts also do not need to use this setting and should use the beacon address in the previous step.
Notice in the screenshot that the example has the same contract address that was entered in previous step. This indicates a basic setup where the purchase function is within the registered NFT contract. The only reason to change this is if purchases should be sent to a different contract address that is not the same as the NFT contract.
Most developers do not need to change this. If you are unsure, leave it as is. Transparent upgradeable contracts also do not need to use this setting and should use the beacon address in the previous step.
 As long as your contract is verified on the block explorer we can query the ABI automatically. If you have not verified your contract, you must enter the ABI manually.
 Unless you specifically deployed a contract that supports USDC you must leave the native currency selected. If you are unsure, leave it as is.
 If you selected the native currency in the previous step, this will be a very short list. If you have multiple mint functions in your contract that you want to accept payments for, you must register each one separately.
USDC mint functions typically are NOT `payable`. Change the currency selector to USDC to populate the mint function list with valid options.
The mint function must accept an address parameter and mint to that address. If your mint function lacks this you'll need to deploy a new contract or modify your existing contract.
If you selected the native currency in the previous step, this will be a very short list. If you have multiple mint functions in your contract that you want to accept payments for, you must register each one separately.
USDC mint functions typically are NOT `payable`. Change the currency selector to USDC to populate the mint function list with valid options.
The mint function must accept an address parameter and mint to that address. If your mint function lacks this you'll need to deploy a new contract or modify your existing contract.
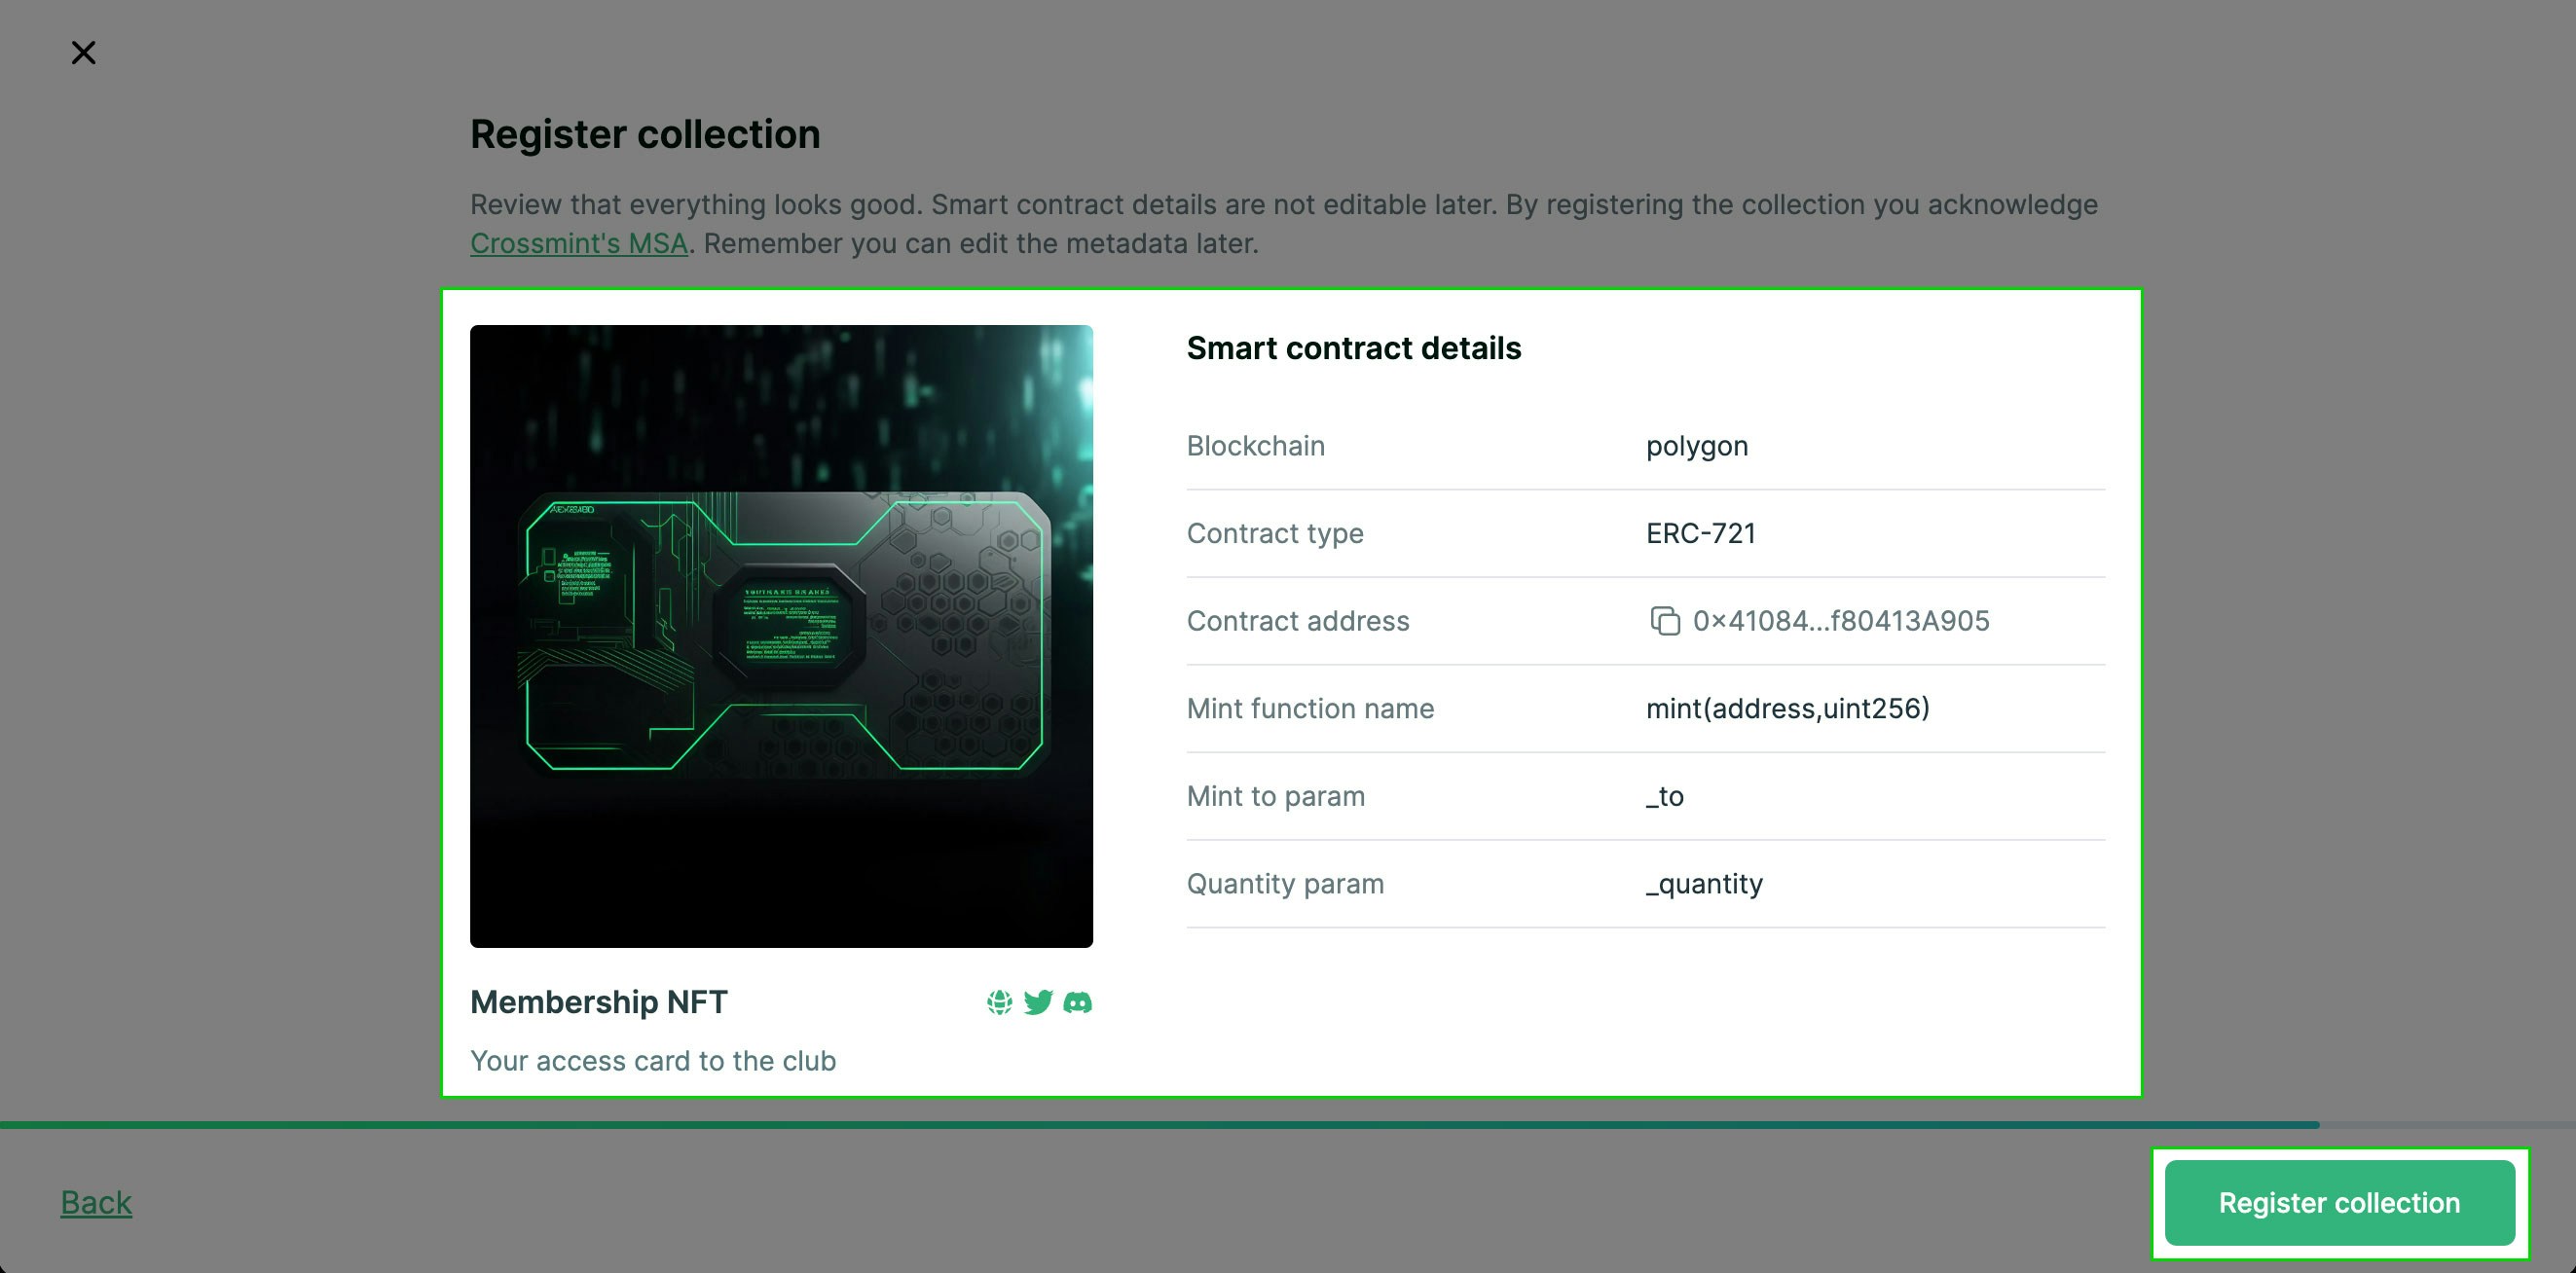
 After the mint function has been selected, this will be a short list built from the function parameters of type `address`. If you have multiple options here, ensure that you select the correct one. Doing this incorrectly will result in the purchased NFTs being sent to the wrong address and they likely will not be recoverable.
 This will be a short list built from the function parameters of type `uint256`. If you have multiple options here, ensure that you select the correct one. Doing this incorrectly will result in the NFT checkout tools not being able to properly mint the correct quantity of NFTs.

 ## Solana-Specific Steps
Complete the [Common Steps](#common-steps-all-chains) above first, then continue with these Solana-specific steps:
Instant support for:
* **Primaries**: Candy Machine v3, Metaplex Instant Sales, Magic Eden's Launchpad
* **Secondaries**: Auction House, Tensor, Magic Eden API, Hyperspace
Only the integrations listed above are available at the moment. For custom integrations, please [contact
sales](https://www.crossmint.com/contact/sales?utm_source=devrel\&utm_medium=docs\&utm_campaign=backlinks).
### Solana Candy Machine Import
Crossmint supports Candy Machine v3. After completing the common steps above, continue with these Solana-specific steps:
This step replaces step 4 from the common steps above - select Solana from the blockchain dropdown.
## Solana-Specific Steps
Complete the [Common Steps](#common-steps-all-chains) above first, then continue with these Solana-specific steps:
Instant support for:
* **Primaries**: Candy Machine v3, Metaplex Instant Sales, Magic Eden's Launchpad
* **Secondaries**: Auction House, Tensor, Magic Eden API, Hyperspace
Only the integrations listed above are available at the moment. For custom integrations, please [contact
sales](https://www.crossmint.com/contact/sales?utm_source=devrel\&utm_medium=docs\&utm_campaign=backlinks).
### Solana Candy Machine Import
Crossmint supports Candy Machine v3. After completing the common steps above, continue with these Solana-specific steps:
This step replaces step 4 from the common steps above - select Solana from the blockchain dropdown.
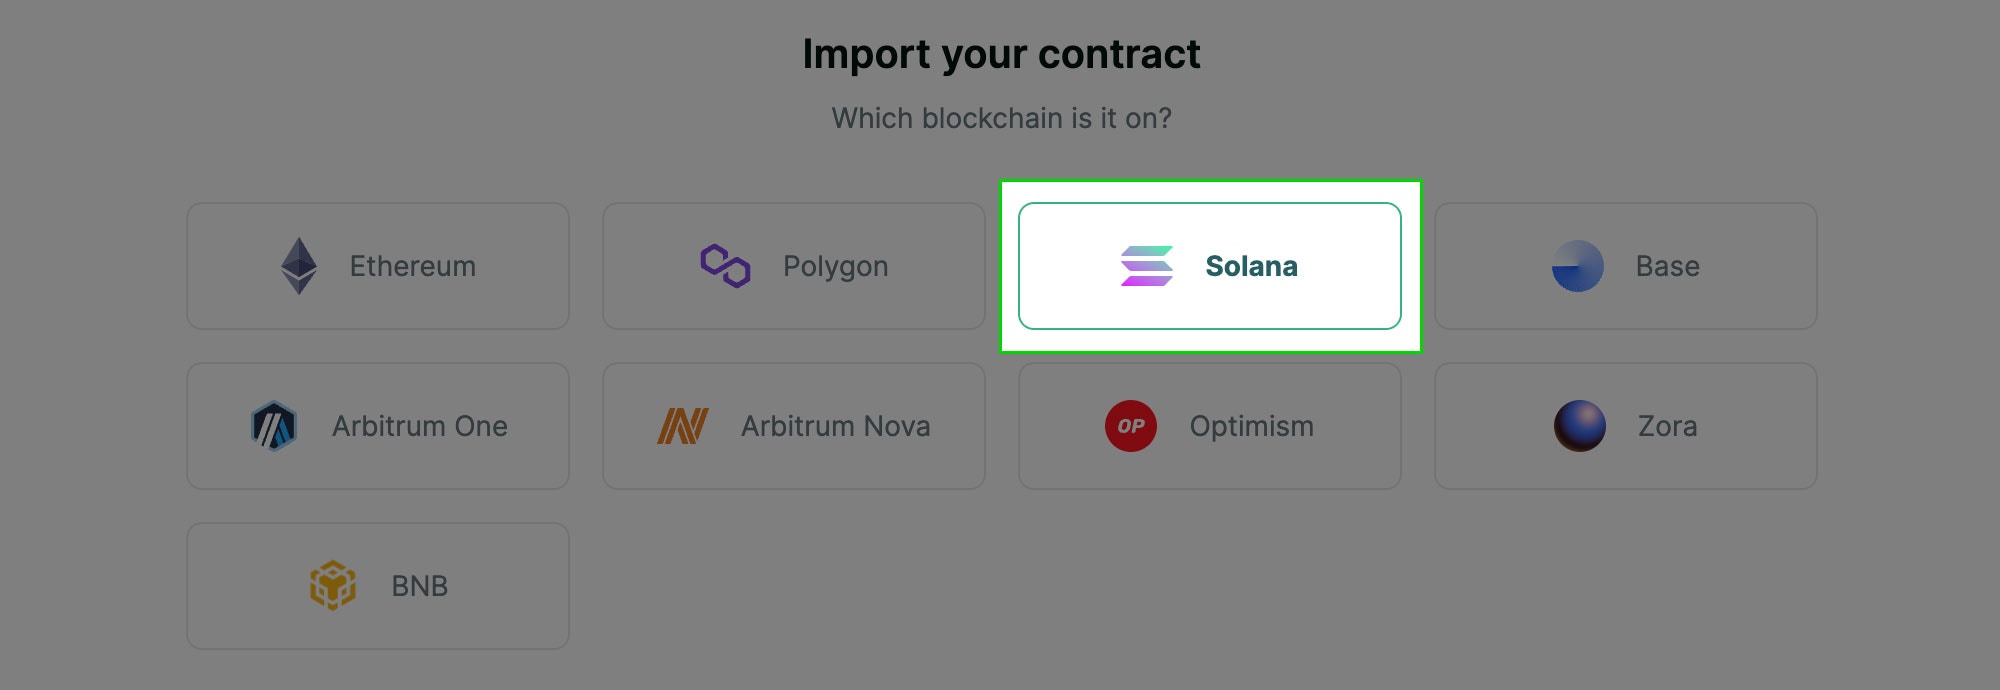 Find the ID in the `cache.json` file in the folder where you deployed your Candy Machine.
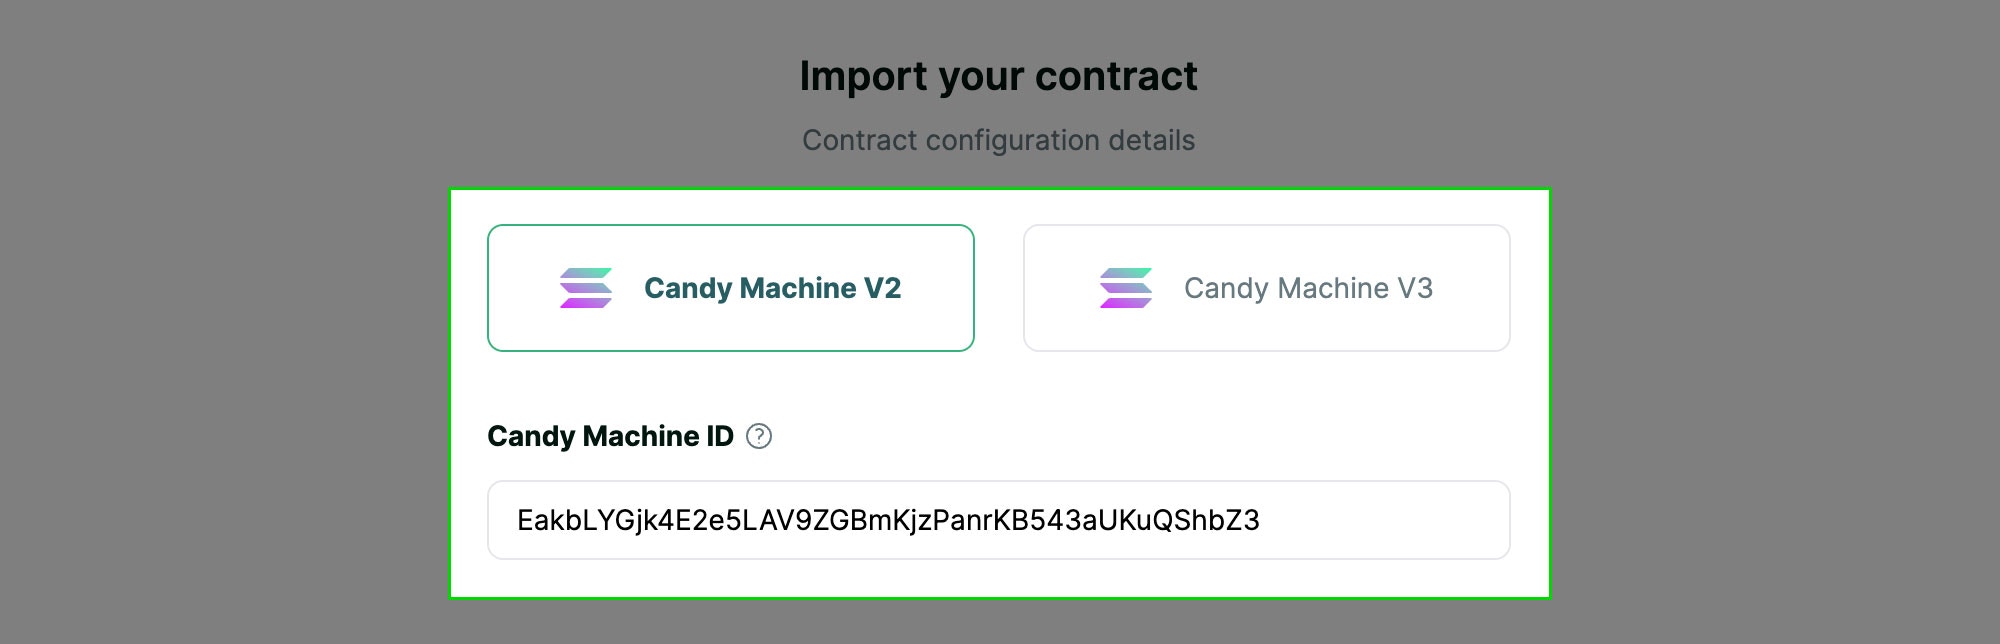
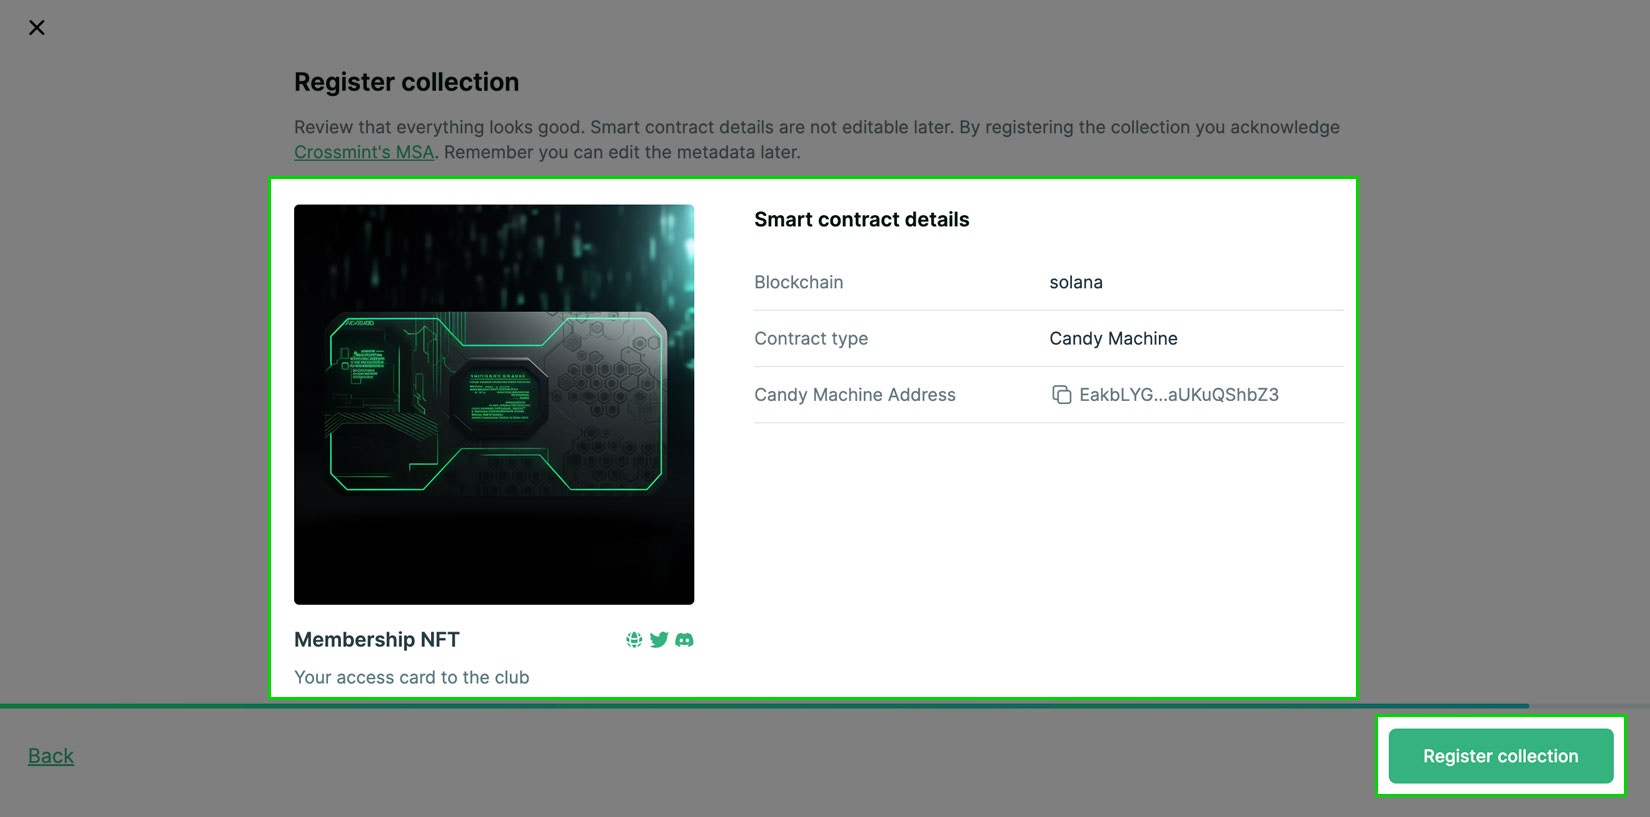 Congratulations! 🎉 You've successfully registered your external collection in Crossmint.
## FAQs
For Xion blockchain contracts, please refer to our [Xion Contract Requirements](/minting/advanced/xion-contracts) documentation.
Currently only importing EVM and Solana primary contracts is self-serve. If you wish to import Aptos and Sui contracts, please [contact
sales](https://www.crossmint.com/contact/sales?utm_source=devrel\&utm_medium=docs\&utm_campaign=backlinks).
Yes! You can programmatically register collections using the Collections Registration API.
**API Endpoint:** `POST https://staging.crossmint.com/api/v1-alpha1/collections`
**Required Headers:**
* `Content-Type: application/json`
* `x-api-key: ` (requires `collections.create` scope)
```bash EVM Contract Example theme={null}
curl --request POST \
--url https://staging.crossmint.com/api/v1-alpha1/collections \
--header 'content-type: application/json' \
--header 'x-api-key: ' \
--data '{
"chain": "ethereum",
"contractType": "erc-721",
"args": {
"contractAddress": "0x1234567890123456789012345678901234567890",
"abi": "[{\"inputs\":[{\"internalType\":\"address\",\"name\":\"_to\",\"type\":\"address\"}],\"name\":\"mintTo\",\"outputs\":[],\"stateMutability\":\"payable\",\"type\":\"function\"}]",
"mintFunctionName": "mintTo(address)",
"toParamName": "_to",
"quantityParamName": "_quantity",
"contractType": "erc-721"
},
"metadata": {
"title": "My NFT Collection",
"description": "A custom NFT collection",
"imageUrl": "https://example.com/collection-image.png",
"social": {
"twitter": "https://twitter.com/mycollection",
"discord": "https://discord.gg/mycollection"
}
},
"ownership": "external",
"category": "art",
"scopes": ["payments:credit-card", "payments:cross-chain"]
}'
```
```bash Solana Candy Machine Example theme={null}
curl --request POST \
--url https://staging.crossmint.com/api/v1-alpha1/collections \
--header 'content-type: application/json' \
--header 'x-api-key: ' \
--data '{
"chain": "solana",
"contractType": "candy-machine",
"args": {
"candyMachineId": "your-candy-machine-id-here"
},
"metadata": {
"title": "My Solana Collection",
"description": "A Solana NFT collection",
"imageUrl": "https://example.com/collection-image.png"
},
"ownership": "external",
"category": "art",
"scopes": ["payments:credit-card", "payments:cross-chain"]
}'
```
**Key Parameters:**
* **chain**: `"solana"`, `"ethereum"`, `"polygon"`, `"bsc"`
* **contractType**: `"candy-machine"`, `"erc-721"`, `"erc-1155"`, `"thirdweb-drop"`
* **args**: Contract-specific arguments (see examples above)
* For EVM: `contractAddress`, `abi`, `mintFunctionName`, `toParamName`, `contractType` (required); `quantityParamName`, `tokenContractAddress` (optional)
In EVM, if you use a separate contract for minting than for token metadata, set the minting contract address as `contractAddress`, and the token contract address as `tokenContractAddress`.
* For Solana: `candyMachineId` (required)
* **metadata**: Object with `title`, `description`, `imageUrl` (all required), and optional `social` object with `twitter`/`discord` links
* **ownership**: `["self", "external"]`. Set to `"external"` for imported contracts
* **category**: `"art"`, `"gaming"`, `"music"`, `"loyalty"`, `"ticketing"`, `"charity"`, `"other"`
* **scopes**: `["payments:credit-card", "payments:cross-chain"]`. Scopes are required when `ownership` is `"external"`
**Response (201 Created):**
The API returns a collection object with identifiers you can use with Crossmint's checkout and payment systems.
```json theme={null}
{
"collectionId": "abc123-def456-ghi789...",
"clientId": "abc123-def456-ghi789..."
}
```
This API is currently in alpha (v1-alpha1) and subject to change. The returned `collectionId` and `clientId` are typically the same value and can be used interchangeably for checkout integration.
Congratulations! 🎉 You've successfully registered your external collection in Crossmint.
## FAQs
For Xion blockchain contracts, please refer to our [Xion Contract Requirements](/minting/advanced/xion-contracts) documentation.
Currently only importing EVM and Solana primary contracts is self-serve. If you wish to import Aptos and Sui contracts, please [contact
sales](https://www.crossmint.com/contact/sales?utm_source=devrel\&utm_medium=docs\&utm_campaign=backlinks).
Yes! You can programmatically register collections using the Collections Registration API.
**API Endpoint:** `POST https://staging.crossmint.com/api/v1-alpha1/collections`
**Required Headers:**
* `Content-Type: application/json`
* `x-api-key: ` (requires `collections.create` scope)
```bash EVM Contract Example theme={null}
curl --request POST \
--url https://staging.crossmint.com/api/v1-alpha1/collections \
--header 'content-type: application/json' \
--header 'x-api-key: ' \
--data '{
"chain": "ethereum",
"contractType": "erc-721",
"args": {
"contractAddress": "0x1234567890123456789012345678901234567890",
"abi": "[{\"inputs\":[{\"internalType\":\"address\",\"name\":\"_to\",\"type\":\"address\"}],\"name\":\"mintTo\",\"outputs\":[],\"stateMutability\":\"payable\",\"type\":\"function\"}]",
"mintFunctionName": "mintTo(address)",
"toParamName": "_to",
"quantityParamName": "_quantity",
"contractType": "erc-721"
},
"metadata": {
"title": "My NFT Collection",
"description": "A custom NFT collection",
"imageUrl": "https://example.com/collection-image.png",
"social": {
"twitter": "https://twitter.com/mycollection",
"discord": "https://discord.gg/mycollection"
}
},
"ownership": "external",
"category": "art",
"scopes": ["payments:credit-card", "payments:cross-chain"]
}'
```
```bash Solana Candy Machine Example theme={null}
curl --request POST \
--url https://staging.crossmint.com/api/v1-alpha1/collections \
--header 'content-type: application/json' \
--header 'x-api-key: ' \
--data '{
"chain": "solana",
"contractType": "candy-machine",
"args": {
"candyMachineId": "your-candy-machine-id-here"
},
"metadata": {
"title": "My Solana Collection",
"description": "A Solana NFT collection",
"imageUrl": "https://example.com/collection-image.png"
},
"ownership": "external",
"category": "art",
"scopes": ["payments:credit-card", "payments:cross-chain"]
}'
```
**Key Parameters:**
* **chain**: `"solana"`, `"ethereum"`, `"polygon"`, `"bsc"`
* **contractType**: `"candy-machine"`, `"erc-721"`, `"erc-1155"`, `"thirdweb-drop"`
* **args**: Contract-specific arguments (see examples above)
* For EVM: `contractAddress`, `abi`, `mintFunctionName`, `toParamName`, `contractType` (required); `quantityParamName`, `tokenContractAddress` (optional)
In EVM, if you use a separate contract for minting than for token metadata, set the minting contract address as `contractAddress`, and the token contract address as `tokenContractAddress`.
* For Solana: `candyMachineId` (required)
* **metadata**: Object with `title`, `description`, `imageUrl` (all required), and optional `social` object with `twitter`/`discord` links
* **ownership**: `["self", "external"]`. Set to `"external"` for imported contracts
* **category**: `"art"`, `"gaming"`, `"music"`, `"loyalty"`, `"ticketing"`, `"charity"`, `"other"`
* **scopes**: `["payments:credit-card", "payments:cross-chain"]`. Scopes are required when `ownership` is `"external"`
**Response (201 Created):**
The API returns a collection object with identifiers you can use with Crossmint's checkout and payment systems.
```json theme={null}
{
"collectionId": "abc123-def456-ghi789...",
"clientId": "abc123-def456-ghi789..."
}
```
This API is currently in alpha (v1-alpha1) and subject to change. The returned `collectionId` and `clientId` are typically the same value and can be used interchangeably for checkout integration.