> ## Documentation Index
> Fetch the complete documentation index at: https://docs.crossmint.com/llms.txt
> Use this file to discover all available pages before exploring further.
# Bring Your Own Auth
> Bring your own auth provider
**You are viewing docs for the previous version of the Wallets SDK.** We recommend upgrading to V1.
See the [updated version of this page](/wallets/guides/bring-your-own-auth) or the [V1 migration guide](/wallets/guides/migrate-to-v1).
Crossmint provides turn-key connectors for the most popular auth providers, including Auth0, Firebase, Supabase, Stytch, Cognito, and Kinde.
When you bring your own auth, Crossmint automatically extracts the user ID from your provider's JWT and assigns it to the wallet's `owner` property. Wallet creation, transaction signing, and balance reads all work the same way regardless of which auth provider you use.
If you're just getting started or prototyping, [Crossmint Auth](/authentication/introduction) is a great way to move fast in staging before connecting your own provider.
## Prerequisites
* **API Key**: Ensure you have an API key with the scopes: `wallets.create`.
## Using your own auth provider
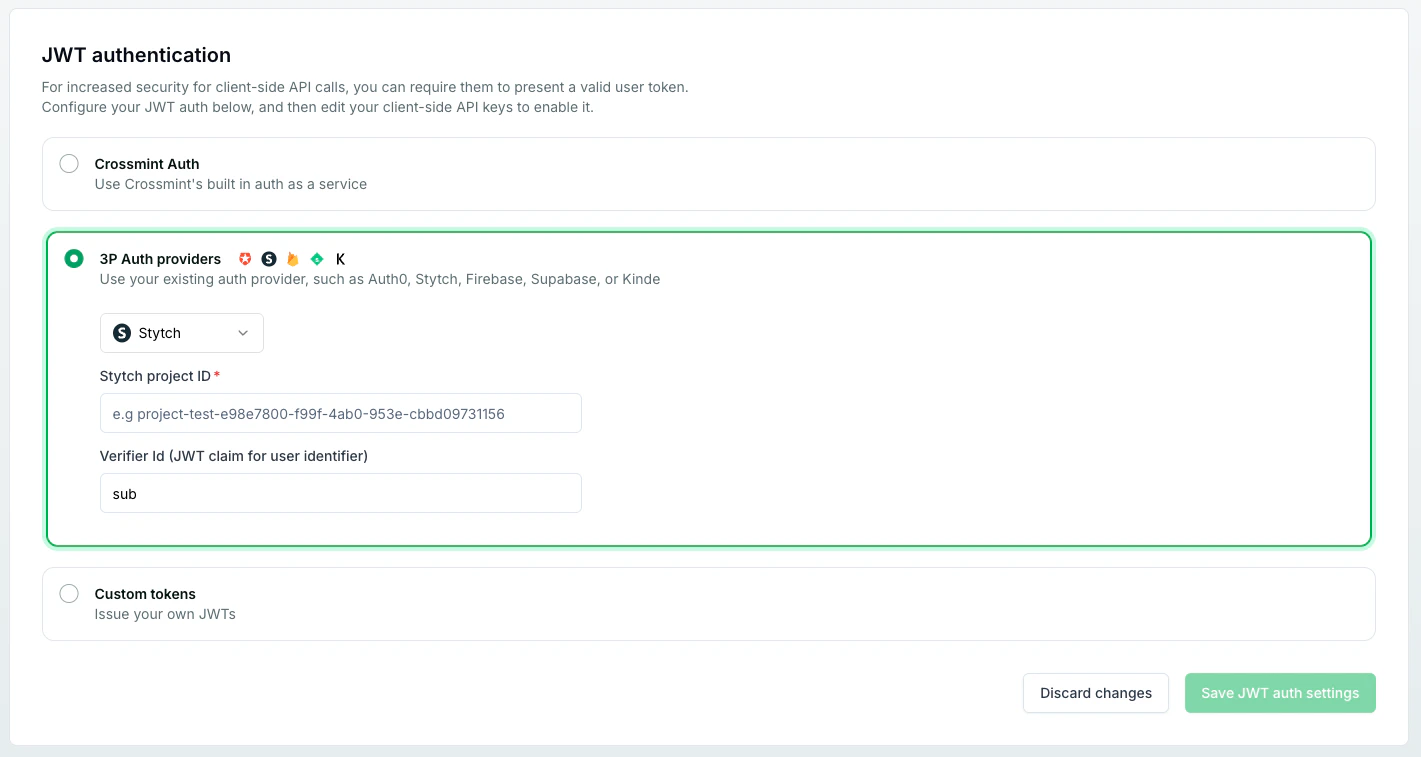
1. Navigate to your project in the Crossmint Console.
2. Go to the API Keys section from the sidebar.
3. Scroll down to the JWT authentication section.
4. Choose your preferred authentication method:
* **3P Auth providers**: Select from supported providers such as Auth0, Stytch, Cognito, Firebase, Kinde, or Supabase. Enter any required environment IDs or configuration details.
* **Custom tokens**: Opt to issue and manage your own JWTs.
5. After making your selection and providing any necessary details, click **Save JWT auth settings** to apply your configuration.
 Add the necessary Crossmint providers to your app together with your own auth provider.
With the current setup, a wallet will be created automatically on login.
```tsx next.js theme={null}
"use client";
import {
CrossmintProvider,
CrossmintWalletProvider,
useCrossmint,
} from "@crossmint/client-sdk-react-ui";
import { YourAuthProvider } from "@your-auth-provider";
// Get the JWT from your auth provider and pass it to the Crossmint provider
const { jwt } = useYourAuthProviderHook();
const { setJwt } = useCrossmint();
useEffect(() => {
setJwt(jwt);
}, [jwt]);
export function Providers({ children }: { children: React.ReactNode }) {
return (
{children}
);
}
```
Create the wallet on login once the jwt and the email are available.
```tsx next.js theme={null}
"use client";
import { useYourAuthProviderHook } from "@your-auth-provider";
import { useEffect } from "react";
import { useCrossmint, useWallet } from "@crossmint/client-sdk-react-ui";
export function YourComponent() {
const { email } = useYourAuthProviderHook();
const { jwt } = useCrossmint();
const { getOrCreateWallet } = useWallet();
useEffect(() => {
if (email != null && jwt != null) {
getOrCreateWallet({ signer: { type: "email", email: email } });
}
}, [email, jwt]);
// your component logic here
return (
Add the necessary Crossmint providers to your app together with your own auth provider.
With the current setup, a wallet will be created automatically on login.
```tsx next.js theme={null}
"use client";
import {
CrossmintProvider,
CrossmintWalletProvider,
useCrossmint,
} from "@crossmint/client-sdk-react-ui";
import { YourAuthProvider } from "@your-auth-provider";
// Get the JWT from your auth provider and pass it to the Crossmint provider
const { jwt } = useYourAuthProviderHook();
const { setJwt } = useCrossmint();
useEffect(() => {
setJwt(jwt);
}, [jwt]);
export function Providers({ children }: { children: React.ReactNode }) {
return (
{children}
);
}
```
Create the wallet on login once the jwt and the email are available.
```tsx next.js theme={null}
"use client";
import { useYourAuthProviderHook } from "@your-auth-provider";
import { useEffect } from "react";
import { useCrossmint, useWallet } from "@crossmint/client-sdk-react-ui";
export function YourComponent() {
const { email } = useYourAuthProviderHook();
const { jwt } = useCrossmint();
const { getOrCreateWallet } = useWallet();
useEffect(() => {
if (email != null && jwt != null) {
getOrCreateWallet({ signer: { type: "email", email: email } });
}
}, [email, jwt]);
// your component logic here
return (
Your Component
);
}
```
See the [React SDK reference](/sdk-reference/wallets/v0/react/get-started) for more details on providers and hooks.
1. Navigate to your project in the Crossmint Console.
2. Go to the API Keys section from the sidebar.
3. Scroll down to the JWT authentication section.
4. Choose your preferred authentication method:
* **3P Auth providers**: Select from supported providers such as Auth0, Stytch, Cognito, Firebase, Kinde, or Supabase. Enter any required environment IDs or configuration details.
* **Custom tokens**: Opt to issue and manage your own JWTs.
5. After making your selection and providing any necessary details, click **Save JWT auth settings** to apply your configuration.
Add the necessary Crossmint providers to your app together with your own auth provider.
With the current setup, a wallet will be created automatically on login.
```tsx theme={null}
import {
CrossmintProvider,
CrossmintWalletProvider,
useCrossmint,
} from "@crossmint/client-sdk-react-native-ui";
import { YourAuthProvider, useYourAuthProviderHook } from "@your-auth-provider";
// Get the JWT from your auth provider and pass it to the Crossmint provider
const { jwt } = useYourAuthProviderHook();
const { setJwt } = useCrossmint();
useEffect(() => {
setJwt(jwt);
}, [jwt]);
type ProvidersProps = {
children: React.ReactNode;
};
export default function Providers({ children }: ProvidersProps) {
return (
{children}
);
}
```
Create the wallet on login once the jwt and the email are available.
```tsx theme={null}
import { useYourAuthProviderHook } from "@your-auth-provider";
import { useEffect } from "react";
import { View, Text } from "react-native";
import { useCrossmint, useWallet } from "@crossmint/client-sdk-react-native-ui";
export function YourAuthComponent() {
const { email } = useYourAuthProviderHook();
const { jwt } = useCrossmint();
const { getOrCreateWallet } = useWallet();
useEffect(() => {
if (jwt != null && email != null) {
getOrCreateWallet({ signer: { type: "email", email: email } });
}
}, [jwt, email]);
// your component logic here
return (
Your Auth Component
);
}
```
See the [React Native SDK reference](/sdk-reference/wallets/v0/react-native/get-started) for more details on providers and hooks.