> ## Documentation Index
> Fetch the complete documentation index at: https://docs.crossmint.com/llms.txt
> Use this file to discover all available pages before exploring further.
# Kotlin
> Create user wallets from your mobile app in under 5 minutes
**You are viewing docs for the previous version of the Wallets SDK.** We recommend upgrading to V1.
See the [updated version of this page](/wallets/quickstarts/kotlin) or the [V1 migration guide](/wallets/guides/migrate-to-v1).
This quickstart integrates the Crossmint Kotlin SDK into an Android app to create a non-custodial wallet for a user, fund it with testnet USDC on Base Sepolia, and send USDC to another wallet.
See a full working example with a repository to clone.
Add the Crossmint dependencies to your app's `build.gradle.kts` file:
```kotlin build.gradle.kts theme={null}
dependencies {
implementation(libs.crossmint.sdk)
implementation(libs.crossmint.compose)
}
```
```toml libs.versions.toml theme={null}
[versions]
crossmint-compose = "0.0.2"
crossmint-sdk = "0.0.2"
[libraries]
crossmint-compose = { module = "com.crossmint:crossmint-compose", version.ref = "crossmint-compose" }
crossmint-sdk = { module = "com.crossmint:crossmint-sdk", version.ref = "crossmint-sdk" }
```
```kotlin build.gradle.kts theme={null}
dependencies {
implementation("com.crossmint:crossmint-sdk:0.0.2")
implementation("com.crossmint:crossmint-compose:0.0.2")
}
```
### Requirements
* Minimum Android SDK: API 24 (Android 7.0+)
* JDK 11 or newer
* Jetpack Compose
The Crossmint SDK requires a client API key for authentication.
[Get your client API key](/introduction/platform/api-keys/client-side) using the Crossmint Console.
Wrap your app content with `CrossmintSDKProvider` to initialize the SDK. This example uses [Crossmint Auth](/authentication/introduction)
but you can use [any authentication provider of your choice](/wallets/v0/guides/bring-your-own-auth).
```kotlin QuickstartApp.kt theme={null}
import androidx.compose.runtime.Composable
import com.crossmint.kotlin.compose.CrossmintSDKProvider
val CROSSMINT_API_KEY = "ck_staging_your_key_here"
@Composable
fun QuickstartApp() {
CrossmintSDKProvider
.Builder(CROSSMINT_API_KEY)
.build {
// Your app content goes here
AppContent()
}
}
```
The environment (staging vs production) is automatically determined by your API key. Staging keys start with `ck_staging_`, production keys with `ck_production_`.
### Access SDK instances
Inside the `CrossmintSDKProvider`, access SDK functionality using `LocalCrossmintSDK.current`:
```kotlin theme={null}
import com.crossmint.kotlin.compose.LocalCrossmintSDK
val sdk = LocalCrossmintSDK.current
val authManager = sdk.authManager
val wallets = sdk.crossmintWallets
```
Actions within the SDK are user-based, so first you need to authenticate a user.
Choose your authentication method:
Use Crossmint's built-in OTP authentication for easy, email-based login.
This is a simple OTP form example you can use for this quickstart.
```kotlin theme={null}
@Composable
actual fun OTPDialog(
onOTPSubmit: (String) -> Unit,
onDismiss: () -> Unit,
) {
var otpCode by remember { mutableStateOf("") }
AlertDialog(
onDismissRequest = onDismiss,
title = { Text("Enter OTP Code") },
text = {
TextField(
value = otpCode,
onValueChange = { otpCode = it },
label = { Text("Enter OTP") },
singleLine = true,
)
},
confirmButton = {
Button(onClick = { onOTPSubmit(otpCode) }) {
Text("Submit")
}
},
dismissButton = {
TextButton(onClick = onDismiss) {
Text("Cancel")
}
},
)
}
```
```kotlin theme={null}
import com.crossmint.kotlin.compose.LocalCrossmintSDK
val authManager = LocalCrossmintSDK.current.authManager
when (val result = authManager.sendOtp("user_email")) {
is Result.Success -> {
// OTP sent to email, now display an input for the OTP
}
is Result.Failure -> {
// Handle error: result.error.message
}
}
```
```kotlin theme={null}
import com.crossmint.kotlin.compose.LocalCrossmintSDK
val authManager = LocalCrossmintSDK.current.authManager
when (val result = authManager.verifyOtp("user_email", "otp_sent_via_email")) {
is Result.Success -> {
// User is authenticated, proceed
}
is Result.Failure -> {
// Handle errors
}
}
```
See the [Android Demo App](https://github.com/Crossmint/android-quickstart) repository for a complete UI implementation example with ViewModels and Compose screens.
If you have an existing auth provider (Auth0, Firebase, Supabase, etc.), authenticate users with your provider and pass the JWT to Crossmint.
```kotlin theme={null}
import com.crossmint.kotlin.compose.LocalCrossmintSDK
val authManager = LocalCrossmintSDK.current.authManager
// After user authenticates with your provider, get their JWT
val token = AuthToken(
jwt = yourProviderJWT,
refreshToken = yourProviderRefreshToken, // optional
userId = yourProviderUserId, // optional
userEmail = userEmail // optional
)
when (val result = authManager.authenticateWithToken(token)) {
is Result.Success -> {
// User authenticated with Crossmint
}
is Result.Failure -> {
// Handle error: result.error.message
}
}
```
Configure JWT authentication in the [Crossmint Console](https://console.crossmint.com) under API Keys → JWT Authentication before using third-party auth. See the [Crossmint Demo App](https://github.com/Crossmint/crossmint-kotlin-sdk/tree/main/crossmintDemoApp) for a complete Supabase integration example.
After authentication, create the user's wallet. This example uses Base Sepolia (Base testnet) but you can chose any [supported chain](/introduction/supported-chains).
```kotlin theme={null}
import com.crossmint.kotlin.compose.LocalCrossmintSDK
import com.crossmint.kotlin.types.EVMChain
import com.crossmint.kotlin.types.SignerData
val crossmintWallets = LocalCrossmintSDK.current.crossmintWallets
val chain = EVMChain.BaseSepolia
val signer = SignerData.Email("user_email")
when (val result = crossmintWallets.getOrCreateWallet(chain, signer)) {
is Result.Success -> {
val wallet = result.value // Wallet is ready to use!
}
is Result.Failure -> {
// Handle error: result.error.message
}
}
```
Before sending some USDC, we need to get some into the wallet.
Get the wallet address:
```kotlin theme={null}
val walletAddress = wallet.address
```
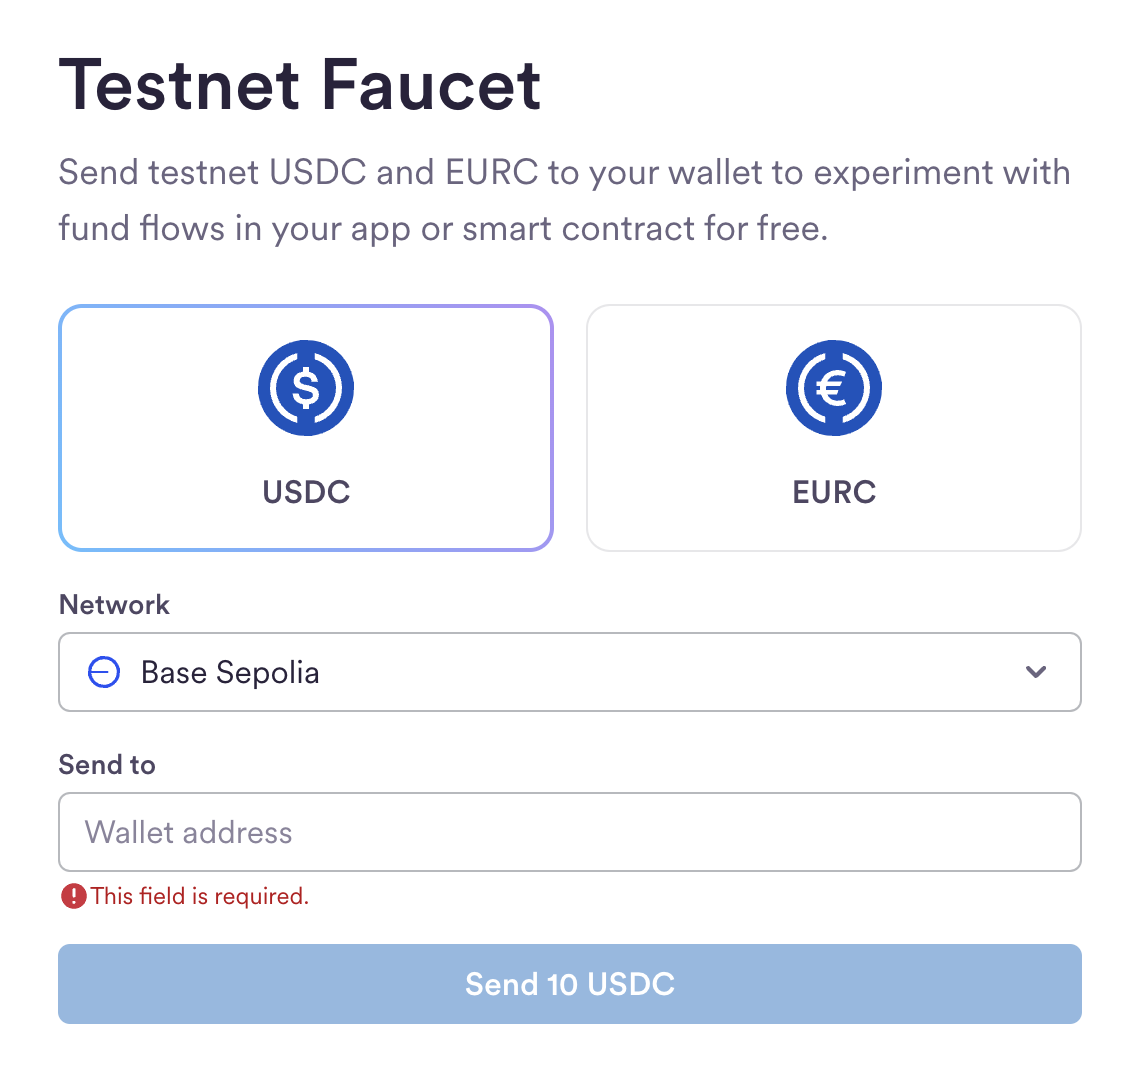
Then, navigate to the [USDC Faucet](https://faucet.circle.com/) to get some USDC into the wallet.
Make sure to select `Base Sepolia` and insert the wallet address.
 Now, to send some USDC to another wallet, use the `wallet.send` function.
```kotlin theme={null}
// Create the transaction
val recipient = "0x742d35Cc6634C0532925a3b844Bc9e7595f0bEb"
val tokenLocator = "base-sepolia:usdc"
val amount = 0.01
val sendResult = wallet.send(recipient, tokenLocator, amount)
if (sendResult is Result.Failure) {
// handle failure
}
// Approve the transaction
val transaction = sendResult as Result.Success
when (val approveResult = wallet.approve(transaction.value.id)) {
is Result.Success -> {
// Transaction successful, proceed
}
is Result.Failure -> {
// Handle failure
}
}
```
The very first time that a wallet sends a transaction on this device, an OTP will be required, sent to the user via email.
Following transactions sent from the same device won't need OTP verification.
To facilitate this, here's a simple component you can use for the OTP input:
This is a simple OTP form example you can use for this quickstart.
```kotlin theme={null}
@Composable
actual fun OTPDialog(
onOTPSubmit: (String) -> Unit,
onDismiss: () -> Unit,
) {
var otpCode by remember { mutableStateOf("") }
AlertDialog(
onDismissRequest = onDismiss,
title = { Text("Enter OTP Code") },
text = {
TextField(
value = otpCode,
onValueChange = { otpCode = it },
label = { Text("Enter OTP") },
singleLine = true,
)
},
confirmButton = {
Button(onClick = { onOTPSubmit(otpCode) }) {
Text("Submit")
}
},
dismissButton = {
TextButton(onClick = onDismiss) {
Text("Cancel")
}
},
)
}
```
and in `QuickstartApp.kt` where the `CrossmintSDKProvider` was initialized, use it like this:
```kotlin QuickstartApp.kt theme={null}
CrossmintSDKProvider
.Builder(CROSSMINT_API_KEY)
.onTEERequired { onOTPSubmit, onDismiss ->
OTPDialog(
onOTPSubmit = onOTPSubmit,
onDismiss = onDismiss,
)
}
.build {
// Your app content goes here
AppContent()
}
```
And that's it! You just created a non-custodial wallet for your user and made a USDC transaction on Base Sepolia.
## Launching in Production
For production, the steps are almost identical, but some changes are required:
1. Create a developer account on the [production console](https://www.crossmint.com/console)
2. Create a production client API key on the [API Keys](https://www.crossmint.com/console/projects/apiKeys) page with the API scopes `users.create`, `users.read`, `wallets.read`, `wallets.create`, `wallets:transactions.create`, `wallets:transactions.sign`, `wallets:balance.read`, `wallets.fund`
3. Update your `local.properties` with the production API key
4. **Use your own authentication provider**: For production applications, Crossmint recommends using [third-party authentication](/wallets/v0/guides/bring-your-own-auth) (Option 2 from Step 4) with providers like Auth0, Firebase, or Supabase, rather than Crossmint Auth (OTP). Configure JWT authentication in the [Crossmint Console](https://www.crossmint.com/console/projects/apiKeys) under API Keys → JWT Authentication.
Now, to send some USDC to another wallet, use the `wallet.send` function.
```kotlin theme={null}
// Create the transaction
val recipient = "0x742d35Cc6634C0532925a3b844Bc9e7595f0bEb"
val tokenLocator = "base-sepolia:usdc"
val amount = 0.01
val sendResult = wallet.send(recipient, tokenLocator, amount)
if (sendResult is Result.Failure) {
// handle failure
}
// Approve the transaction
val transaction = sendResult as Result.Success
when (val approveResult = wallet.approve(transaction.value.id)) {
is Result.Success -> {
// Transaction successful, proceed
}
is Result.Failure -> {
// Handle failure
}
}
```
The very first time that a wallet sends a transaction on this device, an OTP will be required, sent to the user via email.
Following transactions sent from the same device won't need OTP verification.
To facilitate this, here's a simple component you can use for the OTP input:
This is a simple OTP form example you can use for this quickstart.
```kotlin theme={null}
@Composable
actual fun OTPDialog(
onOTPSubmit: (String) -> Unit,
onDismiss: () -> Unit,
) {
var otpCode by remember { mutableStateOf("") }
AlertDialog(
onDismissRequest = onDismiss,
title = { Text("Enter OTP Code") },
text = {
TextField(
value = otpCode,
onValueChange = { otpCode = it },
label = { Text("Enter OTP") },
singleLine = true,
)
},
confirmButton = {
Button(onClick = { onOTPSubmit(otpCode) }) {
Text("Submit")
}
},
dismissButton = {
TextButton(onClick = onDismiss) {
Text("Cancel")
}
},
)
}
```
and in `QuickstartApp.kt` where the `CrossmintSDKProvider` was initialized, use it like this:
```kotlin QuickstartApp.kt theme={null}
CrossmintSDKProvider
.Builder(CROSSMINT_API_KEY)
.onTEERequired { onOTPSubmit, onDismiss ->
OTPDialog(
onOTPSubmit = onOTPSubmit,
onDismiss = onDismiss,
)
}
.build {
// Your app content goes here
AppContent()
}
```
And that's it! You just created a non-custodial wallet for your user and made a USDC transaction on Base Sepolia.
## Launching in Production
For production, the steps are almost identical, but some changes are required:
1. Create a developer account on the [production console](https://www.crossmint.com/console)
2. Create a production client API key on the [API Keys](https://www.crossmint.com/console/projects/apiKeys) page with the API scopes `users.create`, `users.read`, `wallets.read`, `wallets.create`, `wallets:transactions.create`, `wallets:transactions.sign`, `wallets:balance.read`, `wallets.fund`
3. Update your `local.properties` with the production API key
4. **Use your own authentication provider**: For production applications, Crossmint recommends using [third-party authentication](/wallets/v0/guides/bring-your-own-auth) (Option 2 from Step 4) with providers like Auth0, Firebase, or Supabase, rather than Crossmint Auth (OTP). Configure JWT authentication in the [Crossmint Console](https://www.crossmint.com/console/projects/apiKeys) under API Keys → JWT Authentication.