# Get Usage
Source: https://docs.crossmint.com/api-reference/admin/get-usage
get /v1-alpha1/projects/{projectId}/usage
Get usage data for a project.
**API scope required** `projects:usage.read`
# Get Action Status
Source: https://docs.crossmint.com/api-reference/common/get-action-status
get /2022-06-09/actions/{actionId}
Use this API to poll for the status of asynchonous actions such as NFT mints, transfers, etc.
**API scope required**: `nfts.create`
The shape of the data property in the `200` response for this API depends on the type of action initially performed.
For example, minting/burning an NFT, creating/updating a collection or template, or NFT transfers.
The `action` property will indicate the type of action originally performed and will be one of:
* `nfts.create`
* `nfts.delete`
* `nfts.update`
* `collections.create`
* `collections.update`
* `wallets:nfts.transfer`
# Check Token Support
Source: https://docs.crossmint.com/api-reference/headless/check-token-support
GET /v1-alpha2/tokens/{tokenLocator}
Get a token by its locator
# Create Order
Source: https://docs.crossmint.com/api-reference/headless/create-order
post /2022-06-09/orders
Creates a new order that can be used to complete a headless checkout.
**API scope required**: `orders.create`
# Edit Order
Source: https://docs.crossmint.com/api-reference/headless/edit-order
patch /2022-06-09/orders/{orderId}
Edit an existing order. You can update the recipient, the payment method, and/or the locale.
**API scope required**: `orders.update`
# Get Order
Source: https://docs.crossmint.com/api-reference/headless/get-order
get /2022-06-09/orders/{orderId}
Get specific order by ID.
**API scope required**: `orders.read`
# Introduction
Source: https://docs.crossmint.com/api-reference/introduction
Explore the APIs and test them live from the browser
This section provides a detailed guide for each of the APIs, with sample code and responses.
## Testing the APIs from the browser
The reference pages allow you to call the APIs directly from the browser. To get started:
1. Create a developer account on the [Staging](https://staging.crossmint.com/console) or [Production](https://www.crossmint.com/console) consoles. Read more about the environments [here](/introduction/platform/staging-vs-production).
2. Create an [API key](/introduction/platform/api-keys) from the `API keys` tab on the console, with the permissions required for the APIs you want to use.
3. From the page of your API of choice, insert the right API key in the authorization slot, introduce the different parameters, and call "Send".
4. (Optional) To call APIs in the production environment, find the API endpoint selector (`⌄`) next to the endpoint URL, and change it to `www.crossmint.com/api`.
The following guide will show you how to create a wallet and mint an NFT into it within 5 minutes. For this, make sure your API key has the scopes `wallets.create`, and `nfts.create`.
Follow the next steps to create a wallet within 5 minutes:
You may add any additional properties. Each API reference page includes the full list of properties and admissible values.
Scroll back to the top of the page and click the blue `Send` button to trigger
the API call.
Here is an example response object:
**Success!** The next guide will show you how to mint an NFT into this wallet and view the content.
In the previous guide, you created a wallet. Now you will deliver an NFT into it and read the wallet's content.
{/* prettier-ignore */}
This is a default collection associated to your account. You can create new ones using the [Create Collections](/minting/nfts/integrate/create-collections) API.
The selector to choose between the different metadata option can be hard to spot. Look closely at the screenshots below to see where it is.
You can provide your own or use this example URL:
```bash metadata URL
https://bafkreidbf4jpxpecwezjbagwmua5qv62ifhhtzsspoml7zls6iq6ms4byi.ipfs.nftstorage.link/
```
```json example JSON
{
"name": "Crossmint Test NFT",
"description": "Created with the Crossmint minting API",
"image": "https://bafkreiexjl6kw4khdxkrt6dojgacscnzvrys47t472l2t7d6r2ss65kifq.ipfs.nftstorage.link/",
"external_url": "https://docs.crossmint.com",
"attributes": [
{
"trait_type": "contract",
"value": "ERC-721"
},
{
"trait_type": "background",
"value": "black"
}
]
}
```
This URL must point to a valid JSON file that adheres to [EVM metadata standards](/minting/nfts/integrate/define-metadata).
There are two options for the `recipient` parameter. The first enables minting to an email address. The second enables minting directly to a wallet address.
```javascript email recipient
// format
email::
// example
email:testy@crossmint.xyz:polygon
```
```javascript wallet recipient
// format
:
// example
polygon:0x0359Cd99FD20e853a85489DFC93EaDFeF7461590
```
Enter your own email address on this step and you can login to see your NFT in the Crossmint wallet later, which can be accessed from [crossmint.com](https://crossmint.com) or [staging.crossmint.com](https://staging.crossmint.com) if you are in staging.
This will prevent unnecessary uploading of files that are already pinned to IPFS.
{/* prettier-ignore */}
Crossmint has a 10MB re-upload size limit. For larger files, upload your media to IPFS, create a metadata.json as shown above, submit the metadata file's URL, and ensure `reuploadLinkedFiles` is set to `false`.
The default option is `true`.
Scroll back to the top of the page and click the blue `Send` button to trigger
the API call.
Here is an example response object:
If you followed this guide closely you can view the NFT in the staging wallet at [https://staging.crossmint.com/user/collection](https://staging.crossmint.com/user/collection).
If you minted directly to a wallet address you can view the NFT in that application. Ensure you are accessing it from a testnet if you used staging.
## Next Steps
Test any other API directly from the reference page. You can find more information about the products on the [documentation guides](/introduction).
# Create IP Asset
Source: https://docs.crossmint.com/api-reference/ip/create-ip-asset
post /v1/ip/collections/{collectionId}/ipassets
Create a new IP Asset
**API scope required**: `nfts.create`
This API is still under development. Contact support for early access.{" "}
# Create IP Asset (Idempotent)
Source: https://docs.crossmint.com/api-reference/ip/create-ip-asset-idempotent
put /v1/ip/collections/{collectionId}/ipassets/{customerFacingId}
Create a new IP Asset with a pre-computed id, or get an existing one if the id already exists
**API scope required**: `nfts.create`
This API is still under development. Contact support for early access.{" "}
# Create IP Collection
Source: https://docs.crossmint.com/api-reference/ip/create-ip-collection
post /v1/ip/collections
Create a new collection with a pre-computed id, or get an existing one if the id already exists
**API scope required**: `collections.create`
This API is still under development. Contact support for early access.
# Create IP Collection (Idempotent)
Source: https://docs.crossmint.com/api-reference/ip/create-ip-collection-idempotent
put /v1/ip/collections/{collectionId}
Create a new collection with a pre-computed id, or get an existing one if the id already exists
**API scope required**: `collections.create`
This API is still under development. Contact support for early access.
# Get All IP Collections
Source: https://docs.crossmint.com/api-reference/ip/get-all-ip-collections
get /v1/ip/collections
Get all collections associated with the Developer Project
**API scope required**: `collections.read`
This API is still under development. Contact support for early access.
# Get IP Action
Source: https://docs.crossmint.com/api-reference/ip/get-ip-action
get /v1/ip/actions/{actionId}
Get an action by its id
**API scope required**: `nfts.create`
This API is still under development. Contact support for early access.
# Get IP Asset
Source: https://docs.crossmint.com/api-reference/ip/get-ip-asset
get /v1/ip/collections/{collectionId}/ipassets/{customerFacingId}
Get a single IP Asset
**API scope required**: `nfts.read`
This API is still under development. Contact support for early access.{" "}
# Get IP Assets in Collection
Source: https://docs.crossmint.com/api-reference/ip/get-ip-assets
get /v1/ip/collections/{collectionId}/ipassets
Get all IP Assets in a collection
**API scope required**: `nfts.read`
This API is still under development. Contact support for early access.{" "}
# Get IP Collection
Source: https://docs.crossmint.com/api-reference/ip/get-ip-collection
get /v1/ip/collections/{collectionId}
Get a collection by its id deployed on the Story chain
**API scope required**: `collections.read`
This API is still under development. Contact support for early access.
# Get IP Asset Graph
Source: https://docs.crossmint.com/api-reference/ip/get-ip-graph
get /v1/ip/graph/{ipAssetId}
Get the graph of an IP Asset, by default it will fetch the first level of parents and children (depth = 1). You can customize the depth using the query parameter 'depth' to a maximum of 3. Maximum 100 parents or children will be returned for each level.
The ipAssetId parameter should be the Story Protocol asset ID (not the Crossmint ID). Must start with '0x' followed by hexadecimal characters.
**API scope required**: `nfts.read`
This API is still under development. Contact support for early access.{" "}
# Get IP Asset License
Source: https://docs.crossmint.com/api-reference/ip/get-ip-license
get /v1/ip/licenses/{ipassetId}
Get the licenses of an IP Asset
The ipassetId parameter should be the Story Protocol asset ID (not the Crossmint ID). Must start with '0x' followed by hexadecimal characters.
**API scope required**: `nfts.read`
This API is still under development. Contact support for early access.{" "}
# Update IP Asset
Source: https://docs.crossmint.com/api-reference/ip/update-ip-asset
patch /v1/ip/collections/{collectionId}/ipassets/{customerFacingId}
Update an existing IP Asset
**API scope required**: `nfts.update`
This API is still under development. Contact support for early access.{" "}
# Create Collection
Source: https://docs.crossmint.com/api-reference/minting/collection/create-collection
post /2022-06-09/collections/
Create a collection that you can mint NFTs/SFTs from
**API scope required**: `collections.create`
# Create Collection (Idempotent)
Source: https://docs.crossmint.com/api-reference/minting/collection/create-collection-idempotent
put /2022-06-09/collections/{collectionId}
Create a collection that you can mint NFTs/SFTs from. This API is idempotent,
if you call it multiple times with the same ID, only one will be created.
**API scope required**: `collections.create`
# Get All Collections
Source: https://docs.crossmint.com/api-reference/minting/collection/get-all-collections
get /2022-06-09/collections/
List all collections created under the current Crossmint project
**API scope required**: `collections.read`
For Solana collections the `onChain.contractAddress` property will be named `onChain.mintAddress`
{/* overriding response here because the auto parsing of deeply nested yaml leaves out too much */}
```json 200
{
"results": [
{
"id": "bb691876-edb3-404c-af3e-c019b8e2ed2c",
"metadata": {
"name": "Test Collection",
"description": "Test",
"imageUrl": "ipfs://QmVocoiYXZLAtheEHV3VF8w4pa68bkPutT8cQZdMrrpzxh",
"symbol": "XMINT"
},
"fungibility": "non-fungible",
"onChain": {
"chain": "polygon",
"type": "erc-721",
"contractAddress": "0x9564bD85f3D5677D86244dDb06F06bbD22D9d0DB"
},
"supplyLimit": 95,
"payments": {
"price": "0.001",
"recipientAddress": "0x6C3b3225759Cbda68F96378A9F0277B4374f9F06"
}
}
]
}
```
# Get Base URI
Source: https://docs.crossmint.com/api-reference/minting/collection/get-base-uri
get /v1-alpha1/minting/collections/{collectionId}/base-uri
Get the Base URI of a collection as it appears onchain.
**API scope required**: `collections.read`
# Get Collection Info
Source: https://docs.crossmint.com/api-reference/minting/collection/get-collection
get /2022-06-09/collections/{collectionId}
Get information about a specific collection.
**API scope required**: `collections.read`
For Solana collections the `onChain.contractAddress` property will be named `onChain.mintAddress`
# Get Royalties Configuration
Source: https://docs.crossmint.com/api-reference/minting/collection/get-royalties-configuration
get /v1-alpha1/minting/collections/{collectionId}/royalties
Fetch the royalty configuration for a collection, from its current state
in the blockchain.
This API is only supported on EVM chains.
If you call GET too soon after PUT/DELETE,
you may not yet see your latest changes, as they can take a few seconds to
record on the blockchain.
**API scope required**: `collections.read`
# Get Transferability
Source: https://docs.crossmint.com/api-reference/minting/collection/get-transferability
get /v1-alpha1/minting/collections/{collectionId}/transferable
Get the transferable status of a collection.
This API is supported on EVM and Aptos chains.
You must contact sales to gain access to this API.
**API scope required**: `collections.read`
# Remove Royalties
Source: https://docs.crossmint.com/api-reference/minting/collection/remove-royalties
delete /v1-alpha1/minting/collections/{collectionId}/royalties
Remove all royalties from a given collection. No new NFT sales will yield royalties to the creator.
This API is only supported on EVM Chains.
**API scope required**: `collections.update`
# Set Base URI
Source: https://docs.crossmint.com/api-reference/minting/collection/set-base-uri
put /v1-alpha1/minting/collections/{collectionId}/base-uri
Update the Base URI of a collection. Setting the baseURI enables
excluding the metadata param when minting. Tokens minted without the metadata
param will have a tokenURI of:
`{BASE_URI}/{TOKEN_ID}`
This API is currently only supported on EVM Chains.
**API scope required**: `collections.update`
# Set Royalties
Source: https://docs.crossmint.com/api-reference/minting/collection/set-royalties
put /v1-alpha1/minting/collections/{collectionId}/royalties
Configure royalties for all NFTs in a collection.
This API is only supported for EVM chains and implements the EIP-2981 standard.
**API scope required**: `collections.update`
# Set Transferability
Source: https://docs.crossmint.com/api-reference/minting/collection/set-transferability
put /v1-alpha1/minting/collections/{collectionId}/transferable
Update the transferable status of a collection.
This API is supported on EVM and Aptos chains.
You must contact sales to gain access to this API.
**API scope required**: `collections.update`
# Update Collection
Source: https://docs.crossmint.com/api-reference/minting/collection/update-collection
patch /2022-06-09/collections/{collectionId}
Update the sales details of a collection
**API scope required**: `collections.update`
# Burn NFT
Source: https://docs.crossmint.com/api-reference/minting/nfts/burn-nft
delete /2022-06-09/collections/{collectionId}/nfts/{id}
Burn a minted NFT.
**API scope required**: `nfts.delete`
# Edit NFT
Source: https://docs.crossmint.com/api-reference/minting/nfts/edit-nft
patch /2022-06-09/collections/{collectionId}/nfts/{id}
Edit a minted NFT's metadata on IPFS.
If you are using a custom baseURI, invoking this will overwrite the specific tokenURI for the edited token.
**API scope required**: `nfts.update`
# Get All NFTs
Source: https://docs.crossmint.com/api-reference/minting/nfts/get-nfts
get /2022-06-09/collections/{collectionId}/nfts
Get a list of all the NFTs in a given collection.
**API scope required**: `nfts.read`
# Mint NFT
Source: https://docs.crossmint.com/api-reference/minting/nfts/mint-nft
post /2022-06-09/collections/{collectionId}/nfts
Mint your NFTs and deliver them to a web3 wallet or an email address
**API scope required**: `nfts.create`
# Mint NFT with ID
Source: https://docs.crossmint.com/api-reference/minting/nfts/mint-nft-idempotent
put /2022-06-09/collections/{collectionId}/nfts/{id}
This pathway allows you to mint NFTs and guarantee idempotency
to ensure you never double mint for the same NFT.
**API scope required**: `nfts.create`
Subsequent requests to this endpoint with the same `id` in the path will ***not*** mint additional NFTs.
Furthermore, the success responses (with status code 200) will be different once the initial request has completed and includes the metadata for the minted NFT.
```json EVM
{
"id": "",
"metadata": {
"name": "",
"image": "",
"description": ""
},
"onChain": {
"status": "",
"tokenId": "",
"owner": "",
"txId": "",
"contractAddress": "",
"chain": ""
},
"actionId": ""
}
```
```json Solana
{
"id": "",
"metadata": {
"name": "",
"symbol": "",
"description": "",
"seller_fee_basis_points": 0,
"image": "",
"attributes": [],
"properties": {}
},
"onChain": {
"status": "success",
"mintHash": "",
"txId": "",
"owner": "",
"chain": "solana"
},
"actionId": ""
}
```
# Mint SFT
Source: https://docs.crossmint.com/api-reference/minting/nfts/mint-sft
post /2022-06-09/collections/{collectionId}/sfts
Mint your SFTs and deliver them to a web3 wallet or an email address
**API scope required**: `nfts.create`
# Mint Status
Source: https://docs.crossmint.com/api-reference/minting/nfts/mint-status
get /2022-06-09/collections/{collectionId}/nfts/{id}
Get the status and associated information for a mint operation.
**API scope required**: `nfts.read`
```json 200 EVM
{
"id": "",
"metadata": {
"name": "",
"image": "",
"description": ""
},
"onChain": {
"status": "success",
"tokenId": "",
"owner": "",
"txId": "",
"contractAddress": "",
"chain": "polygon"
},
"action": "https://staging.crossmint.com/api/2022-06-09/actions/"
}
```
```json 200 Solana
{
"id": "",
"metadata": {
"name": "",
"symbol": "",
"seller_fee_basis_points": 0,
"properties": {},
"description": "",
"image": "",
"attributes": []
},
"onChain": {
"status": "success",
"mintHash": "",
"txId": "",
"owner": "",
"chain": "solana"
},
"action": "https://staging.crossmint.com/api/2022-06-09/actions/"
}
```
# Create Template
Source: https://docs.crossmint.com/api-reference/minting/template/create-template
post /2022-06-09/collections/{collectionId}/templates
Create a token template, that NFTs or SFTs may be minted from
**API scope required**: `nfts.create`
# Create Template with ID
Source: https://docs.crossmint.com/api-reference/minting/template/create-template-idempotent
put /2022-06-09/collections/{collectionId}/templates/{templateId}
Create a token template with preconfigured metadata
**API scope required**: `nfts.create`
# Delete Template
Source: https://docs.crossmint.com/api-reference/minting/template/delete-template
delete /2022-06-09/collections/{collectionId}/templates/{templateId}
Delete a Token template.
**API scope required**: `nfts.delete`
# Edit Template
Source: https://docs.crossmint.com/api-reference/minting/template/edit-template
patch /2022-06-09/collections/{collectionId}/templates/{templateId}
Edit a Token template.
**API scope required**: `nfts.update`
# Get All Templates
Source: https://docs.crossmint.com/api-reference/minting/template/get-all-templates
get /2022-06-09/collections/{collectionId}/templates
Get all of the templates for a collection
**API scope required**: `nfts.read`
# Get Template
Source: https://docs.crossmint.com/api-reference/minting/template/get-template
get /2022-06-09/collections/{collectionId}/templates/{templateId}
Fetch the contents of a token template.
**API scope required**: `nfts.read`
# Issue Credential
Source: https://docs.crossmint.com/api-reference/verifiable-credentials/credentials/issue-credential
post /v1-alpha1/credentials/templates/{templateId}/vcs
Issue a credential and deliver it to a wallet or email address.
**API scope required** `credentials.create`
# Get Credential by Credential ID
Source: https://docs.crossmint.com/api-reference/verifiable-credentials/credentials/retrieve-credential-by-id
get /v1-alpha1/credentials/{id}
Get a verifiable credential by the ID associated with it.
This ID will have the format: `urn:uuid:`. For example: `urn:uuid:64f9877d-a19a-4205-8d61-f8c2abed5766`
**API scope required** `credentials.read`. This enpoint will work also with a client side API key.
# Get Credential by NFT ID
Source: https://docs.crossmint.com/api-reference/verifiable-credentials/credentials/retrieve-credential-by-nft
get /v1-alpha1/credentials/templates/{collectionId}/nfts/{id}/credentials
Get a verifiable credential by the ID associated with the minted NFT.
This ID will have the format: ``. For example: `d7eb777b-e9b4-4f34-ab5f-ce199111166a`
**API scope required** `credentials.read`. This endpoint will not work with a client side API key.
# Get Credential by NFT Locator
Source: https://docs.crossmint.com/api-reference/verifiable-credentials/credentials/retrieve-credential-by-nft-locator
get /v1-alpha1/nfts/{nftLocator}/credentials
Get a verifiable credential by the NFT locator.
This locator will have the format: `::`.
For example: `polygon:0x1234abcde...:1`
**API scope required** `credentials.read`. This enpoint will work also with a client side API key.
# null
Source: https://docs.crossmint.com/api-reference/verifiable-credentials/credentials/retrieve-credential-nfts
get /api/v1-alpha1/wallets/{walletLocator}/credential_nfts
# Revoke Credential
Source: https://docs.crossmint.com/api-reference/verifiable-credentials/credentials/revoke-credential
DELETE /v1-alpha1/credentials/{id}
Revoke a verifiable credential by the credential ID.
This involves burning the associated nft.
This ID will have the format: `urn:uuid:`. For example: `urn:uuid:64f9877d-a19a-4205-8d61-f8c2abed5766`
**API scope required** `credentials.create`.
# Verify Credential
Source: https://docs.crossmint.com/api-reference/verifiable-credentials/credentials/verify-credential
post /v1-alpha1/credentials/verification/verify
Verify that a verifiable credential is valid.
**API scope required** `credentials.read`
It is impractical to use the API Playground to verify a credential. Instead you can copy the sample code for your
preferred language in the righthand sidebar and fill in the JSON of the credential you intend to verify.
Here is an example of how to verify a credential using javascript:
```javascript verifyVC.js
const options = {
method: "POST",
headers: {
"X-API-KEY": "YOUR_API_KEY",
"Content-Type": "application/json",
},
body: '{"credential": {"id":"urn:uuid:e31316b6-3be1-49af-a95f-c7f4c3f52aa1","credentialSubject":{"course":"Blockchain 101","passed":true,"id":"did:polygon:0x6C3b3225759Cbda68F96378A9F0277B4374f9F06"},"expirationDate":"2034-02-03","nft":{"tokenId":"1","chain":"polygon","contractAddress":"0xdC444A3F4768185497Dae6250E2F348b99bE89F3"},"issuer":{"id":"did:polygon:0xa22CaDEdE67c11dc1444E507fDdd9b831a67aBd1"},"type":["VerifiableCredential","65c15243e9bee8deac219d57"],"issuanceDate":"2024-02-05T23:21:32.641Z","@context":["https://www.w3.org/2018/credentials/v1","https://github.com/haardikk21/ethereum-eip712-signature-2021-spec/blob/main/index.html","DUMMY_CROSSMINT/65c15243e9bee8deac219d57"],"proof":{"verificationMethod":"did:polygon:0xa22CaDEdE67c11dc1444E507fDdd9b831a67aBd1#ethereumAddress","ethereumAddress":null,"created":"2024-02-05T23:22:24.058Z","proofPurpose":"assertionMethod","type":"EthereumEip712Signature2021","proofValue":"0x748a55d9770cbc6ef16689f0d9547355e288bcce03a8949a32d2aac59244cb9e08cbf54c960bc00d133fc51e6651a4ac1366aeda320dd121777118a4e74980631b","eip712":{"domain":{"name":"Krebit","version":"0.1","chainId":4,"verifyingContract":"0xD8393a735e8b7B6E199db9A537cf27C61Aa74954"},"types":{"VerifiableCredential":[{"name":"@context","type":"string[]"},{"name":"type","type":"string[]"},{"name":"id","type":"string"},{"name":"issuer","type":"Issuer"},{"name":"credentialSubject","type":"CredentialSubject"},{"name":"issuanceDate","type":"string"},{"name":"expirationDate","type":"string"},{"name":"nft","type":"Nft"}],"CredentialSubject":[{"name":"id","type":"string"},{"name":"course","type":"string"},{"name":"passed","type":"bool"}],"Issuer":[{"name":"id","type":"string"}],"Nft":[{"name":"tokenId","type":"string"},{"name":"contractAddress","type":"string"},{"name":"chain","type":"string"}]},"primaryType":"VerifiableCredential"}}}}',
};
// note the gigantic VC JSON string in the body property
fetch("https://staging.crossmint.com/api/v1-alpha1/credentials/verification/verify", options)
.then((response) => response.json())
.then((response) => console.log(response))
.catch((err) => console.error(err));
```
```json 200 valid
{
"isValid": true,
"error": null
}
```
```json 200 revoked
{
"isValid": false,
"error": "Credential Revoked"
}
```
```json 200 expired
{
"isValid": false,
"error": "Credential expired at "
}
```
```json 200 invalid_proof
{
"isValid": false,
"error": "Invalid proof"
}
```
# Create Credential template
Source: https://docs.crossmint.com/api-reference/verifiable-credentials/templates/create-template
post /v1-alpha1/credentials/templates/
Create a template, similar to an NFT collection, for issuing verifiable credentials.
**API scope required** `credentials:template.create`
# Create Credential Type with Name
Source: https://docs.crossmint.com/api-reference/verifiable-credentials/types/create-named-type
put /v1-alpha1/credentials/types/{typeName}
Create or import a type with a given name. This is how you define a custom credential schema.
**API scope required** `credentials.create`
# Create Credential Type
Source: https://docs.crossmint.com/api-reference/verifiable-credentials/types/create-type
post /v1-alpha1/credentials/types
Create or import a credential type with a random UUID. This is how you define a custom credential schema.
**API scope required** `credentials.create`
# Get a Credential Type
Source: https://docs.crossmint.com/api-reference/verifiable-credentials/types/get-type
get /v1-alpha1/credentials/types/{typeName}
Get the schema of a given type by name (or id)
**API scope required** `credentials.read`
# Approve Signature
Source: https://docs.crossmint.com/api-reference/wallets/approve-signature
post /2022-06-09/wallets/{walletLocator}/signatures/{signatureId}/approvals
Submit approval for a signature to sign a message or typed data.
**API scope required**: `wallets:signatures.create`
# Approve Transaction
Source: https://docs.crossmint.com/api-reference/wallets/approve-transaction
post /2022-06-09/wallets/{walletLocator}/transactions/{transactionId}/approvals
Submit approval signature for a pending transaction. Required for transactions using external signers.
**API scope required**: `wallets:transactions.sign`
# Create Signature
Source: https://docs.crossmint.com/api-reference/wallets/create-signature
post /2022-06-09/wallets/{walletLocator}/signatures
Creates a new signature for signing messages or typed data.
**API scope required**: `wallets:signatures.create`
# Create Transaction
Source: https://docs.crossmint.com/api-reference/wallets/create-transaction
post /2022-06-09/wallets/{walletLocator}/transactions
Creates a new transaction for the specified wallet. Transaction will be automatically broadcast once it has all necessary approvals.
**API scope required**: `wallets:transactions.create`
# Create Wallet
Source: https://docs.crossmint.com/api-reference/wallets/create-wallet
post /2022-06-09/wallets
Creates a new wallet of specified type. If called with an idempotency key or for a user who already has a wallet, returns existing wallet. When linkedUser is provided, subsequent calls with the same linkedUser will return the existing wallet. Supports both custodial and non-custodial wallet types.
**API scope required**: `wallets.create`
# Fund Wallet
Source: https://docs.crossmint.com/api-reference/wallets/fund-wallet
post /v1-alpha2/wallets/{walletLocator}/balances
Send funds to a wallet.
**API scope required**: `wallets.fund`
This endpoint is only available in **staging** and only supports USDC and USDXM.
# Get NFTs from Wallet
Source: https://docs.crossmint.com/api-reference/wallets/get-nfts-from-wallet
get /2022-06-09/wallets/{identifier}/nfts
Fetch the NFTs in a provided wallet
**API scope required**: `wallets:nfts.read`
This API enables fetching the NFTs for a provided wallet address and chain.
The response will be slightly different between EVM, Solana, and other wallets. See the example responses to the right.
{/* The below section overrides the response examples in the .yaml file because mintlify doesn't parse out multiple options */}
```json 200 EVM
[
{
"chain": "",
"contractAddress": "",
"tokenId": "",
"metadata": {
"attributes": [],
"collection": {},
"description": "",
"image": "",
"animation_url": "",
"name": ""
},
"locator": "",
"tokenStandard": ""
}
]
```
```json 200 EVM (with subscription)
[
{
"chain": "",
"contractAddress": "",
"tokenId": "",
"metadata": {
"attributes": [],
"collection": {},
"description": "",
"image": "",
"animation_url": "",
"name": ""
},
"locator": "",
"tokenStandard": "",
"subscription": {
"expiresAt": ""
}
}
]
```
```json 200 Solana
[
{
"chain": "",
"mintHash": "",
"metadata": {
"name": "",
"description": "",
"image": "",
"attributes": []
},
"locator": ""
}
]
```
{/* prettier-ignore */}
{/*
```json 200 Cardano
[
{
"chain": "",
"assetId": "",
"metadata": {
"assetId": "",
"name": "",
"description": "",
"image": "",
"attributes": []
},
"locator": ""
}
]
```
prettier-ignore
\*/}
```json 400
{
"error": ""
}
```
# Get Signature
Source: https://docs.crossmint.com/api-reference/wallets/get-signature
get /2022-06-09/wallets/{walletLocator}/signatures/{signatureId}
Retrieves details about a specific signature by its ID.
**API scope required**: `wallets:signatures.read`
# Get All Signatures
Source: https://docs.crossmint.com/api-reference/wallets/get-signatures
get /2022-06-09/wallets/{walletLocator}/signatures
Retrieves all signatures associated with the specified wallet.
**API scope required**: `wallets:signatures.read`
# Get Delegated Signer
Source: https://docs.crossmint.com/api-reference/wallets/get-signer
get /2022-06-09/wallets/{walletLocator}/signers/{signer}
Retrieve details about a specific delegated signer by its locator.
**API scope required**: `wallets.read`
# Get Transaction
Source: https://docs.crossmint.com/api-reference/wallets/get-transaction
get /2022-06-09/wallets/{walletLocator}/transactions/{transactionId}
Retrieves the current status and details of a specific transaction.
**API scope required**: `wallets:transactions.read`
# Get Wallet Transactions
Source: https://docs.crossmint.com/api-reference/wallets/get-transactions
get /2022-06-09/wallets/{walletLocator}/transactions
Retrieves all transactions associated with the specified wallet.
**API scope required**: `wallets:transactions.read`
# Get Wallet Balance
Source: https://docs.crossmint.com/api-reference/wallets/get-wallet-balance
get /v1-alpha2/wallets/{walletLocator}/balances
Get the balance of a wallet for a given chain and currency
**API scope required**: `wallets:balance.read`
# Get Wallet By Locator
Source: https://docs.crossmint.com/api-reference/wallets/get-wallet-by-locator
get /2022-06-09/wallets/{walletLocator}
Retrieves a wallet by its locator (address or user identifier and wallet type)
**API scope required**: `wallets.read`
# Register Delegated Signer
Source: https://docs.crossmint.com/api-reference/wallets/register-delegated-key
post /2022-06-09/wallets/{walletLocator}/signers
Register a delegated key for a smart wallet with optional restrictions around permissions and expiry date.
**API scope required**: `wallets.create`
# Transfer Token
Source: https://docs.crossmint.com/api-reference/wallets/transfer-token
post /unstable/wallets/{walletLocator}/tokens/{tokenLocator}/transfers
Sends a token of any type from this wallet to a recipient
# Customization
Source: https://docs.crossmint.com/authentication/customization
Customize the authentication flow and email templates
With Crossmint Auth, you can customize the authentication flow and email templates with your brand's identity.
## Modal Customization
The `CrossmintAuthProvider` component allows you to customize the authentication modal appearance and content.
```tsx
By continuing, you agree to our Terms of Service and{" "}
Privacy Policy
}
appearance={{
spacingUnit: "8px",
borderRadius: "12px",
colors: {
inputBackground: "#fffdf9",
buttonBackground: "#fffaf2",
border: "#835911",
background: "#FAF5EC",
textPrimary: "#5f2c1b",
textSecondary: "#835911",
textLink: "#1400cb",
danger: "#ff3333",
accent: "#602C1B",
},
}}
>
{children}
```
### Modal props
| Prop | Type | Description |
| -------------------- | --------------------- | -------------------------------------------------------------------- |
| `authModalTitle` | `string` | Custom title displayed at the top of the authentication modal |
| `termsOfServiceText` | `string \| ReactNode` | Custom terms of service text displayed below the authentication form |
| `appearance` | `UIConfig` | Styling configuration for the modal (see example above) |
The modal will also use your display name configured in the Crossmint Console. To learn more, see the "Email Customization" section below.
## Embedded Login
For a more integrated experience, you can use our embedded login component, which offers flexibility to display the login form in your own modal or as part of a split login screen.
```tsx
import { EmbeddedAuthForm, useAuth } from "@crossmint/client-sdk-react-ui";
export default function Home() {
const { user, status } = useAuth(); // "in-progress" | "logged-in" | "logged-out"
return
{status === "logged-in" ? user.email : }
;
}
```
## Email Customization
Email OTP is a login method that allows users to sign in to your app using their email address. They receive a one-time code via email that they can use to log in.
You can customize the email template to align with your brand's identity. We **strongly recommend** doing so, as it increases user trust and security.
To modify the email template:
1. In the Crossmint Console, click on Settings, and navigate to the **Branding** tab.
2. Here, you can customize:
* The **logo** displayed in the email with your logo.
* The **display name** textbox to include your brand's name.
When customizing email text, avoid using terms like "airdrop", "token", or "crypto" as these can trigger spam
filters and hurt email deliverability.

# Introduction
Source: https://docs.crossmint.com/authentication/introduction
A user management solution tightly integrated with all other Crossmint products
Authenticate users using web3 or traditional sign-in methods:
* **Email OTP**: passwordless sign-in using a one time code delivered to the user's email.
* **Social Accounts**: Sign in with Google, Apple, X, and more.
* **Farcaster**: using the [Sign In With Farcaster (SIWF) standard](https://github.com/farcasterxyz/protocol/discussions/110).
* **External wallets**: connect with crypto wallets for Web3 authentication.
## Key Characteristics
Optionally create or link user wallets with all your user accounts, to have a single, unified identity system
across your backend and web3 app.
Authorize calls to your backend services, and to any of Crossmint's products: minting, payments, subscriptions,
etc.
Setup is quick and easy. Launch your app in under 5 minutes.
## Get started
Log-in your first user in less than 5 minutes.
More detailed guide on how to integrate wallets upon user login.
Get and update user information.
Contact our sales team for advanced support.
# Login Methods
Source: https://docs.crossmint.com/authentication/login-methods
Customize how users can log in to your app
Crossmint Auth supports the following login methods:
* **Email OTP**: passwordless sign-in using a one time code delivered to the user's email.
* **Social Accounts**: Sign in with Google, X, Farcaster, and more.
* **External wallets**: connect with crypto wallets for Web3 authentication. Use `"web3"` for all wallets, `"web3:evm-only"` for Ethereum-compatible wallets only, or `"web3:solana-only"` for Solana wallets only.
To customize which login methods are shown to your users, use the `loginMethods` prop when initializing Crossmint Auth.
By default, only email and Google are enabled.
```tsx app/providers/Providers.tsx
"use client";
import { CrossmintProvider, CrossmintAuthProvider } from "@crossmint/client-sdk-react-ui";
export default function Providers({ children }: { children: React.ReactNode }) {
return (
{children}
);
}
```
# Quickstart ⚡
Source: https://docs.crossmint.com/authentication/quickstart
Sign up your first user in 5 minutes
See a full working example with auth and wallets.
Run the following command to install the SDK:
Add the necessary Crossmint providers to your app.
```tsx next.js
"use client";
import {
CrossmintProvider,
CrossmintAuthProvider,
CrossmintWalletProvider,
} from "@crossmint/client-sdk-react-ui";
export function Providers({ children }: { children: React.ReactNode }) {
return (
{children}
);
}
```
```tsx create-react-app
import ReactDOM from 'react-dom/client';
import './index.css';
import App from './App';
import {
CrossmintProvider,
CrossmintAuthProvider,
CrossmintWalletProvider,
} from "@crossmint/client-sdk-react-ui";
const root = ReactDOM.createRoot(document.getElementById('root'));
root.render(
);
```
```tsx next.js
"use client";
import { useAuth } from "@crossmint/client-sdk-react-ui";
export function AuthButton() {
const { login, logout, user, jwt } = useAuth();
return (
Google display name: {user?.google?.displayName ?? "None"}
JWT: {jwt}
);
}
```
## Launching in Production
For production, the steps are almost identical, but some changes are required:
1. Create a developer account on the [production console](https://www.crossmint.com/console)
2. Create a production client API key on the [API Keys](https://www.crossmint.com/console/projects/apiKeys) page with the API scopes `users.create`, `users.read`, `wallets.read`
3. Replace your test API key with the production key
## Next steps
* Read and update [user information](/authentication/user-profile)
* Use [webhooks](/authentication/webhooks) to get notified when a user signs up
* [Create Smart Wallets on sign up](/wallets/quickstarts/client-side-wallets)
# Secure Cookies
Source: https://docs.crossmint.com/authentication/security
Learn how to securely store Crossmint Auth cookies in your application
Authentication tokens are accessible to client-side JavaScript by default through non-HttpOnly cookies. For stronger security, you can store tokens in HttpOnly cookies, which are accessible only on the server side. This setup requires custom routes for refreshing tokens and logging out, using utilities from `@crossmint/server-sdk`.
## 1. Configure Cookie Options
When initializing the server SDK, configure secure cookie options:
```typescript
import { createCrossmint, CrossmintAuth } from "@crossmint/server-sdk";
const crossmint = createCrossmint({ apiKey: process.env.SERVER_CROSSMINT_API_KEY });
const crossmintAuth = CrossmintAuth.from(crossmint, {
cookieOptions: {
httpOnly: true,
secure: true, // Only send cookies over HTTPS
domain: ".yourdomain.com", // Optional: specify cookie domain
},
});
```
**Note:** The `httpOnly` flag only applies to the refresh token. The session JWT remains accessible to client-side JavaScript since it's needed for API calls.
## 2. Custom Routes Implementation
### Token Refresh Route
```typescript
import { createCrossmint, CrossmintAuth } from "@crossmint/server-sdk";
import { NextRequest } from "next/server";
const crossmint = createCrossmint({ apiKey: process.env.SERVER_CROSSMINT_API_KEY! });
const crossmintAuth = CrossmintAuth.from(crossmint);
export async function POST(request: NextRequest) {
return await crossmintAuth.handleCustomRefresh(request);
}
```
```typescript
import express from "express";
import { createCrossmint, CrossmintAuth } from "@crossmint/server-sdk";
const app = express()
const crossmint = createCrossmint({ apiKey: process.env.SERVER_CROSSMINT_API_KEY! });
const crossmintAuth = CrossmintAuth.from(crossmint);
app.post("/api/auth/refresh", async (req, res) => {
await crossmintAuth.handleCustomRefresh(req, res);
res.end();
});
```
### Logout Route
```typescript
import { createCrossmint, CrossmintAuth } from "@crossmint/server-sdk";
import { NextRequest } from "next/server";
const crossmint = createCrossmint({ apiKey: process.env.SERVER_CROSSMINT_API_KEY! });
const crossmintAuth = CrossmintAuth.from(crossmint);
export async function POST(request: NextRequest) {
return await crossmintAuth.logout(request);
}
```
```typescript
import express from "express";
import { createCrossmint, CrossmintAuth } from "@crossmint/server-sdk";
const app = express()
const crossmint = createCrossmint({ apiKey: process.env.SERVER_CROSSMINT_API_KEY! });
const crossmintAuth = CrossmintAuth.from(crossmint);
app.post("/api/auth/logout", async (req, res) => {
await crossmintAuth.logout(req, res);
res.end();
});
```
## 3. Client Configuration
Configure the client SDK to use your custom routes:
```typescript
import { createCrossmint, CrossmintAuth } from "@crossmint/client-sdk-auth";
const crossmint = createCrossmint({ apiKey: process.env.NEXT_PUBLIC_CLIENT_CROSSMINT_API_KEY! });
const crossmintAuth = CrossmintAuth.from(crossmint, {
refreshRoute: "/api/auth/refresh",
logoutRoute: "/api/auth/logout"
});
```
```typescript
{children}
```
**Note:** Depending on the framework you're using, you might need to set the whole URL in the `refreshRoute` and `logoutRoute` options.
# Server-Side Rendering (SSR)
Source: https://docs.crossmint.com/authentication/ssr
Integrate Crossmint Auth on the server-side for user authentication and management
export const CreateApiKey = ({client, scopes, useJwt}) => {
const scopeStr = (scope, index) => {
if (index === scopes.length - 1) {
return {scope};
} else {
return {scope}, ;
}
};
const localHostInAuthOrigin = client ? "http://localhost:3000" : "";
return
Navigate to the "Integrate" section on the left navigation bar, and ensure you're on the "API Keys" tab.
Within the {client ? "Client-side" : "Server-side"} keys section, click the "Create new key"
button in the top right.
{client ?
On the authorized origins section, enter http://localhost:3000 and click "Add origin".
: ""}
Next, check the scopes labeled {scopes.map((scope, index) => {scopeStr(scope, index)})}.
{useJwt ?
Check the "JWT Auth" box.
: ""}
Finally, create your key and save it for subsequent steps.
;
};
Crossmint Auth provides a flexible and simple authentication solution for your crypto server-side applications. This guide covers how to integrate and use Crossmint Auth across various server-side frameworks.
## Overview
Our server SDK allows you to:
* Manage user sessions
* Retrieve user profiles
* Verify JSON Web Tokens (JWTs)
## Installation
First, install the Crossmint Server SDK:
```bash
npm install @crossmint/server-sdk
```
## Initialization
To use Crossmint Auth, you need to initialize it with your Server API key. This API requires the `users.read` scope.
```typescript
import { createCrossmint, CrossmintAuth } from "@crossmint/server-sdk";
const crossmint = createCrossmint({ apiKey: process.env.SERVER_CROSSMINT_API_KEY });
const crossmintAuth = CrossmintAuth.from(crossmint);
```
## Core Functionality
### Session Management
The `getSession` method validates or refreshes a user's session based on their JWT and refresh token.
```typescript
const { jwt, refreshToken, userId } = await crossmintAuth.getSession(req, res);
```
This method:
1. Fetches the current JWT and refresh token from the cookies with keys `crossmint-jwt` and `crossmint-refresh-token`.
2. Checks if the current JWT is valid
3. Refreshes the session if needed
4. Stores the new JWT and refresh token in cookies
5. Returns new auth materials and the user ID
For other frameworks that do not expose standard request and response objects, such as Next.js using the App Router, you can pass in an object with `jwt` and `refreshToken` properties instead:
```typescript middleware.ts
import { NextResponse } from "next/server";
import type { NextRequest } from "next/server";
import { createCrossmint, CrossmintAuth } from "@crossmint/server-sdk";
export async function middleware(request: NextRequest) {
// Skip middleware for API routes and static files
if (request.nextUrl.pathname.startsWith("/api") || request.nextUrl.pathname.startsWith("/_next")) {
return NextResponse.next();
}
const response = NextResponse.next();
const jwt = request.cookies.get("crossmint-jwt")?.value;
const refreshToken = request.cookies.get("crossmint-refresh-token")?.value;
if (refreshToken == null) {
return response;
}
try {
const crossmint = createCrossmint({
apiKey: process.env.SERVER_CROSSMINT_API_KEY || "",
});
const crossmintAuth = CrossmintAuth.from(crossmint);
const { jwt: newJwt, refreshToken: newRefreshToken } = await crossmintAuth.getSession({
jwt,
refreshToken,
});
// Only update response cookies if tokens have changed
if (newJwt !== jwt || newRefreshToken.secret !== refreshToken) {
response.cookies.set("crossmint-jwt", newJwt);
response.cookies.set("crossmint-refresh-token", newRefreshToken.secret);
}
} catch (_) {
// If auth fails, clear cookies and redirect to home
response.cookies.delete("crossmint-jwt");
response.cookies.delete("crossmint-refresh-token");
}
return response;
}
```
```typescript getAuthSession.ts
import { cookies } from "next/headers";
import { createCrossmint, CrossmintAuth } from "@crossmint/server-sdk";
export async function getAuthSession() {
const cookieStore = await cookies();
const jwt = cookieStore.get("crossmint-jwt")?.value;
const refreshToken = cookieStore.get("crossmint-refresh-token")?.value;
if (refreshToken == null) {
return;
}
try {
const crossmint = createCrossmint({
apiKey: process.env.SERVER_CROSSMINT_API_KEY || "",
});
const crossmintAuth = CrossmintAuth.from(crossmint);
const session = await crossmintAuth.getSession({
jwt,
refreshToken,
});
return session;
} catch (_) {
return;
}
}
```
```typescript page.tsx
import { getAuthSession } from "@/hooks/auth";
import { createCrossmint, CrossmintAuth } from "@crossmint/server-sdk";
export default async function ProtectedRoute() {
const session = await getAuthSession();
const userId = session?.userId;
if (userId != null) {
// Fetch user data or perform authorized actions
const crossmint = createCrossmint({
apiKey: process.env.SERVER_CROSSMINT_API_KEY || "",
});
const crossmintAuth = CrossmintAuth.from(crossmint);
const userData = await crossmintAuth.getUser(userId);
return
Welcome, {userData.email}!
;
}
// Handle unauthenticated state
return
Please log in to access this page.
;
}
```
For Express.js applications, you can create middleware to handle authentication:
```typescript
import express from "express";
const app = express();
const authMiddleware = async (req, res, next) => {
try {
const { jwt, refreshToken, userId } = await crossmintAuth.getSession(req, res);
req.user = { userId };
next();
} catch (error) {
res.status(401).json({ error: "Authentication failed" });
}
};
app.use(authMiddleware);
app.get("/protected", (req, res) => {
res.json({ message: "Protected route", userId: req.user.userId });
});
```
For a basic Node.js server:
```typescript
import http from "http";
const server = http.createServer(async (req, res) => {
if (req.url === "/protected") {
try {
const { userId } = await crossmintAuth.getSession(req, res);
const userData = await crossmintAuth.getUser(userId);
res.writeHead(200, { "Content-Type": "application/json" });
res.end(JSON.stringify({ message: "Authenticated", user: userData }));
} catch (error) {
res.writeHead(401, { "Content-Type": "application/json" });
res.end(JSON.stringify({ error: "Authentication failed" }));
}
} else {
res.writeHead(404);
res.end();
}
});
server.listen(3000);
```
### User Profile Retrieval
Fetch user details using the `getUser` method:
```typescript
const user = await crossmintAuth.getUser(userId);
```
This provides access to user information such as email, phone number, and connected accounts (e.g., Google, Farcaster).
### JWT Verification
Verify JWTs independently using the `verifyCrossmintJwt` method:
```typescript
const decodedJwt = crossmintAuth.verifyCrossmintJwt(token);
```
This is useful for validating tokens in middleware or specific endpoints. We expose our public keys for this purpose at [https://www.crossmint.com/.well-known/jwks.json](https://www.crossmint.com/.well-known/jwks.json).
# User Profile
Source: https://docs.crossmint.com/authentication/user-profile
Retrieve user profile data such as email or social login metadata
Crossmint Auth provides a way to retrieve and update user profile data, such as email, social login metadata, and more.
The user object contains the following information:
* `userId`: User's unique identifier.
* `email`: User's email address.
* `phoneNumber`: User's phone number.
* `google`: User's Google account data.
* `farcaster`: User's Farcaster account data.
Google Account data contains:
* `name`: User's Google display name.
* `picture`: User's Google profile picture URL.
Farcaster Account data contains:
* `fid`: User's Farcaster ID.
* `username`: User's Farcaster username.
* `bio`: User's Farcaster bio.
* `displayName`: User's Farcaster display name.
* `pfpUrl`: User's Farcaster profile image URL.
* `custody`: User's FID custody address.
* `verifications`: List of the user's verified addresses.
## Reading User Data
This API requires the `users.read` scope.
* **Server side**: Requires a server-side API key.
* **Client side**: Requires a client-side API key, and a logged in user.
### Server-side
For server-side operations, use the `@crossmint/server-sdk` that provides a `getUser` function to fetch user information.
```typescript
import { createCrossmint, CrossmintAuth } from "@crossmint/server-sdk";
const crossmint = createCrossmint({ apiKey: SERVER_API_KEY });
const crossmintAuth = CrossmintAuth.from(crossmint);
async function getUser(userId: string) {
try {
const user = await crossmintAuth.getUser(userId);
console.log("User data:", user);
} catch (error) {
console.error("Error fetching user data:", error);
}
}
```
### Response Format
```json
{
"userId": "123",
"email": "test@test.com", // Optional (if user was created with email)
"phoneNumber": "123456789", // Optional (if user was created with phone number)
"google": {
"name": "John Doe",
"picture": "https://example.com/picture.jpg"
},
"farcaster": {
"fid": "123",
"username": "johndoe",
"bio": "Hello, I'm John Doe",
"displayName": "John Doe",
"pfpUrl": "https://example.com/pfp.jpg",
"custody": "0x1234567890123456789012345678901234567890",
"verifications": ["0x1234567890123456789012345678901234567890"]
}
}
```
### Client-side
Use the `useAuth` react hook from `@crossmint/client-sdk-react-ui` to access the user object.
If you would like to use a different framework, [contact support](https://help.crossmint.com/hc/en-us/requests/new)
```typescript React
import { useAuth } from "@crossmint/client-sdk-react-ui";
function User() {
const { user } = useAuth();
if (!user) {
return
);
}
```
# User Webhooks
Source: https://docs.crossmint.com/authentication/webhooks
Crossmint provides webhooks to notify your application about important user-related events. Below are the details of the available webhooks
### Webhook Events
#### `users.created`
This webhook is triggered when a new user is created.
##### Payload
```json
{
"type": "users.created",
"status": "success",
"data": {
"userId": "123", // User's identifier
"email": "test@test.com", // Optional (if user was created with email)
"phoneNumber": "123456789" // Optional (if user was created with phone number)
}
}
```
#### `users.updated`
This webhook is triggered when a user's email or phone number is successfully updated.
##### Payload
```json
{
"type": "users.updated",
"status": "success",
"data": {
"actionId": "1234", // Update action identifier
"userId": "123", // User identifier
"oldEmail": "test@test.com", // Optional (if user was created with email)
"newEmail": "test2@test2.com", // Optional (if user was created with email)
"oldPhoneNumber": "123456789", // Optional (if user was created with phone number)
"newPhoneNumber": "987654321" // Optional (if user was created with phone number)
}
}
```
### Handling Webhooks
To handle webhooks, you need to set up an endpoint in your application that can receive HTTP POST requests from Crossmint. Here's an example of how you might handle a webhook in a Node.js application:
```javascript
// Example webhook handler
app.post("/webhooks", (req, res) => {
const event = req.body;
switch (event.type) {
case "users.created":
handleUserCreated(event.data);
break;
case "users.updated":
handleUserUpdated(event.data);
break;
default:
console.log(`Unhandled event type: ${event.type}`);
}
res.sendStatus(200);
});
```
# Changelog Timeline
Source: https://docs.crossmint.com/changelog/timeline
A complete history of Crossmint's product updates and new features
**[Support for sign in with Ethereum and Solana on Crossmint Auth](/changelog/2025-04-03)**
Users can now log in with external ethereum and solana wallets, and obtain a Crossmint JWT token for authorization against any backend and Crossmint APIs
`features` wallets
**[Enhanced Solana Transaction Signing](/changelog/2025-04-03-1)**
Fixed signing for keypair in Solana sendTransaction method. This improvement ensures more reliable transaction signing when using Solana keypairs.
`improvements` wallets
**[Support for cNFT v2 on Core Collections](/changelog/2025-03-27)**
Added support for minting cNFT v2 on Core collections, expanding the platform's NFT creation capabilities. This enhancement allows users to perform more sophisticated operations with cNFTs such as burning, freezing and transferring as a collection owner.
`features` minting
**[Passkey Support for Delegated Signers](/changelog/2025-03-25)**
Added passkey support as a delegated signer option for EVM wallets, enhancing security and user experience. This feature allows users to use passkeys as an authentication method for wallet operations.
`features` wallets
**[New Default Project Form](/changelog/2025-03-24)**
Added a new default project form to improve the console onboarding experience. This allows users to easily set their project name on creation, instead of having a default name assigned to them.
`features` console
**[SUI Chain Integration](/changelog/2025-03-14)**
Added support for SUI chain integration. This new chain integration enables users to create and manage collections, mint NFTs, and perform transactions using SUI chain.
`new` chains
**[Delegated Signer Support for Solana Smart Wallets](/changelog/2025-02-26)**
Enhanced Solana smart wallet capabilities with delegated signer support, enabling more flexible wallet management and mainnet functionality.
`features` wallets
**[Managed Collections Support for Avalanche Blockchain](/changelog/2025-02-18-1)**
Added support for managed collections on the Avalanche blockchain, expanding our multi-chain capabilities for NFT management.
`features` chains
**[Walrus Storage Integration: Decentralized Storage for NFT Metadata](/changelog/2025-02-12)**
Introduced Walrus Network as a new decentralized storage solution for efficient and scalable NFT metadata hosting across multiple blockchains.
`new` infrastructure
**[Sui Blockchain Support for Custodial Wallets](/changelog/2025-01-15)**
Added support for Sui blockchain in Custodial Wallets V2, enabling wallet creation and management for this emerging blockchain.
`features` wallets
**[ApeCoin Chain Integration](/changelog/2025-01-08)**
Added support for ApeCoin chain with native APE currency integration. This new chain integration enables users to create and manage collections, mint NFTs, and perform transactions using APE as the native currency.
`new` chains
**[EVM MPC Wallet Signature Support](/changelog/2025-01-08-4)**
Added signature functionality for EVM MPC wallets, enhancing the security and capabilities of our wallet infrastructure for Ethereum Virtual Machine compatible chains.
`features` wallets, security
**[Enhanced Wallet Security with Fund Amount Metrics](/changelog/2025-01-08-3)**
Implemented comprehensive metrics tracking for custodial wallet funding to enhance security monitoring and prevent potential treasury drainage risks.
`improvements` wallets, security
**[Enhanced Stable Wallets SDK and API Compatibility](/changelog/2025-01-08-2)**
Improved SDK and API compatibility for stable wallets, ensuring seamless integration and enhanced functionality across the platform.
`improvements` wallets
**[Hosted v3 Documentation Update](/changelog/2025-01-08-1)**
Updated platform documentation to make hosted v3 the default, improving accessibility and organization of developer resources.
`changed` infrastructure
**[Scroll Chain Mainnet Launch](/changelog/2025-01-07)**
Launched full mainnet support for Scroll chain, enabling NFT minting and collection management with proven transaction capability on the Scroll network.
`new` chains
**[Send email delivery notifications to NFT recipients](/changelog/2024-09-16)**
New feature allowing customizable email notifications to be sent to NFT recipients when minting, with support for different locales and branding options
`feature` minting
**[Sponsor fees for users on the checkout](/changelog/2024-07-26)**
Added support for sponsor fee calculations during the checkout process
`new` checkout
**[Launching Orders: See who purchased your NFTs from the Console](/changelog/2024-06-05)**
New feature allowing creators to track and view NFT purchase orders directly from the Console interface
`new` console
**[Crossmint now supports SKALE](/changelog/2024-05-30)**
Launch of SKALE blockchain support for wallet creation, NFT collections, and minting on both testnet and mainnet environments
`new` chains
**[Adding Support for NFT Checkout on Apex Protocol](/changelog/2024-04-30)**
Integration of NFT Checkout functionality for Apex Protocol smart contracts, enabling credit card and crypto payments
`new` checkout
**[Deprecating Polygon Mumbai and Releasing Polygon Amoy support on Staging](/changelog/2024-04-04)**
Transition from Polygon Mumbai to Polygon Amoy testnet with timeline for Mumbai deprecation and Amoy integration
`changed` chains
**[New: You can now update compressed NFTs in Solana](/changelog/2024-02-15)**
Added support for updating compressed NFTs on Solana blockchain with same pricing as minting operations
`new` minting
**[Addition of a new webhook for the third party contracts deployed and imported on Crossmint.](/changelog/2024-02-09)**
New webhook event 'nfts.create.failed' added to track failed minting attempts for third-party contracts
`new` minting
**[Releasing Sepolia support on all EVM L2s](/changelog/2024-02-01)**
Addition of Sepolia testnet support for all EVM chains and phased deprecation plan for Goerli testnet across all networks
`new` chains
**[Event identifiers property renamed on the Webhook payload](/changelog/2024-01-11)**
Breaking changes to webhook event type names requiring updates to handle both old and new event identifiers for collection and NFT operations
`changed` infrastructure
**[Announcing Branded Checkout v2](/changelog/2023-11-30)**
Launch of new modular checkout system with improved user experience and feature customization options for all Crossmint projects
`improvement` checkout
**[Pay with crypto is now available with Embedded Checkout](/changelog/2023-11-22)**
Added support for cross-chain cryptocurrency payments in Embedded Checkout alongside existing credit card payment option
`feature` checkout
**[Deprecating Support for Arbitrum on the Staging Developer Console](/changelog/2023-11-15)**
Announcement of the deprecation of Arbitrum support in the staging developer console environment
`changed` chains
**[Contract creation is now self-serve for Optimism](/changelog/2023-11-07)**
Users can now create and deploy contracts on Optimism through a self-service process
`new` chains
**[Minting API is now self-serve for four more EVM chains](/changelog/2023-10-31)**
Self-serve Minting API support expanded to include Base, Optimism, Arbitrum, and Avalanche chains
`feature` chains
**[Support for Highlight.xyz on Crossmint](/changelog/2023-10-28)**
Added integration support for Highlight.xyz NFT marketplace on the Crossmint platform
`new`
**[Treasury Contract Upgrade](/changelog/2023-10-14)**
Details of the Treasury smart contract upgrade and its new features
`improvement` infrastructure
# Crossmint help
Source: https://docs.crossmint.com/cli/help
List all commands and provides the help documentation for a given command
Run the following command from your terminal to list all commands
````
crossmint help
```
## Options
```
$ crossmint --help # Display help for command, including the supported flags
$ crossmint -h # Display help for command, including the supported flags
```
## Example
```
Usage: crossmint [options] [command]
Crossmint CLI Tool
Options:
-V, --version output the version number
-h, --help display help for command
Commands:
keys API Keys management commands
login Login to Crossmint
logout Logout from Crossmint
projects Project management commands
whoami Show current user and environment
help [command] display help for command
```
````
# Get started with the Crossmint CLI
Source: https://docs.crossmint.com/cli/install
Manage and configure your Crossmint projects directly from the command line
export const ExternalLink = ({href}) => {
return ;
};
The Crossmint CLI is a command-line tool that allows you to interact with Crossmint directly from your terminal. It uses [homebrew](https://brew.sh/) and works on macOS and Linux.
### Prerequisites
* You'll need to have [Hombrew](https://brew.sh/) installed.
## Installing Crossmint CLI
To download and install Crossmint CLI, run the following command from your terminal:
```bash
brew tap crossmint/tap
brew install crossmint
```
To update Crossmint CLI run:
```
brew update
brew upgrade crossmint
```
## Command Reference
The Crossmint CLI provides the following commands:
| Command | Description |
| ------------------------------------------------------------------------- | ------------------------------------------------------------- |
| `crossmint login` | Login to Crossmint |
| `crossmint logout` | Logout from Crossmint |
| `crossmint whoami` | Show current user and environment |
| `crossmint help` | List and explains all commands |
| `crossmint keys create` | Create a new API Key |
| `crossmint keys list [type]` | List all API Keys (optionally filter by type: server\|client) |
| `crossmint keys delete ` | Delete an API Key |
| `crossmint keys edit ` | Edit the scopes of an API Key |
| `crossmint projects create` | Create a new project |
| `crossmint projects select` | Select a project |
| `crossmint projects details` | Show project details |
Refer to the individual command documentation for more detailed information on each command.
# Crossmint keys create
Source: https://docs.crossmint.com/cli/keys/create
Create a new API key
The keys create command allows you to create a new API key for your Crossmint project.
To use it, run the following command from your terminal
```bash
crossmint keys create
```
**Server-side keys** are view-once in Production, make sure to copy your API key secret when it’s displayed, as it
won’t be shown again.
**Client-side keys** require selecting the app type and adding allowed origins—use domain URLs for web or
package/bundle IDs for mobile.
## Example
Start the API key creation process:
```bash
crossmint keys create
```
Select the type of key you want to create:
```
? Select Key Usage: (Use arrow keys)
Server side
> Client side
```
For client-side keys, select the application type:
```
? Select client platform: (Use arrow keys)
> Web
Mobile
```
Specify the allowed origins for your key.
* For web enter the domain, eg: [https://crossmint.com](https://crossmint.com)
* For mobile enter your Android Package name or IOS Bundle ID, eg: com.company.appname
Enter multiple domains or app identifiers separated by a comma.
```
? Enter whitelisted domain or localhost (e.g., https://www.yourdomain.com) (separate multiple domains with a comma):
https://www.crossmint.com
```
Select the scopes you want to add to the key by pressing space. Once you are ready, press enter to create the key:
```
? Select scopes for client key:
● Read wallet (wallets.read)
● Create wallet (wallets.create)
○ Create Transaction (wallets.transactions.create)
○ Sign Transaction (wallets.transactions.sign)
○ Read Transactions (wallets.transactions.read)
○ Create Wallet Signatures (wallets.signatures.create)
```
The CLI will display the created API key information, this includes the Key ID and Client Secret:
```
✅ API Key created successfully!
Key ID: 67ff9c388687868382...
🔒 Key Secret: ck_production_3218u5TFZMGkK16uLbKfxDsJ4xtwSd2xtZRa9A8cbe64oRMe1J148XTGbuSvqmxB4k9TspLUAbKyt2RTqbArGBdkvARxkCg8S1tgwb4ie3gUNFw74vTuCUhSpu7ojkjGxY6epj...
```
# Crossmint keys delete
Source: https://docs.crossmint.com/cli/keys/delete
Delete an API key
The keys delete command allows you to delete an existing API key from your Crossmint project.
To use it, run the following command from your terminal
```bash
crossmint keys delete
```
Where `` is the ID of the API key you want to delete.
You can get the key id by running `keys list` command
## Example
Delete an API key:
```bash
crossmint keys delete sk_test_abcd1234
```
You will be prompted to confirm the deletion:
```
? Are you sure you want to delete this API key? This action cannot be undone. (y/N)
```
After confirming, you'll see a success message:
```
✅ API Key deleted successfully!
```
**Note:** Once an API key is deleted, any applications or services using that key will no longer be able to authenticate with the Crossmint API.
# Crossmint keys edit
Source: https://docs.crossmint.com/cli/keys/edit
Edit an API key
The keys edit command allows you to modify the scopes of an existing server API key.
To use it, run the following command from your terminal
```bash
crossmint keys edit
```
Where `` is the ID of the API key you want to edit. You can get the key id by running `keys list` command.
## Example
Edit an API key:
```bash
crossmint keys edit sk_test_abcd1234
```
For client-side keys, edit the allowed origins for your key. Press `` for editing or `` for confirming the value.
* For web enter the domain, eg: [https://crossmint.com](https://crossmint.com)
* For mobile enter your Android Package name or IOS Bundle ID, eg: com.company.appname
Enter multiple domains or app identifiers separated by a comma.
```
? Enter whitelisted domain or localhost (e.g., https://www.yourdomain.com) (separate multiple domains with a comma):
Press to edit or to confirm current value (https://www.crossmint.com)
```
The CLI will display the current scopes and prompt you to select new ones:
```
Current scopes: Wallets
? Select the new scopes for this key: (Press to select, to toggle all, to invert selection, and to proceed)
❯◉ Wallets
◉ Minting
◯ Payments
◯ Authentication
```
After selecting the new scopes, you'll see a confirmation message:
```
✅ API Key updated successfully!
```
Note: This command only works for server API keys, as client API keys do not have configurable scopes.
# Crossmint keys list
Source: https://docs.crossmint.com/cli/keys/list
List all API keys
The keys list command displays all API keys associated with your Crossmint project.
To use it, run the following command from your terminal
```bash
crossmint keys list [type]
```
Where `[type]` is an optional parameter to filter keys by type (server or client).
## Example
List all API keys:
```bash
crossmint keys list
```
```
=========
1. Key ID: 67d444369323ea298a4ef9f8
Key Secret: ******************4jTa
Type Server
Created By guille.a@paella.dev
Created 3/14/2025, 3:59:02 PM
Scopes wallets.read, wallets.create, wallets:transactions.create, wallets:transactions.sign, wallets:transactions.read, wallets:signatures.create, wallets:signatures.read, wallets:nfts.read, wallets:balance.read, wallets.fund, wallets:messages.sign
=========
2. Key ID: 679217c403723242bd87d3e75
Key Secret: ck_production_AGUysPdnSg3rW2opefTqWAbfXRaCLtEBiYCSNL7
Jbm9L
Type Client
Created 1/23/2025, 11:19:48 AM
Scopes wallets.read, wallets.create, wallets:nfts.read, wallets:transactions.create
Whitelisted App IDs com.company.appname
=========
```
List only server API keys:
```bash
crossmint keys list server
```
```
=========
1. Key ID: 67d444369bbbea298a4ef932
Key Secret: ******************4jTa
Type Server
Created By guille.a@paella.dev
Created 3/14/2025, 3:59:02 PM
Scopes wallets.read, wallets.create, wallets:transactions.create, wallets:transactions.sign, wallets:transactions.read, wallets:signatures.create, wallets:signatures.read, wallets:nfts.read, wallets:balance.read, wallets.fund, wallets:messages.sign
=========
```
# Crossmint login
Source: https://docs.crossmint.com/cli/login
Authenticate to the Crossmint platform
The login command authenticates you with the Crossmint platform. It allows you to access your account and manage API keys and projects through the CLI.
To use it, run the following command from your terminal
```bash
crossmint login
```
## Example
Start the login process:
```bash
crossmint login
```
Select an environment:
```
? Select environment: (Use arrow keys)
> Production
Staging
```
The CLI will open a browser window to authorize your device. If you're not signed in to Crossmint in the browser, you'll need to login first. Once the device is authorized, you can close the browser and return to the terminal.

```
✅ Login successful! You are now authenticated in the Production environment.
```
You'll then be prompted to select a project:
```
? Select a project: (Use arrow keys)
> My Project
Website Integration
Mobile App
```
# Crossmint logout
Source: https://docs.crossmint.com/cli/logout
Sign out from the Crossmint platform
The logout command signs you out from the Crossmint platform by removing your session token from local storage.
To use it, run the following command from your terminal
```bash
crossmint logout
```
## Example
Sign out from Crossmint:
```bash
crossmint logout
```
After running the command, you'll see a confirmation message:
```
✅ Logout successful! You are no longer authenticated.
```
After logging out, you will need to use the `login` command to authenticate again before using other commands that require authentication.
# Crossmint projects create
Source: https://docs.crossmint.com/cli/projects/create
Create a new project in Crossmint
The projects create command allows you to create a new project in your Crossmint account.
To use it, run the following command from your terminal
```bash
crossmint projects create [options]
```
## Options
| Option | Description |
| ------------------- | ------------------------ |
| `-n, --name ` | Give your project a name |
## Example
Create a new project:
```bash
crossmint projects create
```
You'll be prompted to enter a name for the project:
```
? Enter project name: My New Project
```
After entering a name, you'll see a confirmation message:
```
✔ ✅ Project created successfully!
📌 Project Details:
Name: New Project
ID: 4b0392a3-35c3-458c-a43e-32d2cdc65eda
```
You'll be ask to confirm if you want to select the created project for subsequent commands.
````
? Do you want to select this project? (Y/n)
```
You can also specify the project name directly using the `--name` option:
```bash
crossmint projects create --name "My New Project"
```
````
# Crossmint projects details
Source: https://docs.crossmint.com/cli/projects/details
View details of a project
The projects details command displays information about the currently selected project.
To use it, run the following command from your terminal
```bash
crossmint projects details
```
## Example
View details of the current project:
```bash
crossmint projects details
```
You'll see the information about your project:
```
📌 Project Details:
Name: New Project
ID: f5e37bee-1a81-4df1-8081-7670eee2a629
Wallet Type: Custodial
```
This command is useful for verifying which project you're currently working with and viewing its basic information.
# Crossmint projects select
Source: https://docs.crossmint.com/cli/projects/select
Select a project to work with
The projects select command allows you to choose which Crossmint project you want to work with for subsequent commands.
To use it, run the following command from your terminal
```bash
crossmint projects select
```
## Example
Select a project:
```bash
crossmint projects select
```
You'll be presented with a list of your projects:
```
? Select a project: (Use arrow keys)
> My New Project
Website Integration
Mobile App
Test Project
```
After selecting a project, you'll see a confirmation message:
```
✅ Project My New Project selected
```
After selecting a project, commands that require a project context (like API key management) will use the selected project.
# Crossmint whoami
Source: https://docs.crossmint.com/cli/whoami
Display current user, environment and selected project
The whoami command displays information about the currently authenticated user, the environment you're working in and the selected project.
To use it, run the following command from your terminal
```bash
crossmint whoami
```
## Example
Check your current authentication status:
```bash
crossmint whoami
```
You'll see output showing your email and environment:
```
You are logged in to 🍀Crossmint as: user@example.com - Environment: Production - Selected Project: My New Project
```
This command is useful for verifying your authentication status, checking which environment and project you're working in.
# About Crossmint
Source: https://docs.crossmint.com/introduction/about-crossmint
Crossmint is an all-in-one platform to integrate wallets, stablecoins, and other blockchain primitives into your product, AI agent, or app.
## Explore the products
Create wallets for users, agents, and companies.
Authenticate users with email, socials, or wallets.
Sell tokens and 1 billion physical products.
Fund wallets with stablecoins or crypto.
Mint, distribute, and manage tokens at scale.
Issue and verify W3C credentials.
## Explore the solutions
Add stablecoins into any product or flow
Turn agents into economic actors
Register IP rights with Story Protocol
## What makes Crossmint unique?
* **One suite for all your needs**, so you don't have to orchestrate 5-10 vendors. In addition to the products above, Crossmint saves you from separate integrations with RPCs, data APIs, AML screening providers, KYC, and other ancilliary providers, offering everything you need in a fully integrated platform.
* **Best-in-class UX for your users**: no gas fees, passphrases, transaction approval prompts, or other blockchain gimmicks.
* **Easy-to-use APIs**, which don't presume any blockchain experience, to get you started in minutes. Crossmint optionally takes care of gas fees and bills you in fiat, so you don't have to touch crypto or set up a treasury wallet.
* **No-code dashboards** for anyone in your team to manage the program - even if they aren't technical.
* **Bank-grade security**: battle-tested and trusted by major financial institutions and Fortune 500 companies like Santander Bank and Nestlé. SOC2 Type II, VASP licensed, and MiCA-ready.
* **No vendor lock-in**: change providers anytime with minimal user disruption.
## More resources
# Using AI Assistants
Source: https://docs.crossmint.com/introduction/ai-assistants
Integrate faster with Crossmint by ingesting the docs into your AI-based code helpers (like Cursor, GitHub Copilot, etc.).
{" "}
AI assistant ready docs
## Integrate with Cursor
1. Navigate to Cursor Settings > Features > Docs
2. Select "Add new doc" and paste the following URL:
```
https://docs.crossmint.com/llms-full.txt
```
3. Use `@docs -> Crossmint` to reference Crossmint's docs in your code.
# Getting Started
Source: https://docs.crossmint.com/introduction/getting-started
Before you can start integrating Crossmint into your application, you need to create a Crossmint account and set up a new project in the Staging Console. This guide will walk you through those steps.
Open Crossmint's [staging console](https://staging.crossmint.com/console) and create an account
**Ready for launch?**
When it's time to go live, simply create an account in the [production console](https://www.crossmint.com/console) and replicate the resources you need.
If you've just created an account for the first time, you'll be taken directly to project creation process. Add the name to your project and continue.
In the [overview of your project](https://staging.crossmint.com/console/overview) you will find the client and server API keys you need to integrate Crossmint into your application.
Now that your project is created in the Console, you can start integrating Crossmint products into your application.
Create wallets for users, agents, and companies.
Authenticate users with email, socials, or wallets.
Sell tokens and 1 billion physical products.
Fund wallets with stablecoins or crypto.
Mint, distribute, and manage tokens at scale.
Issue and verify W3C credentials.
# Account Verification
Source: https://docs.crossmint.com/introduction/platform/account-verification
Learn how to get your account and collection verified
Enabling certain Crossmint products requires a quick seller KYC and collection review:
| Product | Requirement |
| --------------- | -------------------------------------------------------------------------------------------- |
| Tokenization | No review required |
| Wallets | No review required |
| Fiat Checkout | Quick seller KYC & Collection Review (only for primary sales. Not required for marketplaces) |
| Crypto Checkout | Collection Review required. No KYC required. |
| Claims Page | Quick seller KYC & Collection Review |
Reviews are only required in production. Staging does not require account or collection review for any product.
Please note that each distinct project you create via the Crossmint Console will require a separate review.
Confirm that your collection is submitted for verification with all of the relevant project details to ensure timely
review. If your collection is still early in development, please refer to our [staging
environment](https://staging.crossmint.com/console) for all testing.
Reviews can take up to 3 business days. For faster reviews, consider upgrading to the Pro subscription plan, where
reviews are expedited under 24hrs. Upgrade from the [billing tab](https://www.crossmint.com/console/billing) of the
console.
### Account Verification
To enable credit card payments on primaries or set up a hosted claims page, sellers are
required to complete a
quick KYC.
You only have to verify a project once, and can create as many collections
as you wish within that project. New projects require additional verification.
Cross-chain payments do not require account verification. Sellers on marketplaces are also not required to KYC.
Account Verification requires a valid government ID and a selfie. Ensure all photos are well lit but without glare, and uncover your face removing eyewear and pulling long hair behind ears.
Crossmint offers a collection registration API and tools to verify creators and collections at scale. To learn more, [contact us](https://www.crossmint.com/contact/sales).
### Collection Verification
Crossmint reviews all collections (a) sold using Crossmint's checkout or (b) airdropped using the "hosted claims page" product.
To start the review, open your collection page in the Crossmint console, look for the "Verification
Status" card in the left navbar, and click on "Verify now" in the collection entry. Ensure your collection
meets Crossmint's [content policy](https://www.crossmint.com/content-policy), and that all the
information provided is up to date and truthful. Reviews take up to 72hrs, or 24hrs for Pro subscribers.
Crossmint does not support the sale of securities, investment contracts, or any of the other categories specified on the content policy.
Crossmint offers a collection registration API and tools to verify collections at scale. To learn more, [contact us](https://www.crossmint.com/contact/sales).
# Client-side Keys
Source: https://docs.crossmint.com/introduction/platform/api-keys/client-side
How to create and use client-side API keys
## Create a Client-side Key
Navigate to the API Keys section of the developer console and click the "Create new key" button in the client-side keys section.
* [Staging API Keys](https://staging.crossmint.com/console/projects/apiKeys)
* [Production API Keys](https://www.crossmint.com/console/projects/apiKeys)
### Setting Authorized Origins
Client-side keys are exposed in the application and thus require additional security measures. The minimum requirement is to whitelist URLs that requests can be sent from. Client-side keys support two types of origins:
#### Web Origins
For web applications, you need to add the domains that requests will be sent from. In development, you'll need to add the local domain you test your application from. This is commonly `http://localhost` followed by a port number such as `3000`, `5173`, etc. For example, when developing with NextJS, the default origin you need to authorize is `http://localhost:3000`.
The expected format for web origins is a full URL with protocol, such as `https://www.yourdomain.com` or `http://localhost:3000`.
#### Mobile App Identifiers
For mobile applications, you need to add the bundle identifiers for iOS apps or package names for Android apps. The expected format is:
* iOS: Bundle ID (e.g., `com.company.appname`)
* Android: Package name (e.g., `com.company.appname`)
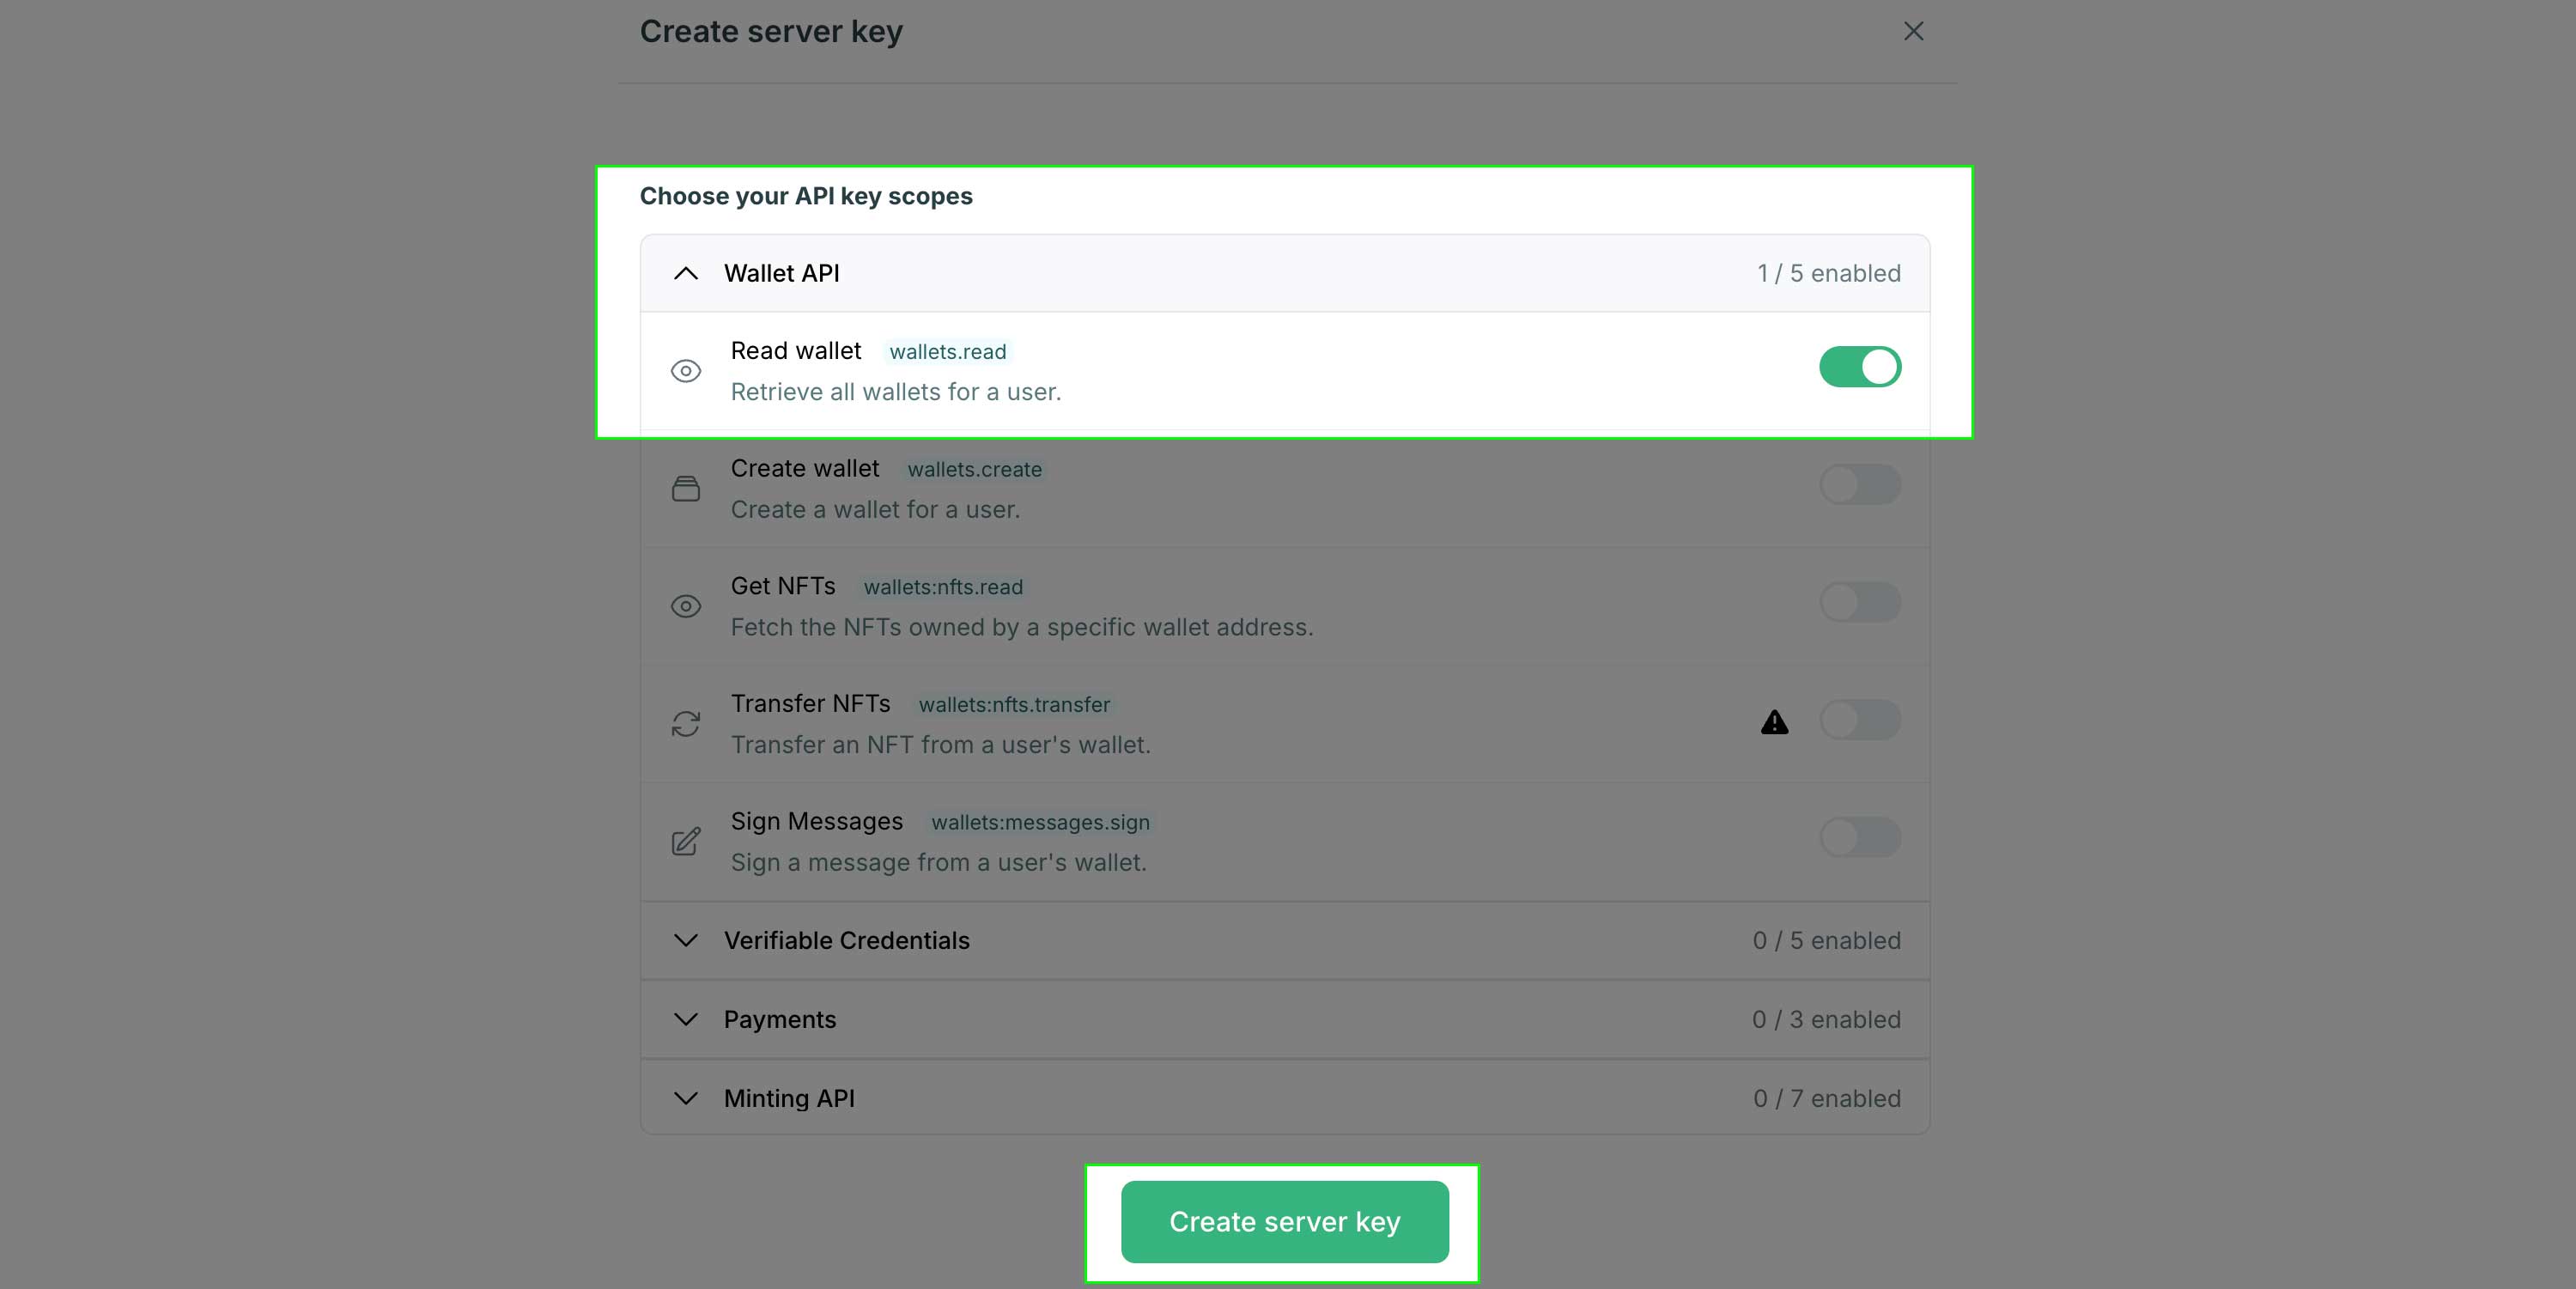
You can only register either web origins or mobile app identifiers for a single API key, not both. If you need both
types, you'll need to create separate API keys.
When you create a production API key you will need to authorize your production domain or app identifiers to use the API key. You can add multiple authorized domains or app identifiers for an API key to make requests from. Type in the domain or app identifier that you want to authorize and then click the "+ Add new origin" button.
### Select Scopes
Within the modal that opens, toggle the required scopes you want to enable. You may need to expand an accordion for the product area you're working on to expose additional scope options.
For more information on API Key scopes visit the scopes page or the API Reference.
Complete list of available API scopes
Detailed docs for all API endpoints
### JWT Authentication
Finally, select the option to require a JWT if your application or use case requires it. Enabing this setting will require that users are authenticated to permit API requests.
The [Wallets SDK](/sdk-reference/wallets/overview) requires this option to be enabled. It is optional for other
client side APIs. For more information on the options, refer to the [JWT
Authentication](/introduction/platform/api-keys/jwt-authentication) section.
If you choose to enable the JWT Authentication for your client-side API key, there are additional configurations that must be made. You can choose between Crossmint authentication (easiest), third party auth providers such as Dynamic, Auth0, Stytch, Privy or Firebase (medium), or integrating with custom solutions where you generate your own JWTs (advanced).
You can find more information and guidance in the [JWT Authentication](/introduction/platform/api-keys/jwt-authentication) section.
***
## Using a Client-side Key
There are a few different approaches to using a client-side key. The most common option is passing it to the `init` function for a supported SDK. There are also some cases where you'll pass the key as a header in a raw API call from custom code, similar to how a server-side key works.
### Initializing an SDK
The most common way you'll leverage a client-side API key is by passing it to the `init` function for a supported SDK. See the examples below.
```typescript smartWalletInit.ts
import { SmartWalletSDK } from "@crossmint/client-sdk-smart-wallet";
const sdk = SmartWalletSDK.init({
clientApiKey: process.env.NEXT_PUBLIC_CLIENT_SIDE_KEY,
});
```
```typescript credentialsInit.ts
import * as sdk from '@crossmint/client-sdk-verifiable-credentials';
sdk.CrossmintAPI.init(process.env.NEXT_PUBLIC_CLIENT_SIDE_KEY);
```
```tsx authExample.tsx
import { CrossmintProvider, CrossmintAuthProvider } from "@crossmint/client-sdk-react-ui";
export default function RootLayout({
children,
}: Readonly<{
children: React.ReactNode;
}>) {
return (
{children}
);
}
```
### Direct API Call From Client
The Headless Checkout is one example where you may be writing custom API calls from your application to create orders. In this case, you set the client-side API key as a header named `X-API-KEY`, much like you would when making a server-side API call.
```typescript
const createOrder = async (orderInput: any) => {
try {
const res = await fetch(`https://staging.crossmint.com/api/2022-06-09/orders`, {
method: "POST",
headers: {
"Content-Type": "application/json",
"x-api-key": process.env.NEXT_PUBLIC_CLIENT_SIDE_KEY,
},
body: JSON.stringify(orderInput),
});
const order = await res.json();
setOrder(order.order);
setClientSecret(order.clientSecret);
} catch (e) {
console.error(e);
throw new Error("Failed to create order");
}
};
```
# JWT Authentication
Source: https://docs.crossmint.com/introduction/platform/api-keys/jwt-authentication
Enable advanced security for client-side API Keys
JWT-based authentication is a mechanism in which you can authorize a call to a Crossmint API, scoping such calls to impact resources related to a single end-user on your platform. You have three options available when enabling this option.
1. **Crossmint Authentication** - With an easy to use react SDK you can add user creation and authentication to your application. Crossmint handles the generation of JWTs and you're able to quickly create a robust application with user access controls.
2. **Third Party Authentication providers** - There are several quality authentication providers in the market and you may already be using one of them. You can continue to use your existing auth tooling and enable Crossmint Wallets on top of them with minimal changes.
3. **Custom JWT** - This option is for providers not yet included with turn-key support or custom built solutions where you issue your own JWTs. You must be able to provide a JWKS endpoint to enable Crossmint to authenticate tokens.
Crossmint's Wallets SDK ***requires*** JWT Authentication be enabled.
## Crossmint Authentication
This option makes the most sense if you're starting a new application and do not have a pre-existing auth provider. You may also want to swap out your existing auth provider if you wish to consolidate your API providers and handle everything with Crossmint.
To use this option, select the Crossmint Auth option within the JWT Authentication section of the API keys page in the Developer Console.
## Third Party Authentication
For projects that have already implemented authentication using one of the supported providers, you can provide Crossmint with the appropriate project/environment/app ID from the settings page of the third party. Supported providers include: Dynamic, Auth0, Stytch, Privy, and Firebase.
To use this option, select the 3P Auth providers option, then choose your provider from the dropdown. Next, you'll need to find the appropriate ID that your provider gives you to identify your project. This can typically be found within the settings pane of their web interface.
## Custom JWT Auth
If your project is using an auth provider not listed in the 3P providers list or is a home-grown JWT solution, you can choose the Custom tokens option. You will need to be able to provide a JWKS endpoint that Crossmint can use to authenticate the JWTs.
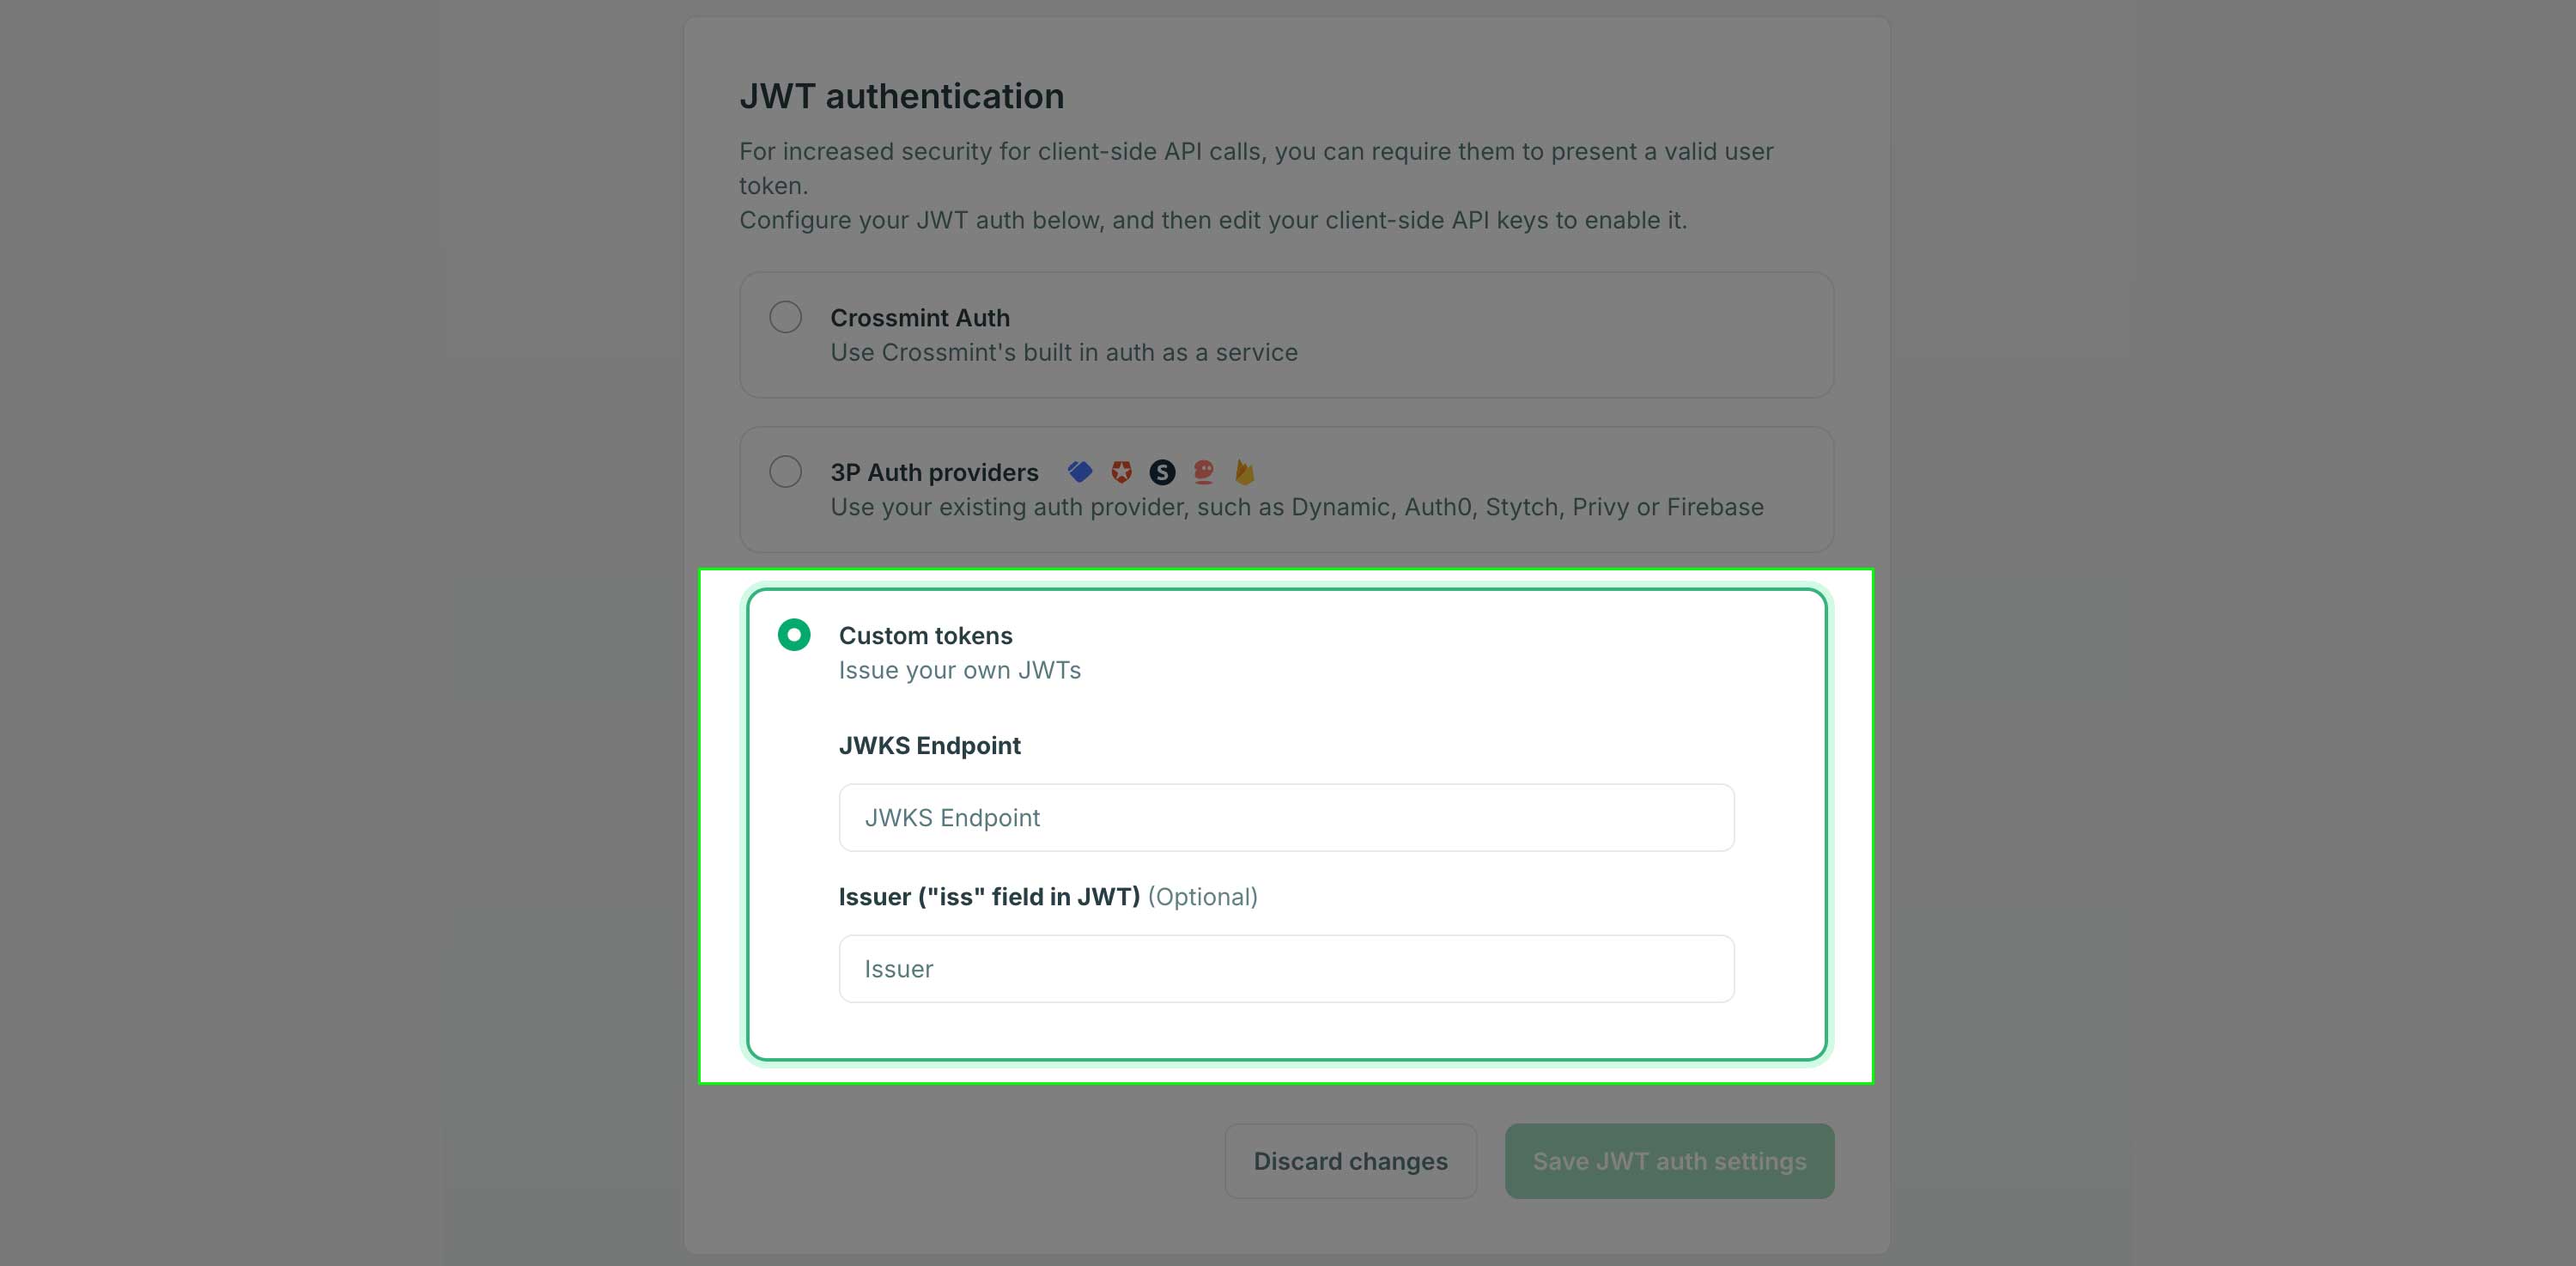
For a detailed guide on implementing this approach, check out the [Custom JWT Authentication Guide](/introduction/platform/api-keys/custom-jwt-auth-guide).
# Overview
Source: https://docs.crossmint.com/introduction/platform/api-keys/overview
Get your keys in seconds and start building
API keys are required to authorize requests against the Crossmint APIs. By using an API key, Crossmint knows which project is making the call, and can deduct credits from your balance.
## Staging vs. Production Keys
First, determine if you need a staging (testing) or production API key.
Generate API keys for testing in the staging developer console
Generate API keys for going live in the production developer console
## Server-side vs. Client-side Keys
Server-side API keys are used in server-to-server communications or in code running on a server. These keys are not exposed to the end users and can have broader permissions because they are considered more secure, being stored and used in controlled environments.
The majority of Crossmint APIs require a server-side API key. For a comprehensive list of APIs available refer to
the [API Reference](/api-reference/introduction).
Client-side API keys are used in code that runs on the client-side, such as in web browsers or mobile apps. These keys are exposed to the end user and are therefore less secure. They typically have more restrictive permissions to minimize security risks. When creating a client-side API key, you also need to configure authorized origins that are allowed to make calls to the endpoint.
Client-side keys are required for building with the [Wallets SDK](/sdk-reference/wallets/overview), Authentication, and [Headless Checkout](/payments/headless/overview).
You can also perform some custodial wallet actions with these key types. Finally, the [Verifiable Credentials SDK](/verifiable-credentials/introduction) also offers some features via client-side keys.
## More information
Information about standard rate limits and exceptions
Complete list of available API scopes
How to create and use server-side API keys
How to create and use client-side API keys
# Rate Limits
Source: https://docs.crossmint.com/introduction/platform/api-keys/rate-limits
Understand the throughput available for API calls
Rate limits prevent individual users from clogging the network. If a limit is exceeded, Crossmint will respond with HTTP 429 and require a brief waiting period before making additional requests.
[Contact us](https://www.crossmint.com/contact/sales) if you need higher rate limits.
### Base Limits
| Method(s) | Rate Limit |
| --------- | ----------------------------------- |
| POST | 120 requests per minute per project |
| PUT | Same as above |
| PATCH | Same as above |
| DELETE | Same as above |
| GET | 360 requests per minute per project |
### Exceptions
| API | Route | Method | Rate Limit |
| ------------------------------------------------------------------------ | ----------------------------------------------------------- | ------ | ------------------- |
| [Mint NFT](/api-reference/minting/nfts/mint-nft) | /api/2022-06-09/collections/\{collectionId}/nfts | POST | 600 req/min/project |
| [Mint NFT (Idempotent)](/api-reference/minting/nfts/mint-nft-idempotent) | /api/2022-06-09/collections/\{collectionId}/nfts/\{nftName} | PUT | 600 req/min/project |
| [Collection Info](/api-reference/minting/collection/get-collection) | /api/2022-06-09/collections/\{collectionId} | GET | 600 req/min/project |
| [Mint Status](/api-reference/minting/nfts/mint-status) | /api/2022-06-09/collections/\{collectionId}/nfts/\{id} | GET | 600 req/min/project |
# Scopes
Source: https://docs.crossmint.com/introduction/platform/api-keys/scopes
Enabling required permissions for API calls
Below is a complete list of the API scopes available. You can also find the scope a specific API requires in the [API Reference](/api-reference/introduction) section.
## Wallet APIs
| Scope | Description | Server Key | Client Key |
| ----------------------------- | -------------------------------------------------- | ---------- | ---------- |
| `wallets.read` | Retrieve all wallets for a user. | ✅ | ✅ |
| `wallets.create` | Create a wallet for a user. | ✅ | ✅ |
| `wallets:nfts.read` | Fetch the NFTs owned by a specific wallet address. | ✅ | ✅ |
| `wallets:balance.read` | Get the balance of a specific wallet address. | ✅ | ✅ |
| `wallets:transactions.create` | Create a transaction from a user's wallet. | ✅ | ✅ |
| `wallets:transactions.sign` | Sign a transaction from a user's wallet. | ✅ | ✅ |
| `wallets:transactions.read` | Read transactions from a user's wallet. | ✅ | ✅ |
| `wallets:signatures.create` | Create a signature for a wallet. | ✅ | ✅ |
| `wallets:signatures.read` | Read a signature for a wallet. | ✅ | ✅ |
| `wallets.fund` | Send funds to a wallet. | ✅ | ✅ |
| `wallets:nfts.transfer` | Transfer an NFT from a user's wallet. | ✅ | |
| `wallets:messages.sign` | Sign a message from a user's wallet. | ✅ | |
When using the [Wallets SDK](/sdk-reference/wallets/overview) you ***must*** use a client-side API key.
## Authentication
| Scope | Description | Server Key | Client Key |
| -------------- | ------------------------------------- | ---------- | ---------- |
| `users.create` | Create users / allow them to sign up. | | ✅ |
| `users.read` | Get profile info for user accounts. | | ✅ |
## Tokenization (Minting) APIs
| Scope | Description | Server Key | Client Key |
| ------------------------------ | -------------------------------------------------------------------------- | ---------- | ---------- |
| `nfts.create` | Mint your NFTs and deliver them to a wallet or to an email address. | ✅ | |
| `nfts.update` | Update a minted NFT's metadata on IPFS (image, description, name...). | ✅ | |
| `nfts.read` | Retrieve all metadata for an NFT. | ✅ | |
| `nfts.delete` | Burn a specific NFT within a collection. | ✅ | |
| `nfts.transfer` | Transfer an NFT to a different wallet. | ✅ | |
| `collections.create` | Create a collection of NFTs. | ✅ | |
| `collections.update` | Update information for an existing collection (image, name, royalties...). | ✅ | |
| `collections.read` | Retrieve the information about a specific collection. | ✅ | |
| `credentials.read` | Fetch credentials, some endpoints will only work with a server side key. | ✅ | ✅ |
| `credentials.decrypt` | Decrypt credentials, mainly used by our client side SDK. | ✅ | ✅ |
| `credentials:templates.create` | Create a template for your credentials. | ✅ | |
| `credentials.create` | Issue your credentials and create credential types | ✅ | |
| `credentials.delete` | Revoke a credential issued to a subject. | ✅ | |
## Checkout APIs
| Scope | Description | Server Key | Client Key |
| --------------- | ----------------------------------------------- | ---------- | ---------- |
| `orders.create` | Create an order for headless checkout. | ✅ | ✅ |
| `orders.read` | Get an existing order for headless checkout. | ✅ | ✱ |
| `orders.update` | Update an existing order for headless checkout. | ✅ | ✱ |
When updating or reading order status from the client-side, you must pass the `clientSecret` returned in the
create-order call as an `authorization` header. The `clientSecret` provides the authorization and an API Key is not
required in this use case. See [this guide](/payments/headless/guides/client-or-server#client-side-example-code) in
the Headless Checkout docs.
## Project Administration
| Scope | Description | Server Key | Client Key |
| --------------------- | ------------------------------------------------- | ---------- | ---------- |
| `billing.readonly` | Get balance in credits for a project. | ✅ | |
| `projects:usage.read` | Get usage for the different products in a project | ✅ | |
# Server-side Keys
Source: https://docs.crossmint.com/introduction/platform/api-keys/server-side
How to create and use server-side API keys
**Server-side API keys must be stored securely!**
Enable only the scopes you need, and no more, and do NOT expose your keys on the frontend of your app, or your github code repository.
## Create a Server-side Key
Navigate to the API Keys section of the developer console and click the "Create new key" button in the server-side keys section.
* [Staging API Keys](https://staging.crossmint.com/console/projects/apiKeys)
* [Production API Keys](https://www.crossmint.com/console/projects/apiKeys)
### Select Scopes
**Production server-side keys follow a "view once" policy**
When you create a server-side API key in the production environment, the key secret will only be shown once during creation. After you close the dialog or navigate away, **you will not be able to view the key secret again.**
Within the modal that opens, toggle the required scopes on and click the "Create server key" button at the bottom. You may need to expand an accordion for the product area you're working on to expose additional scope options.
You can determine the scopes you need by visiting the API reference page for the API(s) you need to interact with.
Complete list of available API scopes
Detailed docs for all API endpoints
## Using a Server-side Key
If you're using the [API Playground](/api-reference) you can add your API key in the Authorization section and this will set it as a header when making the request.
When calling the APIs from server-side code, you set the `X-API-KEY` header however the target language or library expects it. See some examples below:
```bash cURL
curl --request POST \
--url https://staging.crossmint.com/api/v1-alpha1/wallets \
--header 'Content-Type: application/json' \
--header 'X-API-KEY: YOUR_API_KEY' \
--data '{
"email": "test@test.com",
"chain": "polygon-amoy"
}'
```
```javascript JavaScript
const options = {
method: 'POST',
headers: {
'X-API-KEY': 'YOUR_API_KEY',
'Content-Type': 'application/json'
},
body: '{
"email":"test@test.com",
"chain":"polygon-amoy"
}'
};
fetch('https://staging.crossmint.com/api/v1-alpha1/wallets', options)
.then(response => response.json())
.then(response => console.log(response))
.catch(err => console.error(err));
```
All of the API routes in the [API Reference](/api-reference/introduction) include code examples for many popular programming languages.
# Project and Team Management
Source: https://docs.crossmint.com/introduction/platform/projects-and-user-management
Manage your projects and their members
## Managing Projects
A project is a group of token collections, user wallets, API keys, billing information, and more.
If you are working with different teams or clients, you can create different projects to seggregate sensitive information and tool access. Alternatively, you can issue different API keys within the same project, but bear in mind they will share the same billing account.
Every developer account automatically includes a project named `Default Project`. You can create new projects and alternate between them using the selector within the console, as illustrated in the screenshot below.
{" "}
## Privacy Policy
Projects have an option to register a link to your company's privacy policy. If set, this link will be shown to your users when they're using any Crossmint-managed user interface, such as the Checkout, where user information is collected. A privacy policy is required by law if you want to later those users' personally identifiable information, such as their email address.
If you don't already have a privacy policy, you can generate and host one using tools like [Termly](https://termly.io/).
> **Note:** Failure to add a privacy policy will result in email addresses being hidden.
#### Cases Requiring a Privacy Policy to Access User Data
| Use Case | Privacy Policy Required |
| ---------------------------- | ----------------------- |
| Payments (payment button) | Yes |
| Payments (embedded checkout) | Yes |
| Payments (headless checkout) | No |
| Mint API or console | No |
| Wallet APIs or console | No |
### Steps to Add a Privacy Policy Link
1. \**Go to the General Settings tab*
* Access the Settings page from the sidear.
2. **Include the Privacy Policy Link**
* In the project settings, locate the section for adding a privacy policy.
* Paste the URL of your privacy policy generated from Termly or any other source.
4. **Verify Email Visibility**
* After adding the privacy policy link, check to ensure that email addresses are now visible.
* If the link is not included, emails will remain hidden to protect user data.
Following these steps will ensure compliance with data protection laws and enable the visibility of email addresses in your project settings.
***
## FAQs
Crossmint requires your project's privacy policy to comply with data protection laws and ensure the privacy and
security of user data. Without it, email addresses and other sensitive information will be hidden.
Older users who joined before the privacy policy was added haven't accepted the new policy. Therefore, their
identifiers remain hidden.
Deleting the privacy policy is restricted to ensure compliance with data protection laws and maintain user
privacy and security.
Projects can be shared across multiple team members. You can add new members from the Members tab on the console. All members get the same permissions, except for the ability to delete other members, which only belongs to the creator of the project.
In order to invite a member to a project, they must already have a Crossmint account within that same environment.
{/* prettier-ignore */}
If you need to remove a team member, submit a ticket with Crossmint support.
# Staging vs Production Environments
Source: https://docs.crossmint.com/introduction/platform/staging-vs-production
Crossmint's console and first-party wallet operate in two different environments:
* **Staging:** free, for testing.
* **Production:** for your live projects. Blockchain operations incur credit costs.
You may access them from [https://staging.crossmint.com](https://staging.crossmint.com), and [https://www.crossmint.com](https://www.crossmint.com).
Staging provides free self-serve access to most functionality.
## Differences between the Environments
| | **Staging** | **Production** |
| ------------ | -------------------------------------------------------------- | ------------------------------------------------------ |
| URL | [https://staging.crossmint.com](https://staging.crossmint.com) | [https://www.crossmint.com](https://www.crossmint.com) |
| Payments | Test credit cards | Accepts real credit cards |
| API Credits | Free to test (no API credits required) | API credits required for some endpoints |
| Verification | Checkout does not require KYC or collection verification | Checkout requires KYC and collection verification |
| Blockchains | Testnets like Sepolia, and Amoy | Mainnets |
## FAQ
No, collections created in one environment will not appear in the other.
Typically, you would start developing your project in staging, and replicate and launch in production when you feel ready.
# Add an Endpoint
Source: https://docs.crossmint.com/introduction/platform/webhooks/add-endpoint
Configure an endpoint to receive webhook messages.
To add an endpoint, provide a URL you control and select the event types you want to listen to.
1. Navigate to the Webhooks page in the console.
2. Click **Add Endpoint**.
3. Provide the URL where you want to receive messages.
4. Select the event types you want to listen to.
5. Click **Create**.

### FAQs
There are many events available to subscribe to from all our products. Some examples include:
* Collection creation
* NFT minting
* NFT edits
* Transaction confirmations
* Transaction failures
You can see the full list of events in the Crossmint Console, under Integrate > Webhooks and the **Event Catalog** tab.
To verify a webhook request is legitimate, you need to verify the signature and timestamp. You can learn more about it in the [Verify webhooks](/introduction/platform/webhooks/verify-webhooks) section.
Crossmint automatically retries webhooks if your endpoint doesn't acknowledge its receipt, or throws an error. We will attempt to deliver the webhook 8 times:
* Immediately
* 5 seconds
* 5 minutes
* 30 minutes
* 2 hours
* 5 hours
* 10 hours
* 10 hours (in addition to the previous)
If, after these attempts, we're unable to deliver the message, we will mark it as failed. Inside the Webhooks page, you can manually resend the webhook.

To indicate that a webhook has been processed, return a 2xx (status code 200-299) response to the webhook message within a 15 seconds timeframe.
Some typical reasons why webhooks fail are:
* Check that the enpdpoint URL is correct and that it's expecting a POST request
* Check that the endpoint is reachable from the public internet. Make sure that CSRF protection is disabled for this endpoint.
* Check that the endpoint is returning a 2xx response code
* Check that the payload signature and timestamp are verified correctly. Remember not to modify the body string of the webhook before processing it.
# Overview
Source: https://docs.crossmint.com/introduction/platform/webhooks/overview
Listen for updates in mints, edits, collection creations, and other async events
Creating NFT collections, minting, and editing NFTs require sending operations to a blockchain. Transaction confirmation on the blockchain can take a few seconds, but during network congestion, it may take several minutes. Webhooks allow you to stay up to date on the status of these asynchronous operations.
Some cases where you may want to listen for transaction confirmations include:
* Notifying your customers via email that their NFT is ready to access
* Updating your database with the NFT ID for the user
* Showing on your website that the mint has been successful
Webhooks are how services notify each other of events. At their core, they are simply POST requests to a pre-determined endpoint. The endpoint can be any URL you choose, and you can [add them from the console](/introduction/platform/webhooks/add-endpoint).
# Verify Webhooks
Source: https://docs.crossmint.com/introduction/platform/webhooks/verify-webhooks
Verify the signature and timestamp when processing webhooks
Because of the way webhooks work, attackers can impersonate services by simply sending a fake webhook to an endpoint. Think about it: it’s just an HTTP POST from an unknown source. This can create a potential security vulnerability for many applications, or at the very least, a source of errors.
To prevent this, Crossmint signs every webhook and its metadata with a unique key for each endpoint. Use this signature to verify that the webhook indeed comes from Crossmint, and process it only if it does.
You can get the signing key secret from the Webhooks page in the console. To find it, go to the endpoint details and look for the Signing Secret section.

We are going to use the Svix open-source library to verify webhooks. First, install the relevant libraries for your language:
```js Javascript
npm install svix
// Or
yarn add svix
```
```py Python
pip install svix
```
```rust Rust
http = "1.0.0"
svix = "1.20.0"
```
```go Go
go get github.com/svix/svix-webhooks/go
```
```java Java
// Gradle: Add this dependency to your project's build file:
implementation "com.svix:svix:0.x.y"
// Maven: Add this dependency to your project's POM file:
com.svixsvix0.x.y
```
```kotlin Kotlin
// Gradle: Add this dependency to your project's build file:
implementation "com.svix.kotlin:svix-kotlin:0.x.y"
// Maven: Add this dependency to your project's POM file:
com.svix.kotlinsvix-kotlin0.x.y
```
```ruby Ruby
gem install svix
```
```csharp C#
dotnet add package Svix
```
```php PHP
composer require svix/svix
```
```bash CLI
# On macOS install via Homebrew:
brew install svix/svix/svix
# On Linux install via Scoop:
scoop bucket add svix https://github.com/svix/scoop-svix.git
scoop install svix
```
Next, verify webhooks using the code below. The payload is the raw (string) body of the request, and the headers are the headers passed in the request.
You need to use the **raw request body** when verifying webhooks, as the cryptographic signature is sensitive to even the slightest changes. Watch out for frameworks that parse the request as JSON and then stringify it, as this will break the signature verification.
See examples below for how to get the raw request body with different frameworks.
Remember to get the signature secret from the endpoint details in the console.
```js Javascript
import { Webhook } from "svix";
const secret = "whsec_MfKQ9r8GKYqrTwjUPD8ILPZIo2LaLaSw";
// These were all sent from the server
const headers = {
"svix-id": "msg_p5jXN8AQM9LWM0D4loKWxJek",
"svix-timestamp": "1614265330",
"svix-signature": "v1,g0hM9SsE+OTPJTGt/tmIKtSyZlE3uFJELVlNIOLJ1OE=",
};
const payload = '{"test": 2432232314}';
const wh = new Webhook(secret);
// Throws on error, returns the verified content on success
const payload = wh.verify(payload, headers);
```
```py Python
from svix.webhooks import Webhook
secret = "whsec_MfKQ9r8GKYqrTwjUPD8ILPZIo2LaLaSw"
# These were all sent from the server
headers = {
"svix-id": "msg_p5jXN8AQM9LWM0D4loKWxJek",
"svix-timestamp": "1614265330",
"svix-signature": "v1,g0hM9SsE+OTPJTGt/tmIKtSyZlE3uFJELVlNIOLJ1OE=",
}
payload = '{"test": 2432232314}'
wh = Webhook(secret)
# Throws on error, returns the verified content on success
payload = wh.verify(payload, headers)
```
```rust Rust
use svix::webhooks::Webhook;
let secret = "whsec_MfKQ9r8GKYqrTwjUPD8ILPZIo2LaLaSw".to_string();
let mut headers = http::HeaderMap::new();
headers.insert("svix-id", "msg_p5jXN8AQM9LWM0D4loKWxJek");
headers.insert("svix-timestamp", "1614265330");
headers.insert(
"svix-signature",
"v1,g0hM9SsE+OTPJTGt/tmIKtSyZlE3uFJELVlNIOLJ1OE=",
);
let payload = b"{\"test\": 2432232314}";
let wh = Webhook::new(&secret)?;
wh.verify(&payload, &headers)?;
// returns Ok on success, Err otherwise
```
```go Go
import (
svix "github.com/svix/svix-webhooks/go"
)
secret := "whsec_MfKQ9r8GKYqrTwjUPD8ILPZIo2LaLaSw"
// These were all sent from the server
headers := http.Header{}
headers.Set("svix-id", "msg_p5jXN8AQM9LWM0D4loKWxJek")
headers.Set("svix-timestamp", "1614265330")
headers.Set("svix-signature", "v1,g0hM9SsE+OTPJTGt/tmIKtSyZlE3uFJELVlNIOLJ1OE=")
payload := []byte(`{"test": 2432232314}`)
wh, err := svix.NewWebhook(secret)
err := wh.Verify(payload, headers)
// returns nil on success, error otherwise
```
```java Java
import com.svix.Webhook;
String secret = "whsec_MfKQ9r8GKYqrTwjUPD8ILPZIo2LaLaSw";
// These were all sent from the server
HashMap> headerMap = new HashMap>();
headerMap.put("svix-id", Arrays.asList("msg_p5jXN8AQM9LWM0D4loKWxJek"));
headerMap.put("svix-timestamp", Arrays.asList("1614265330"));
headerMap.put("svix-signature", Arrays.asList("v1,g0hM9SsE+OTPJTGt/tmIKtSyZlE3uFJELVlNIOLJ1OE="));
HttpHeaders headers = HttpHeaders.of(headerMap, BiPredicate)
String payload = "{\"test\": 2432232314}";
Webhook webhook = new Webhook(secret);
webhook.verify(payload, headers)
// throws WebhookVerificationError exception on failure.
```
```kotlin Kotlin
import com.svix.kotlin.Webhook
val secret = "whsec_MfKQ9r8GKYqrTwjUPD8ILPZIo2LaLaSw";
// These were all sent from the server
val headersMap = mapOf(
"svix-id" to listOf("msg_p5jXN8AQM9LWM0D4loKWxJek"),
"svix-timestamp" to listOf("1614265330"),
"svix-signature" to listOf("v1,g0hM9SsE+OTPJTGt/tmIKtSyZlE3uFJELVlNIOLJ1OE=")
)
val headers = HttpHeaders.of(headersMap) { _, _ -> true }
val payload = "{\"test\": 2432232314}";
val webhook = Webhook(secret);
webhook.verify(payload, headers)
// throws WebhookVerificationError exception on failure.
```
```ruby Ruby
require 'svix'
# These were all sent from the server
headers = {
"svix-id" => "msg_p5jXN8AQM9LWM0D4loKWxJek",
"svix-timestamp" => "1614265330",
"svix-signature" => "v1,g0hM9SsE+OTPJTGt/tmIKtSyZlE3uFJELVlNIOLJ1OE="
}
payload = '{"test": 2432232314}'
wh = Svix::Webhook.new("whsec_MfKQ9r8GKYqrTwjUPD8ILPZIo2LaLaSw")
# Raises on error, returns the verified content on success
json = wh.verify(payload, headers)
```
```csharp C#
using Svix;
using System.Net;
// These were all sent from the server
var headers = new WebHeaderCollection();
headers.Set("svix-id", "msg_p5jXN8AQM9LWM0D4loKWxJek");
headers.Set("svix-timestamp", "1614265330");
headers.Set("svix-signature", "v1,g0hM9SsE+OTPJTGt/tmIKtSyZlE3uFJELVlNIOLJ1OE=");
var payload = "{\"test\": 2432232314}";
var wh = new Webhook("whsec_MfKQ9r8GKYqrTwjUPD8ILPZIo2LaLaSw/Je4ZJEGP1QFb");
// Throws on error
wh.Verify(payload, headers);
```
```php PHP
// import using composers autoload
require_once('vendor/autoload.php');
// or manually
require_once('/path/to/svix/php/init.php');
// These were all sent from the server
$payload = '{"test": 2432232314}';
$header = array(
'svix-id' => 'msg_p5jXN8AQM9LWM0D4loKWxJek',
'svix-timestamp' => '1614265330',
'svix-signature' => 'v1,g0hM9SsE+OTPJTGt/tmIKtSyZlE3uFJELVlNIOLJ1OE=',
);
// Throws on error, returns the verified content on success
$wh = new \Svix\Webhook('whsec_MfKQ9r8GKYqrTwjUPD8ILPZIo2LaLaSw');
$json = $wh->verify($payload, $header);
```
```bash CLI
export SVIX_AUTH_TOKEN="AUTH_TOKEN"
svix verify --secret whsec_MfKQ9r8GKYqrTwjUPD8ILPZIo2LaLaSw --msg-id msg_p5jXN8AQM9LWM0D4loKWxJek --timestamp 1614265330 --signature v1,g0hM9SsE+OTPJTGt/tmIKtSyZlE3uFJELVlNIOLJ1OE= '{"test": 2432232314}'
```
This is a manual verification process. We recommend using a library to verify webhooks automatically.
If you need to verify manually, follow these instructions.
Each webhook call includes three headers with additional information that are used for verification:
* `svix-id`: The unique message identifier for the webhook message. This identifier is unique across all messages, but will be the same when the same webhook is resent (e.g., due to a previous failure).
* `svix-timestamp`: Timestamp in seconds since epoch.
* `svix-signature`: The Base64 encoded list of signatures (space delimited).
### Constructing the Signed Content
The content to sign is composed by concatenating the ID, timestamp, and payload, separated by the full-stop character (`.`). In code, it will look something like this:
```js
const signedContent = `${svix_id}.${svix_timestamp}.${body}`;
```
Where `body` is the raw body of the request. The signature is sensitive to any changes, so even a small change in the body will cause the signature to be completely different. This means that you should not change the body in any way before verifying.
Ensure you use the **raw request body** for verification. Parsing and re-stringifying JSON will alter the content and cause verification failure.
### Determining the Expected Signature
We use HMAC with SHA-256 to sign webhooks.
To calculate the expected signature, HMAC the `signedContent` from above using the base64 portion of your signing secret (this is the part after the `whsec_` prefix) as the key. For example, if your secret is `whsec_MfKQ9r8GKYqrTwjUPD8ILPZIo2LaLaSw`, use `MfKQ9r8GKYqrTwjUPD8ILPZIo2LaLaSw`.
For example, this is how you can calculate the signature in Node.js:
```js
const crypto = require('crypto');
const signedContent = `${svix_id}.${svix_timestamp}.${body}`;
const secret = "whsec_5WbX5kEWLlfzsGNjH64I8lOOqUB6e8FH";
// Need to base64 decode the secret
const secretBytes = Buffer.from(secret.split('_')[1], "base64");
const signature = crypto
.createHmac('sha256', secretBytes)
.update(signedContent)
.digest('base64');
console.log(signature);
```
This generated signature should match one of the ones sent in the `svix-signature` header.
The `svix-signature` header is a list of space-delimited signatures with version identifiers. The list is typically one item but can contain multiple signatures, like this:
```
v1,g0hM9SsE+OTPJTGt/tmIKtSyZlE3uFJELVlNIOLJ1OE= v1,bm9ldHUjKzFob2VudXRob2VodWUzMjRvdWVvdW9ldQo= v2,MzJsNDk4MzI0K2VvdSMjMTEjQEBAQDEyMzMzMzEyMwo=
```
Make sure to remove the version prefix and delimiter (e.g. `v1,`) before verifying the signature.
Please note that to compare the signatures it's recommended to use a constant-time string comparison method in order to prevent timing attacks.
### Verify timestamp
We include the timestamp of the attempt in the `svix-timestamp` header. Compare this timestamp against your system timestamp to ensure it’s within an acceptable tolerance to prevent replay attacks.
# Supported Chains
Source: https://docs.crossmint.com/introduction/supported-chains
Tap into 40+ chains in one single integration
Refer to the table below to see which chains are supported for which product categories.
| Blockchain | │ | Smart Wallets | MPC Wallets | Minting | Checkout | Onramp | Mainnet Label | Testnet Label |
| :---------------- | :-: | :-----------: | :---------: | :-----: | :------: | :----: | :----------------: | :------------------------: |
| Apex | │ | - | - | - | ✅ | ✅ | `apex` | - |
| Atleta | │ | ✱ | ✅ | ✅ | ✅ | ✅ | `atleta` | `atleta-testnet` |
| ApeChain | │ | ✅ | ✅ | ✅ | ✅ | ✅ | `apechain` | `curtis` |
| Aptos | │ | ✱ | ✅ | ✅ | ✱ | ✱ | `aptos` | `aptos` |
| Arbitrum One | │ | ✅ | ✅ | ✅ | ✅ | ✅ | `arbitrum` | `arbitrum-sepolia` |
| Arbitrum Nova | │ | ✅ | ✅ | ✅ | ✅ | ✅ | `arbitrumnova` | `arbitrum-sepolia` |
| Astar | │ | ✱ | ✅ | ✅ | ✅ | ✅ | `astar-zkevm` | `zkyoto` |
| Avalanche | │ | ✱ | ✅ | ✅ | ✅ | ✅ | `avalanche` | `avalanche-fuji` |
| Avalanche Subnets | │ | ✱ | ✱ | ✱ | ✱ | ✱ | `avalanche-subnet` | `avalanche-subnet-testnet` |
| Base | │ | ✅ | ✅ | ✅ | ✅ | ✅ | `base` | `base-sepolia` |
| Boss | │ | - | - | - | ✅ | - | `boss` | - |
| BSC | │ | ✅ | ✱ | ✱ | ✱ | ✱ | `bsc` | `bsc-testnet` |
| Chiliz | │ | ✱ | ✅ | ✅ | ✅ | ✅ | `chiliz` | `chiliz-spicy-testnet` |
| Coti | │ | ✱ | ✅ | ✅ | ✅ | ✅ | `coti` | `coti-testnet` |
| Ethereum | │ | ✅ | ✅ | ✱ | ✅ | ✅ | `ethereum` | `ethereum-sepolia` |
| Hedera EVM | │ | - | ✅ | ✅ | ✅ | ✅ | `hedera` | `hedera-testnet` |
| Mantle | │ | ✅ | ✅ | ✅ | ✅ | ✅ | `mantle` | `mantle-testnet` |
| Mode | │ | ✅ | ✅ | ✅ | ✅ | ✅ | `mode` | `mode-sepolia` |
| Monad | │ | ✱ | ✱ | ✱ | ✱ | ✱ | `monad` | `monad-testnet` |
| Optimism | │ | ✅ | ✅ | ✅ | ✅ | ✅ | `optimism` | `optimism-sepolia` |
| Polygon | │ | ✅ | ✅ | ✅ | ✅ | ✅ | `polygon` | `polygon-amoy` |
| Rari | │ | ✱ | ✅ | ✅ | ✅ | ✅ | `rari` | `rari-testnet` |
| Sei | │ | ✅ | ✅ | ✅ | ✅ | ✅ | `sei-pacific-1` | `sei-atlantic-2-testnet` |
| Scroll | │ | ✅ | ✅ | ✅ | ✅ | ✅ | `scroll` | `scroll-sepolia` |
| Solana | │ | ✅ | ✅ | ✅ | ✅ | ✅ | `solana` | `solana` |
| Shape | │ | ✅ | ✅ | ✅ | ✅ | ✅ | `shape` | `shape-sepolia` |
| SKALE | │ | ✱ | ✅ | ✅ | ✅ | ✅ | `skale-nebula` | `skale-nebula-testnet` |
| Soneium | │ | ✱ | ✅ | ✅ | ✅ | ✅ | `soneium` | `soneium-minato-testnet` |
| Story | │ | ✅ | ✅ | ✅ | ✱ | ✱ | `story-mainnet` | `story-testnet` |
| Sui | │ | ✱ | ✱ | ✅ | ✱ | ✱ | `sui` | - |
| U2U | │ | ✱ | ✅ | ✅ | ✅ | ✅ | `u2u` | `u2u-testnet` |
| Xion | │ | ✱ | ✅ | ✅ | ✅ | ✅ | `xion` | `xion-testnet` |
| Xai | │ | ✱ | ✅ | ✅ | ✅ | ✅ | `xai` | `xai-sepolia-testnet` |
| Zenchain | │ | ✱ | ✅ | ✅ | ✅ | ✅ | `zenchain` | `zenchain-testnet` |
| Zora | │ | ✅ | ✅ | ✅ | ✅ | ✅ | `zora` | `zora-sepolia` |
| Other EVM chains | │ | ✱ | ✱ | ✱ | ✱ | ✱ | | |
**Legend:**
* ✅ Supported
* ✱ Available, but not self-serve. [Contact us](https://www.crossmint.com/contact/sales) to request it for your project.
* `-` Not supported
Notes:
* Fungible token checkout available self service only in Solana. [Contact us](https://www.crossmint.com/contact/sales) for other chains.
Contact us. We launch new chains regularly and yours is likely in the pipeline.
## Testnets
You can access testnets by using the [staging console](https://staging.crossmint.com/console). Read more about the different environments [here](/introduction/platform/staging-vs-production).
Please refer to the supported chains table above for details about which testnet the staging environment targets. If there is not a specific testnet listed for a chain it is not supported in staging.
# Introduction
Source: https://docs.crossmint.com/minting/introduction
Mint and distribute tokens at scale, reliably
**It takes months to build secure and reliable minting infrastructure:**
1. Write and maintain token smart contracts
2. Build a backend for orchestrating all blockchain transactions
3. Securely administer keys and crypto balances
4. Add queueing, batching, RPC redundancy, priority/gas fee estimations, e2e observability...
**Crossmint manages all of this for you via a suite of APIs to create, update, delete and manage tokens of any type through REST APIs, available on any chain.**
## Key Characteristics
Easiest developer experience in the market. Launch today.
Forget about smart contracts, IPFS, wallet and key management...
Let Crossmint handle all the infrastructure, or combine it with your own.
SOC-II certified, audited smart contracts, and keys guarded by Fireblocks.
Handle millions of tokens an hour and save on customer support.
Tap into 40+ chains with one single integration.
## Quickstarts
Mint unique digital assets you can own, transfer, and verify authentically in under 5 minutes
Mint limited sets of identical digital assets in under 5 minutes
Mint credentials that users control, share, and verify anywhere in under 5 minutes.
Mint IP credentials for creators to secure their work, in under 5 minutes.
## Get Started
Get API keys and manage collections.
Test any API in seconds directly from the docs.
Contact our sales team for advanced support.
## FAQs
No, you can migrate providers anytime, transfering ownership of the smart contracts to an external wallet.
Yes, you can transfer ownership at any time. However, note that Crossmint APIs (eg. minting, editing NFTs) may
stop working on that contract unless you whitelist Crossmint on the contract to continue executing those
actions. If you transfer ownership of the contract to your own wallet, you are responsible for ensuring the
security of that wallet.
When you create an account, Crossmint automatically creates a gas station to manage network fees on your behalf. You will be billed in fiat and Crossmint will ensure you never run out of funds to support customer operations. This eliminates the need to build a cryptoaccounting system, execute recurring and expensive crypto purchases, holding the FX risk, and automating treasury operations.
When you create an account, Crossmint will automatically create a dedicated MPC vault to secure your token contracts which you can manage via API. You get one vault per project, in case you are working with multiple teams. You can transfer ownership of the contracts to an external wallet at any time.
# Bring Your Own Contract
Source: https://docs.crossmint.com/minting/nfts/integrate/bring-your-own-contract
Use Crossmint's infrastructure with your own smart contract
Crossmint allows you to use your own smart contract while leveraging our infrastructure for minting NFTs. This guide will walk you through the process of integrating your custom smart contract with Crossmint.
## Prerequisites
Before you can use your own smart contract with Crossmint, ensure that:
1. Your smart contract has a **free minting function** that allows Crossmint to mint NFTs without paying for gas.
2. Your smart contract complies with the **ERC721 standard** (for NFTs) or **ERC1155 standard** (for SFTs).
Currently, this feature is only available for EVM chains. Support for Solana and other chains is coming soon.
## Integration Guide
### 1. Register Your Smart Contract
First, you need to register your smart contract with Crossmint:
```bash cURL
curl --request POST \
--url https://staging.crossmint.com/api/2022-06-09/collections/custom \
--header 'Content-Type: application/json' \
--header 'X-API-KEY: ' \
--data '{
"chain": "polygon",
"contractAddress": "0x123...",
"metadata": {
"name": "My Custom Collection",
"description": "A collection using my own smart contract"
}
}'
```
### 2. Contract Review
After registering your contract, the Crossmint team will review it to ensure compatibility with our infrastructure. This typically takes 1-2 business days.
During the review process, we'll verify that your contract has the necessary free minting function and complies with
the required standards.
### 3. Mint NFTs
Once your contract is approved, you can start minting NFTs using the Crossmint API:
```bash cURL
curl --request POST \
--url https://staging.crossmint.com/api/2022-06-09/collections/{collectionId}/nfts \
--header 'Content-Type: application/json' \
--header 'X-API-KEY: ' \
--data '{
"recipient": "polygon:0x123...",
"contractFunction": {
"name": "mintTo",
"params": [
{
"name": "to",
"type": "address",
"value": "$RECIPIENT_ADDRESS"
},
{
"name": "tokenId",
"type": "uint256",
"value": "1"
}
]
}
}'
```
The `$RECIPIENT_ADDRESS` placeholder will be automatically replaced with the recipient's address by Crossmint.
## Contract Function Parameters
When using your own smart contract, you need to specify the contract function to call and its parameters:
* **name**: The name of the function in your smart contract that mints NFTs.
* **params**: An array of parameters to pass to the function.
* **name**: The parameter name as defined in your smart contract.
* **type**: The parameter type (e.g., address, uint256, string).
* **value**: The value to pass to the parameter.
You cannot pass custom metadata as a parameter. Metadata is controlled at the smart contract level when using your
own contract.
## Example: Minting with a Custom Contract
Here's an example of minting an NFT using a custom contract with a `mintTo` function:
```javascript
const apiKey = "YOUR_API_KEY";
const collectionId = "your-custom-collection-id";
const env = "staging"; // or "www" for production
const recipient = "polygon:0x123..."; // Recipient's wallet address
const url = `https://${env}.crossmint.com/api/2022-06-09/collections/${collectionId}/nfts`;
const options = {
method: "POST",
headers: {
accept: "application/json",
"content-type": "application/json",
"x-api-key": apiKey,
},
body: JSON.stringify({
recipient,
contractFunction: {
name: "mintTo",
params: [
{
name: "to",
type: "address",
value: "$RECIPIENT_ADDRESS",
},
{
name: "tokenId",
type: "uint256",
value: "42",
},
],
},
}),
};
fetch(url, options)
.then((response) => response.json())
.then((data) => console.log("NFT minted:", data))
.catch((error) => console.error("Error minting NFT:", error));
```
## Best Practices
When using your own smart contract with Crossmint:
1. **Test Thoroughly**: Test your contract integration in the staging environment before moving to production.
2. **Function Visibility**: Ensure your minting function has the appropriate visibility and access controls.
3. **Gas Optimization**: Optimize your contract to minimize gas costs for minting operations.
4. **Error Handling**: Implement proper error handling in your contract to provide meaningful error messages.
## FAQs
Yes, you can use an existing deployed contract as long as it meets the prerequisites mentioned above.
Your contract must have a function that allows Crossmint to mint NFTs without paying for gas. If your contract
doesn't have this, you'll need to modify it or deploy a new version.
Yes, you can still use Crossmint's email delivery system with your own contract. Just specify an email recipient
in the mint request.
Token ID management depends on your contract implementation. You can either pass a specific token ID as a
parameter or let your contract handle token ID assignment internally.
# Configure Admin Functions
Source: https://docs.crossmint.com/minting/nfts/integrate/configure-admin-functions
Manage token controls including admin burn and admin transfer
Crossmint provides admin functions that allow you to control your NFTs throughout their lifecycle.
## Admin Transfer
The NFT Admin Transfer API allows collection owners to transfer NFTs between user wallets.
Admin transfers only work for Solana cNFTs. [Contact us](https://www.crossmint.com/contact/sales) if you want to
access to this API.
## Admin Burn
The [Burn NFT API](/api-reference/minting/nfts/burn-nft) allows collection owners to permanently remove NFTs from circulation.
Once an NFT is burned, this action cannot be reversed.
## Requirements
To use admin functions:
1. Your collection must be of a supported type (Solana cNFTs for transfers, Solana cNFTs or EVM for burns)
2. Your API key must have the appropriate scopes (`nfts.transfer` for transfers, `nfts.delete` for burns)
3. You must be the collection owner or have admin privileges
# Create Collections
Source: https://docs.crossmint.com/minting/nfts/integrate/create-collections
Deploy smart contracts and NFT collections
A collection is a container of NFTs, used by applications like marketplaces and wallets to group NFTs together.
Crossmint allows you to create managed collections via API or directly from the console. Crossmint has a library of pre-audited smart contracts which work for most major use cases. However, you can also [bring your own contract](/minting/nfts/integrate/bring-your-own-contract) if you already have one.
Crossmint supports non-fungible and semi-fungible tokens (editions), free and paid mints, and builds on open ERC and Metaplex standards. On EVM chains, ERC-721 and ERC-1155 contracts are supported, while on Solana, Metaplex standard programs and compressed NFT programs are supported.
See the list of supported blockchains [here](/introduction/supported-chains)
## 1. Create and Deploy an NFT collection
The first time you mint an NFT on a specific blockchain, Crossmint will assign it, and any subsequent mints, to a default collection for that chain. You can create additional collections from the console or in a single API call (requires the API key scope `collections.create`):
```bash cURL
curl --request POST \
--url https://staging.crossmint.com/api/2022-06-09/collections/ \
--header 'content-type: application/json' \
--header 'x-api-key: ' \
--data '
{
"chain": "polygon",
"metadata": {
"name": "A new collection",
"imageUrl": "https://www.crossmint.com/assets/crossmint/logo.png",
"description": "A new collection with its own dedicated smart contract"
}
}
'
```
The collection details you provide will be displayed to your customers on marketplaces and other interfaces.
If you intend to sell the NFTs in your collection, read the guide on [how to enable
payments](/minting/nfts/integrate/list-for-sale) first.
## 2. Check the status of your collection
It takes a few seconds (up to a minute, depending on the blockchain and how congested it is) to deploy a collection.
You can use the following API to check collection status API to check what the status of a collection is. For example:
```bash cURL
curl --request GET \
--url https://staging.crossmint.com/api/2022-06-09/collections/default-solana \
--header 'x-client-secret: ' \
--header 'x-project-id: '
```
## 3. List all collections under your project
```bash cURL
curl --request GET \
--url https://staging.crossmint.com/api/2022-06-09/collections/ \
--header 'x-client-secret: ' \
--header 'x-project-id: '
```
Test any API in seconds directly from the docs.
Contact our sales team for support.
# Define Metadata
Source: https://docs.crossmint.com/minting/nfts/integrate/define-metadata
Understand NFT metadata standards & storage options
Metadata in the context of NFTs includes essential information such as the name, description, and media (e.g., images, videos) associated with the asset.
### Metadata Standards
Collection and NFT metadata (e.g. title, description, image) must be specified in JSON format and follow industry conventions to ensure it renders appropriately across wallets and marketplaces.
Crossmint supports rich metadata like audio, video, and HTML. To include rich metadata, simply populate `animation_url` as specified in the links below.
Crossmint's standard plan has a **10mb** file size limit. For larger uploads, you must upgrade to a [premium
plan](https://www.crossmint.com/contact/sales) or handle the upload yourself.
Metadata standards differ slightly across blockchains:
EVM chains follow the OpenSea standard. Refer to their official documentation to see what attributes can be included and how. Note that `name` and `image` are mandatory fields.
```json EVM Metadata Example
{
"name": "Crossmint Test NFT",
"description": "Created with the Crossmint minting API",
"image": "https://bafkreiexjl6kw4khdxkrt6dojgacscnzvrys47t472l2t7d6r2ss65kifq.ipfs.nftstorage.link/",
"external_url": "https://docs.crossmint.com",
"attributes": [
{
"trait_type": "background",
"value": "black"
},
{
"trait_type": "flavor",
"value": "minty"
}
]
}
```
Solana follows the Metaplex Metadata Standard. For more information, refer to the official Metaplex documentation - see the JSON structure section.
```json Solana Metadata Example
{
"name": "Crossmint Test NFT",
"symbol": "XMINT",
"description": "Created with the Crossmint minting API",
"seller_fee_basis_points": 5000,
"image": "https://bafkreiexjl6kw4khdxkrt6dojgacscnzvrys47t472l2t7d6r2ss65kifq.ipfs.nftstorage.link/",
"attributes": [
{
"trait_type": "background",
"value": "black"
},
{
"trait_type": "flavor",
"value": "minty"
}
],
"properties": {
"files": [
{
"uri": "https://bafkreiexjl6kw4khdxkrt6dojgacscnzvrys47t472l2t7d6r2ss65kifq.ipfs.nftstorage.link/",
"type": "image/png"
}
],
"category": "image",
"creators": [
{
"address": "xm2Mc3HEd2bGJXeqJEBrek4bj79gxzYkBaEobnpFraH",
"share": 100
}
]
}
}
```
Aptos follows the Aptos Legacy Token Standard. For more information, refer to the official Aptos Documentation - see the JSON structure section.
```json Aptos Metadata Example
{
"name": "Crossmint Test NFT",
"description": "Aptos Attributes Test",
"image": "https://www.arweave.net/abcd5678?ext=png",
"animation_url": "https://www.arweave.net/efgh1234?ext=mp4",
"external_url": "https://petra.app/",
"attributes": [
{
"trait_type": "web",
"value": "yes"
},
{
"trait_type": "mobile",
"value": "yes"
},
{
"trait_type": "extension",
"value": "yes"
}
],
"properties": {
"files": [
{
"uri": "https://www.arweave.net/abcd5678?ext=png",
"type": "image/png"
},
{
"uri": "https://watch.videodelivery.net/9876jkl",
"type": "unknown",
"cdn": true
},
{
"uri": "https://www.arweave.net/efgh1234?ext=mp4",
"type": "video/mp4"
}
],
"category": "video"
}
}
```
## Crossmint Metadata Storage
Metadata must be stored somewhere to be accessible and verifiable on the blockchain. Crossmint automatically uploads and validates metadata for you on decentralized storage solutions, ensuring a seamless minting experience.
### Supported Storage Providers
Crossmint supports two primary storage providers:
* **IPFS (InterPlanetary File System)** (Default): A widely adopted decentralized storage standard ensuring compatibility across blockchain ecosystems by enabling peer-to-peer file storage and retrieval.
* **Walrus Network**: A new decentralized storage solution designed for efficient and scalable metadata hosting. Walrus is currently not supported for EVM NFT templates.
If you are interested in using **Arweave** for metadata storage, please contact us for further information.
### Configuring Storage
By default, Crossmint uses IPFS to store metadata and media. However, if you prefer to use Walrus, you can configure this in the [Crossmint Console](https://staging.crossmint.com/console) under **Settings > General**.

{" "}
If you prefer to upload and manage media files independently, you can pass a direct URL to the [Mint API](/api-reference/minting/nfts/mint-nft)
and set the `reuploadLinkedFiles` flag to `false`. This prevents Crossmint from automatically reuploading media files
to decentralized storage.
***
## FAQs
You may store any text and image file. Additionally, you may include multi-media files such as GLTF, GLB, WEBM, MP4, M4V, OGV, and OGG, along with the audio-only extensions MP3, WAV, and OGA. Please stored them as `animation_url`.
In addition, `animation_url` also supports HTML pages, allowing you to build rich experiences and interactive NFTs using JavaScript canvas, WebGL, and more. Scripts and relative paths within the HTML page are also supported. However, access to browser extensions is not supported.
The maximum file size is 10mb. For larger files, you must upgrade to an enterprise plan or upload the metadata yourself and pass the URI to the API.
Yes. You must handle the upload yourself and pass the URL to the API.
# List for Sale
Source: https://docs.crossmint.com/minting/nfts/integrate/list-for-sale
Configure royalties and marketplace profiles for your NFT collections
When selling NFTs on secondary markets, you can configure royalties to receive a percentage of each sale and optimize your collection's marketplace profile to attract buyers.
## Sell Tokens
The [minting guide](/minting/nfts/integrate/mint-tokens) showed you how to create NFTs.
In this guide you will learn how to enable Crossmint's Checkout so you
can sell them to your customers using cryptocurrency or credit card.
### How It Works
* You can set a price in crypto (ETH, MATIC, SOL or USDC).
* For imported and secondary collections, payouts arrive instantly. For managed collections, payouts arrive after a 24-hour withholding period.
* Your customers can pay with crypto or credit card.
* You pay credits for NFT gas, user pays only for the item.
### Configure a Collection for Sale
1. [Create an NFT collection](/minting/nfts/integrate/create-collections) and navigate
to it in the console.
2. Upload NFT "templates" for all the NFTs you wish to list for sale. You
can do so from the "NFTs" tab in the console, or by using
[the API](/api-reference/minting/template/create-template).
3. Navigate to the `Checkout` entry on the navbar in the collections page.
Follow the wizard to enable payments.
4. (Production only) [Verify your account and collection](/introduction/platform/account-verification). Not required in staging.
5. Share the url or QR code with your users.
**Enable at collection creation time**
Pass a `payments` object to the [Collection Creation
API](/api-reference/minting/collection/create-collection) with the
`price`,
`recipientAddress` and `currency`. You can optionally set up a
`supplyLimit` to cap the collection supply.
The following snippet creates a new sales-enabled collection:
```bash cURL
curl --request POST \
--url https://staging.crossmint.com/api/2022-06-09/collections/ \
--header 'Content-Type: application/json' \
--header 'X-API-KEY: ' \
--data '{
"chain": "polygon",
"fungibility": "non-fungible",
"metadata": {
"description": "This is a sample NFT collection",
"imageUrl": "https://www.crossmint.com/assets/crossmint/logo.png",
"name": "Sample NFT Collection",
},
"payments": {
"price": "",
"recipientAddress": "",
"currency": "usdc"
},
"supplyLimit": 123
}'
```
**Enable on an existing collection**
If you had already created a collection, use the [Update Collection API](/api-reference/minting/collection/update-collection) to enable sales on it.
Enabling sales in production requires [verifying your account](/introduction/platform/account-verification).
***
### Set Up a Checkout
Now that your collection accepts payments, the next step is to integrate one of
Crossmint's [Checkout](/payments/introduction) variants into your app
or website, and start accepting sales.
There are two ways to integrate:
Add a button to your site which opens a checkout in a pop-up or new tab.
Insert a checkout inside your site for maximum control over the user experience.
## Set Collection Royalties
With royalties, you can receive revenue when your NFTs are traded on secondary markets. Crossmint allows you to configure royalties for a collection via API and (soon) directly from the console. You just have to specify the % of royalties and where you want those funds to be sent.
Royalties are defined at the collection level, not at the NFT level. Updating the royalties of a collection will update all NFTs, including the ones which have already been minted.
This API follows royalty standards compatible with virtually all marketplaces. However, note that some marketplaces have determined to not honor royalties, so transactions occuring there may not generate additional revenue.
Available self-serve for ERC-721 collections in EVM chains. Please [contact
us](https://www.crossmint.com/contact/sales) for ERC-1155 or Solana support.
| Endpoint | Description | |
| :------------------------------------------------------------------------- | :---------------------- | :- |
| [Add / Edit Royalties](/api-reference/minting/collection/set-royalties) | Add or edit royalties | |
| [Get Royalty Information](/api-reference/minting/collection/get-royalties) | Get royalty information | |
| [Disable Royalties](/api-reference/minting/collection/disable-royalties) | Disable royalties | |
### Add / Edit Royalties
To add or edit royalties for a collection, use the following API endpoint:
```bash cURL
curl --request POST \
--url https://staging.crossmint.com/api/v1-alpha1/minting/collections/{collectionId}/royalties \
--header 'Content-Type: application/json' \
--header 'X-API-KEY: ' \
--data '{
"recipients": [
{
"address": "0x123...",
"percentage": 5
}
]
}'
```
### Get Royalty Information
To retrieve the current royalty configuration for a collection:
```bash cURL
curl --request GET \
--url https://staging.crossmint.com/api/v1-alpha1/minting/collections/{collectionId}/royalties \
--header 'X-API-KEY: '
```
### Disable Royalties
To disable royalties for a collection:
```bash cURL
curl --request DELETE \
--url https://staging.crossmint.com/api/v1-alpha1/minting/collections/{collectionId}/royalties \
--header 'X-API-KEY: '
```
## Implementation Examples
```javascript
// Example: Setting up royalties for a new collection
const apiKey = "YOUR_API_KEY";
const collectionId = "your-collection-id";
const env = "staging"; // or "www" for production
// Define royalty recipients
const royaltyRecipients = [
{
address: "0x123abc...", // Creator wallet
basisPoints: 5 // 5% royalty
},
{
address: "0x456def...", // Community fund wallet
basisPoints: 2.5 // 2.5% royalty
}
];
// Set up royalties
const url = `https://${env}.crossmint.com/api/v1-alpha1/minting/collections/{collectionId}/royalties`;
const options = {
method: "POST",
headers: {
"Content-Type": "application/json",
"X-API-KEY": apiKey
},
body: JSON.stringify({
recipients: royaltyRecipients
})
};
fetch(url, options)
.then(response => response.json())
.then(data => console.log("Royalties configured:", data))
.catch(error => console.error("Error configuring royalties:", error));
```
## Marketplace Profile
Optimizing your collection's profile on marketplaces like OpenSea, Rarible, and others can significantly impact your NFT sales and visibility.
At this time, updating your collection profile on OpenSea, Rarible, and other marketplaces requires manual work and is limited to enterprise clients.
### Key Marketplace Profile Elements
When working with our enterprise team to configure your marketplace profile, consider these important elements:
1. **Collection Banner**: A high-quality banner image that represents your brand
2. **Collection Logo**: A distinctive logo that's recognizable at small sizes
3. **Collection Description**: A compelling description of your project and its value
4. **External Links**: Links to your website, social media, and community channels
5. **Category Tags**: Appropriate categories that help collectors discover your NFTs
## FAQs
Royalty enforcement varies by marketplace. Some marketplaces like OpenSea have made royalties optional, while
others still enforce them. Crossmint implements royalties according to blockchain standards, but cannot
guarantee enforcement across all marketplaces.
No, royalties are set at the collection level and apply to all NFTs within that collection. If you need
different royalty structures, consider creating separate collections.
Royalty changes take effect immediately for new listings. For existing listings on marketplaces, the timing
depends on how frequently each marketplace refreshes metadata.
While technically there's no upper limit, most marketplaces and collectors expect royalties between 2.5% and
10%. Setting royalties too high may discourage secondary market activity.
# Manage Delivery
Source: https://docs.crossmint.com/minting/nfts/integrate/manage-delivery
Configure recipient options and customize email delivery notifications
Crossmint provides flexible options for delivering NFTs to recipients and customizing the delivery experience. This guide covers how to specify different types of recipients and how to customize the email notifications they receive.
## Specify Recipients
You can deliver NFTs to three kinds of recipients when using minting APIs:
* [Wallet address](#send-nft-to-wallet-address): directly specify a wallet address, which could be a user owned wallet (e.g. MetaMask, Phantom, etc.) or a wallet you manage.
* [Email address](#send-nft-to-email-address): in this modality, Crossmint automatically generates a secure MPC backed custodial wallet for the email, and delivers the NFT inside.
* [User identifier](#send-nft-by-userid): in this modality, Crossmint automatically generates a wallet and associates it with an user ID from your application, and delivers the NFT inside. You must build the interface for users to access this wallet.
Check out the [create-wallet](/api-reference/wallets/create-wallet) endpoint in the API reference if you wish to
pre-create a wallet prior to invoking the mint API.
### Send NFT to Wallet Address
To mint an NFT directly to an existing blockchain address, the following `recipient` format is used:
```bash
:
```
For a full list of chain names, refer to the [Supported Chains](/introduction/supported-chains) page.
#### Examples
* EVM: `polygon:0x123...`
* Solana: `solana:3Q5...`
* Aptos: `aptos:0x0f07...`
### Send NFT to Email Address
To mint an NFT and send it to an email address, the following `recipient` format is used:
```bash
email::
```
#### Examples
* EVM: `email:demo@test.com:polygon`
* Solana: `email:demo@test.com:solana`
Minting to an email address is not currently supported on Aptos.
The NFT can then be accessed by logging into Crossmint with the specified email address:
* for `staging/testnet` NFTs: [https://staging.crossmint.com/user/collection](https://staging.crossmint.com/user/collection)
* for `mainnet` NFTs: [https://www.crossmint.com/user/collection](https://www.crossmint.com/user/collection)
### Send NFT to a Twitter/X account
To mint an NFT to a Twitter/X account, the following `recipient` format is used:
```bash
twitter::
```
#### Examples
* EVM: `twitter:@username:polygon`
* Solana: `twitter:@username:solana`
### Send NFT by `userId`
This method allows you to deliver NFTs by directly specifying the user identifier of the recipient in your system. Crossmint will fetch a custodial wallet linked to that user identifier inside your project or, if none exists, create one on the fly. Then the NFT will be delivered there. This way, you don't need to keep a mapping between your user identifiers and their wallets, just pass your user id and crossmint takes care of the rest.
Wallets created with the `userId` option cannot be accessed by logging into Crossmint.com.
To mint an NFT to this type of recipient, follow this format:
```bash
userId::
```
#### Examples
* EVM: `userId:user1234:polygon`
* Solana: `userId:user1234:solana`
## Customize Delivery Emails
Email delivery notifications can be customized to align with your branding and communication needs. This section will walk you through how to configure your email template.
### Edit the email template
To adjust the visual presentation and branding of your email notifications:
1. In the Crossmint Console, click on Settings, and navigate to the **Branding** tab.
2. Select **Deliver NFT via email** from the dropdown options.
3. Here, you can customize:
* The **logo** displayed in the email with your logo. This will default to Crossmint's logo, unless specified otherwise.
* The main **button's color** . This will default to #04AA6D (Crossmint's green).
* The **display name** textbox to include your brand's name. This will be empty, by default.
As you make adjustments, you can preview the changes. Once satisfied, save your changes and now they will apply to all future minting email notifications, related to this project. Emails now reflect your project's brand identity while providing essential delivery information to recipients.

### Enable email delivery
You should make sure email delivery notifications are enabled for the customized email to reach your users. For new projects created after [Sep 16,2024](/changelog/2024-09-16), the "sendNotification" parameter is set to `true` by default, meaning mint recipients will automatically receive email notifications.
For legacy projects, created before Sep 16 2024, "sendNotification" is set to `false` until March 14, 2025. If you choose so, you can enable email notifications for legacy projects by explicitly turning the feature on via API or via the Console.
#### Console
To send email notifications to NFT recipients:
1. Navigate to an **unminted NFT** part of a Collection in the Crossmint Console.
2. Click on the **more options** button and select **Mint & send NFT**.
3. Ensure the **Notify recipient via email** option is selected.
4. Enter the **recipient's email address** and press Mint.
The recipient will receive an email delivery notification for their newly minted NFT.
#### API
To do the same programmatically, you can configure two new parameters:
1. **sendNotification** (boolean): Determines whether the recipient will receive an email notification.
* Default value: `true` for new projects created after Sep 16, 2024.
* For legacy projects (created before Sep 16, 2024), this feature will default to `false` until March 14, 2025, unless explicitly set to `true`.
2. **locale** (string): Specifies the language for the email content. Default is `en-US` for English. We support all locales (i.e. "es-ES" for Spanish).
## FAQs
Yes, recipients can manage their email preferences through their Crossmint account settings.
If an email address is invalid, the NFT will still be minted but the notification will fail to deliver. The NFT
will be associated with the email address in Crossmint's system, but the recipient won't receive a notification.
Currently, each API call mints to a single recipient. For bulk operations, you'll need to make multiple API
calls. See the [Mint In Bulk](/minting/nfts/integrate/mint-in-bulk) guide for more information.
Crossmint doesn't currently provide delivery tracking for email notifications. For critical notifications,
consider implementing your own email delivery system alongside Crossmint's.
# Mint In Bulk
Source: https://docs.crossmint.com/minting/nfts/integrate/mint-in-bulk
Scale your NFT operations with bulk minting capabilities
Crossmint's infrastructure is designed to handle high-volume minting operations efficiently, allowing you to scale your NFT projects to serve thousands or even millions of users.
## Enterprise Solutions
For enterprise customers with very high volume requirements, Crossmint offers additional capabilities:
Enterprise bulk minting features are available for high-volume projects. Please [contact
us](https://www.crossmint.com/contact/sales) to discuss your specific requirements.
## Bulk Minting Capabilities
Crossmint's platform offers several advantages for bulk minting operations:
* **High Throughput**: Mint thousands of NFTs per hour with optimized transaction batching
* **Cost Efficiency**: Reduce gas costs through intelligent transaction scheduling
* **Queue Management**: Automatic handling of transaction queues and retries
* **Observability**: Track the status of all minting operations in real-time
* **Gas Optimization**: Automatic gas price adjustments based on network conditions
## Bulk Minting via Crossmint Console
The Crossmint Console provides an easy-to-use interface for uploading and minting NFTs in bulk. Here's how to use it:
### Step 1: Access the Batch Upload Feature
In the Crossmint Console, navigate to your collection and select the "Batch upload" option.

### Step 2: Prepare Your Metadata
Before uploading your assets, you need to prepare them properly:
1. You can upload up to 1,000 NFT collectibles at once
2. Download the example CSV file provided by Crossmint to use as a template
3. Prepare your metadata according to the template format

### Step 3: Upload Your Metadata CSV
1. Add a CSV file named `metadata.csv` with your NFT metadata
2. Click the "Upload CSV" button to upload your prepared file

### Step 4: Upload Media Files
1. Prepare your NFT media files (images, animations, videos)
2. Crossmint supports various formats (PNG, JPEG, GIF etc.)
3. Each file must be under 10MB in size
4. All media files should be in the same folder, not in subfolders
5. Click "Upload media files" to upload your prepared media

### Step 5: Complete the Upload
After uploading both your metadata CSV and media files, click the "Upload" button to start the batch minting process.

## Monitoring Bulk Operations
When minting in bulk, it's essential to track the status of your operations:
1. **Webhooks**: Set up [webhooks](/minting/nfts/integrate/webhooks-and-status-apis) to receive real-time notifications about mint completions and failures
2. **Status API**: Use the [action status API](/minting/nfts/integrate/webhooks-and-status-apis) to check the status of individual minting operations
3. **Console Dashboard**: Monitor your minting operations through the Crossmint Console
# Mint Tokens
Source: https://docs.crossmint.com/minting/nfts/integrate/mint-tokens
Create and distribute tokens at scale
To mint and airdrop unique digital assets, you can follow the guide on the [Quickstart](/minting/quickstarts/nfts). For more detail, please check the [API reference](/api-reference/minting/nfts/mint-nft). You can watch a quick video tutorial for this [here](https://youtu.be/yYJRW35zqUQ?si=b6PQTbZ7zqYVGwXw).
SFTs (semifungible tokens) follow the ERC-1155 standard. Each token is a replica of a predefined template. Each collection (smart contract) can contain multiple templates, which can contain many tokens.
To get started, it's recommended to read the [Introduction](/minting/introduction) for general information on how the minting product works.
This API only supports EVM chains self-serve. Contact us if you need support for another chain.
## 1. Create an SFT collection to hold your templates
```bash cURL
curl --request POST \
--url https://staging.crossmint.com/api/2022-06-09/collections \
--header 'accept: application/json' \
--header 'content-type: application/json' \
--header 'x-api-key: YOUR_API_KEY' \
--data '
{
"chain": "polygon",
"fungibility": "semi-fungible",
"metadata": {
"name": "My New Collection",
"imageUrl": "https://www.crossmint.com/assets/crossmint/logo.png",
"description": "A new collection with its own dedicated smart contract"
}
}'
```
```json JSON
{
"id": "5263650e-6d43-4ed3-9e31-0cf593d076a4",
"metadata": {
"name": "Test Collection",
"description": "Test",
"imageUrl": "https://cdn.io/metadata.json",
"symbol": "XMINT"
},
"fungibility": "semi-fungible",
"onChain": {
"chain": "polygon",
"type": "erc-1155"
},
"actionId": "5263650e-6d43-4ed3-9e31-0cf593d076a4"
}
```
## 2. Create a template within that collection
```bash cURL
curl --request POST \
--url https://staging.crossmint.com/api/2022-06-09/collections/{COLLECTION_ID}/templates \
--header 'accept: application/json' \
--header 'content-type: application/json' \
--header 'x-api-key: YOUR_API_KEY' \
--data '
{
"onChain": {
"tokenId": "2"
},
supply: {
limit: 10
},
"metadata": {
"name": "My template",
"image": "https://www.crossmint.com/assets/crossmint/logo.png",
"description": "A new token template for my ERC1155 collection"
}
}'
```
```json JSON
{
"templateId": "58b0c1aa-e457-48dd-bb55-5a27e6a92f74",
"metadata": {
"name": "My template",
"image": "ipfs://bafkreigbqsmxzkbjgbwtj6exfdt5z3t3swgoysf7hr6vjzddqnmykj6x2u",
"description": "A new token template for my ERC1155 collection"
},
"onChain": {
"tokenId": "1"
},
"supply": {
"limit": "10",
"minted": "0"
}
}
```
## 3. Mint an SFT from a template
Mint SFTs from the template and send them to wallets or email addresses.
```bash cURL
curl --request POST \
--url https://staging.crossmint.com/api/2022-06-09/collections/{COLLECTION_ID}/sfts \
--header 'accept: application/json' \
--header 'content-type: application/json' \
--header 'x-api-key: YOUR_API_KEY' \
--data '
{
"templateId": "58b0c1aa-e457-48dd-bb55-5a27e6a92f74",
"recipient": "email:user@example.com:polygon",
"amount": 1
}'
```
```json JSON
{
"actionId": "a91c15e3-60f2-4a45-bf1a-cee508981667",
"action": "nfts.create",
"status": "pending",
"data":
{
"chain": "polygon",
"collection":
{
"id": "84e3d617-9c1b-4e7a-9686-522a9ea7c520",
"contractAddress": "0x9b8ab8949bd7E73E61945b88F7fe12151f98ad3C"
},
"recipient":
{
"walletAddress": "0xcFDc00Cf926A5053f9Cdf004e6DF17e6dEB2E146",
"email": "testy@crossmint.com"
},
"token":
{
"id": "a91c15e3-60f2-4a45-bf1a-cee508981667"
}
},
"startedAt": "2024-01-02T22:05:01.000Z",
"resource": "https://staging.crossmint.com/api/2022-06-09/actions/a91c15e3-60f2-4a45-bf1a-cee508981667"
}
```
**All set!**
To confirm delivery, use the [transaction status API](/minting/nfts/integrate/webhooks-and-status-apis) or set up a [webhook](/minting/nfts/integrate/webhooks-and-status-apis).
## What are Compressed NFTs?
Compressed NFTs are a new standard on the Solana blockchain, for minting NFTs with the lowest cost amongst L1 and L2 blockchains, and the highest throughput (thousands of NFTs per second). Read more details about how it works [here](https://www.metaplex.com/posts/expanding-digital-assets-with-compression-for-nfts).
Using this standard to mint NFTs is extremely complicated if you manage everything on your own. On top of the intrinsic complexity usually required to mint a regular NFT, compressed NFTs require deploying and managing Merkle trees, batching, and dealing with nascent infrastructure. Crossmint also supports updating the NFT metadata after minting. Please refer to this [doc page](/minting/nfts/integrate/update-nfts).
Here's where Crossmint can help: we've done all the hard work so that minting compressed NFTs is no harder than minting regular ones: all it takes is a single API call, and you can even use one of Crossmint's no-code tools to do so.
## Current Protocol Limitations
* There's a 10-30 second delay between when an NFT is minted and it shows in wallets.
## How to use the Minting API with Compressed NFTs
The Minting API for Compressed NFTs is exactly the same as for regular NFTs, but it only works on the Solana blockchain.
POST `https://staging.crossmint.com/api/2022-06-09/collections//nfts`
You can mint both compressed and non-compressed NFTs on the same collection.
```bash cURL
curl --request POST \
--url https://staging.crossmint.com/api/2022-06-09/collections/default-solana/nfts \
--header 'Content-Type: application/json' \
--header 'X-API-KEY: ' \
--data '{
"recipient": "solana:VALID_SOLANA_WALLET_ADDRESS",
"metadata": {
"name": "Crossmint Example NFT",
"image": "https://www.crossmint.com/assets/crossmint/logo.png",
"description": "My NFT created via the mint API!"
},
"compressed": true,
"reuploadLinkedFiles": false
}'
```
The above will return an NFT ID. Use it in the next call to retrieve the mint status.
```bash cURL
curl --request GET \
--url https://staging.crossmint.com/api/2022-06-09/collections/{COLLECTION_ID}/nfts/{YOUR_NFT_ID} \
--header 'X-API-KEY: X_API_KEY'
```
Be sure to replace:
* `X_API_KEY`, `{COLLECTION_ID}` and `{YOUR_NFT_ID}`
* Recipient: change `VALID_WALLET_ADDRESS` with the wallet you want to send the NFT to
* Metadata: add the name, image, and description.
Other explorers, like Solscan, still have not added support.
There are two ways to set the transferrability of NFTs:
1. Defining it at the smart contract level
2. If you are using custodial wallets, enabling or disabling transfers from the frontend
If you want to configure it at the smart contract level, see the following endpoints:
| Endpoint | Chain | Description |
| ---------------------------------------------------------------------------- | ------------- | --------------------------------- |
| [Set Transferability](/api-reference/minting/collection/set-transferability) | EVM and Aptos | Set transferability to on or off |
| [Get Transferability](/api-reference/minting/collection/get-transferability) | EVM and Aptos | Get transferability configuration |
For Solana or other non-EVM chain support, [contact us](https://www.crossmint.com/contact/sales)
***
The API also has an idempotent version which prevents you from calling the same API action multiple times and
mitigates the risk of unwanted NFT duplicates.
## Advanced Guides
# Pricing
Source: https://docs.crossmint.com/minting/nfts/integrate/pricing
Crossmint Mint API Pricing
## Chain operations pricing
*All values shown in USD.*
| Chain | Create Collection | Update Collection | Mint NFTs | Update Royalty | Update Metadata |
| :-------------- | ----------------: | ----------------: | -----------: | -------------: | --------------: |
| Aptos | \$0.10 | Not supported | \$0.01 | Not supported | Not supported |
| Arbitrum\* | \$0.03 + gas | \$0.03 + gas | \$0.03 + gas | \$0.03 + gas | \$0.03 + gas |
| Arbitrum Nova\* | \$0.01 + gas | \$0.01 + gas | \$0.01 + gas | \$0.01 + gas | \$0.01 + gas |
| Avalanche\* | \$0.10 + gas | \$0.10 + gas | \$0.10 + gas | \$0.10 + gas | \$0.10 + gas |
| Base\* | \$0.08 + gas | \$0.08 + gas | \$0.08 + gas | \$0.08 + gas | \$0.08 + gas |
| BSC\* | \$0.01 + gas | \$0.01 + gas | \$0.01 + gas | \$0.01 + gas | \$0.01 + gas |
| Chiliz | \$1 | \$0.20 | \$0.50 | \$0.20 | \$0.20 |
| Mode | \$0.05 | \$0.05 | \$0.05 | \$0.05 | \$0.05 |
| Optimism\* | \$0.06 + gas | \$0.06 + gas | \$0.06 + gas | \$0.06 + gas | \$0.06 + gas |
| Polygon | \$0.50 | \$0.50 | \$0.10 | \$0.50 | \$0.05 |
| Rari | \$0.20 | \$0.20 | \$0.20 | \$0.20 | \$0.20 |
| Sei | \$0.05 | \$0.01 | \$0.01 | \$0.01 | \$0.01 |
| Shape | \$2 | \$2 | \$2 | \$2 | \$2 |
| Solana | \$8 | Not supported | \$0.02 | Not supported | \$0.02 |
| Skale Nebula | \$0.01 | \$0.01 | \$0.01 | \$0.01 | \$0.01 |
| Viction | \$0.01 | \$0.01 | \$0.01 | \$0.01 | \$0.01 |
| Xai | \$0.01 | \$0.01 | \$0.01 | \$0.01 | \$0.01 |
| Zora\* | \$0.08 + gas | \$0.08 + gas | \$0.08 + gas | \$0.08 + gas | \$0.08 + gas |
\*For some chains (Arbitrum, Arbitrum Nova, Avalanche, Base, BSC, Optimism, and Zora), gas fees are added to the base price. Gas fees are determined at the time the operation is submitted and depend on blockchain network congestion.
For more details, or to discuss custom pricing for large operations volumes, [contact our sales team](https://www.crossmint.com/contact/sales).
# Set up a Claims Page
Source: https://docs.crossmint.com/minting/nfts/integrate/set-up-a-claims-page
Deploy a website for your users to come claim your NFTs
The [minting guide](/minting/nfts/integrate/mint-tokens) showed you how to create NFTs.
In this guide you will learn how to set up a website where users can claim
those NFTs into their wallets, for free.
## Key Characteristics
* **Easy to set up**: no coding required.
* **No wallet required**: users can claim an NFT to their existing wallet, or,
if they didn't have one, enter an email address and have a wallet created on
the fly.
* **Bot protection**: comes with signature protected mint function, reCAPTCHA,
Cloudflare rate-limiting, and optional password protection.
* **Blockchain-less UX**: users don't need to sign any transaction, nor pay gas
fees.
If you want users to pay the gas fees when claiming a token, you can do so by [enabling
payments](/minting/nfts/integrate/list-for-sale) for your collection with a price of 0.
## Guide
1. [Create an NFT collection](/minting/nfts/integrate/create-collections) and navigate
to it in the console.
2. Upload NFT "templates" for all the NFTs you wish to list for claiming. You
can do so from the "NFTs" tab in the console, or by using
[the API](/api-reference/minting/template/create-template).
3. Navigate to the `Claims` entry on the left navbar in the collections page.
Follow the wizard to deploy a claims page. It is recommended to set a
password, so that only those who know it can claim.
4. (Optional) Customize the branding of your page.
5. (Production only) [Verify your account and collection](/introduction/platform/account-verification). Not required in staging.
6. Share the url or QR code with your users.
### FAQs
There are multiple ways:
* The claims page shows the number of items claimed
* By setting up [webhooks](/minting/nfts/integrate/webhooks-and-status-apis) to listen to mint events
* (Coming soon) Using the Crossmint console
To prevent unwanted users from minting your NFTs, you can require a password
for the claim. This can be activated from the Claims page on the console.
# Update NFTs
Source: https://docs.crossmint.com/minting/nfts/integrate/update-nfts
Make your NFTs change over time
Dynamic NFTs are tokens whose content changes over time. There are two ways to achieve this with Crossmint:
1. Using Crossmint's [Edit NFT API](/api-reference/minting/nfts/edit-nft)
2. Storing the metadata offchain and updating it on your database. To use this option, set the property `reuploadLinkedFiles` to `false` when minting an NFT.
## Using the Edit NFT API
The [Edit NFT API](/api-reference/minting/nfts/edit-nft) allows you to update the metadata of an existing NFT, including its name, description, image, and attributes. This is useful for creating NFTs that evolve over time or need to be updated based on external events.
### Prerequisites
* Ensure your API key is a server-side key with the `nfts.update` scope
* You need the collection ID and NFT ID from the minting process
### Implementation
```bash cURL
curl --request PATCH \
--url https://staging.crossmint.com/api/2022-06-09/collections/{collectionId}/nfts/{nftId} \
--header 'Content-Type: application/json' \
--header 'X-API-KEY: ' \
--data '{
"metadata": {
"description": "My updated NFT description!",
"image": "https://www.crossmint.com/assets/crossmint/updated-image.png",
"name": "Evolved NFT",
"attributes": [
{
"trait_type": "level",
"value": "2"
}
]
},
"reuploadLinkedFiles": true
}'
```
## Using Off-chain Metadata
You can also store the metadata off-chain and update it directly:
1. When minting the NFT, set `reuploadLinkedFiles` to `false`
2. Use your own server to host the metadata
3. Update the metadata on your server as needed
```javascript
// Example: Minting with off-chain metadata
const apiKey = "YOUR_API_KEY";
const chain = "polygon-amoy"; // or "ethereum-sepolia", "base-sepolia", etc.
const env = "staging"; // or "www" for production
const recipientEmail = "TEST_EMAIL_ADDRESS";
const recipientAddress = `email:${recipientEmail}:${chain}`;
// The URL to your metadata server
const metadataImgUrl = "https://your-server.com/metadata/token123.png";
const url = `https://${env}.crossmint.com/api/2022-06-09/collections/default/nfts`;
const options = {
method: "POST",
headers: {
accept: "application/json",
"content-type": "application/json",
"x-api-key": apiKey,
},
body: JSON.stringify({
recipient: recipientAddress,
metadata: {
name: "Dynamic NFT",
description: "This NFT will update over time",
image: metadataImgUrl,
},
reuploadLinkedFiles: false,
}),
};
fetch(url, options)
.then((response) => response.json())
.then((data) => console.log(data))
.catch((error) => console.error("Error:", error));
```
## Use Cases for Dynamic NFTs
Dynamic NFTs enable a wide range of applications:
* **Game Assets**: NFTs that evolve as players progress
* **Membership Passes**: NFTs that update based on membership status
* **Event Tickets**: NFTs that change before, during, and after events
* **Digital Collectibles**: NFTs that evolve based on real-world events
* **Loyalty Programs**: NFTs that update based on customer activity
## Best Practices
When implementing dynamic NFTs:
1. **Plan for Updates**: Design your NFT with future updates in mind
2. **Versioning**: Consider including version information in your metadata
3. **Event Triggers**: Define clear conditions for when updates should occur
4. **User Communication**: Inform users about how and when their NFTs might change
5. **Testing**: Thoroughly test update mechanisms before implementation
## FAQs
With Crossmint's Edit API, you can update NFTs as needed, but consider blockchain transaction costs and network
congestion. For very frequent updates, consider using off-chain metadata.
Updates don't change the token ID or ownership history, but the perceived value may change based on the nature
of the updates. It's important to communicate your update policy to collectors.
Crossmint doesn't provide native scheduling, but you can implement scheduled updates using your own backend
services that call the Edit API at specified times.
Most marketplaces will display the current state of your NFT's metadata, but the frequency of metadata refreshes
may vary by marketplace.
# Webhooks and Status APIs
Source: https://docs.crossmint.com/minting/nfts/integrate/webhooks-and-status-apis
Listen for updates in mints, edits, collection creations and other async events
Creating NFT collections and minting or [editing NFTs](/minting/nfts/integrate/update-nfts) are operations that must be sent to a blockchain. Transaction confirmation on the blockchain can take a few seconds, but during network congestion, it may take several minutes. Webhooks and the action status API allow you to stay up to date on the status of these asynchronous operations.
Some cases where you may want to listen to when transactions are confirmed include:
* Notifying your customers via email that their NFT is ready to access
* Updating your database with the NFT id for the user
* Showing in your website that that the mint has been successful
### Ways to check the status of an action
| Model | Best for | Mechanism |
| ------------------------ | --------------------------- | ----------------- |
| Pull (query for updates) | Quick testing | Action Status API |
| Push (get notified) | Scalable apps in production | Webhooks |
## Action Status APIs
Call the following API to check the status of an action:
```bash cURL
env=
YOUR_API_KEY=
actionId=
curl --request GET \
--url https://${env}.crossmint.com/api/2022-06-09/actions/${actionId}\
--header 'accept: application/json' \
--header 'x-api-key: YOUR_API_KEY'
```
* `actionID` is returned from any async API calls you perform.
* `YOUR_API_KEY` can be found in the `Developers -> API Keys` tab of the [Production](https://www.crossmint.com/console/projects/apiKeys) or [Staging](https://staging.crossmint.com/console/projects/apiKeys) consoles.
## Webhooks
In this guide, we will use nodejs to create an API endpoint to listen for and parse webhook events:
### 1. Create an endpoint route
Using a standard nodejs API server, create an endpoint.
You can test locally by installing [ngrok](https://ngrok.com/docs/getting-started/) and creating a routed endpoint to a specified port.
### 2. Configure the endpoint to read and parse webhook events
On this endpoint, modify the code to handle POST requests only. When a POST request comes through, parse the webhook event of the request body. Ensure your webhook listener responds with a `200` status code. Otherwise the webhook may be sent until you acknowledge it.
The snippet below is an example handler that parses webhook events:
```javascript
// endpoint.js
// listen to webhook ingestion
export default function handler(req, res) {
if (req.method === "POST") {
console.log(`[webhook] Successfully minted ${req.body.id}`);
}
res.status(200).json({});
}
```
Don't be strict with payload validations as Crossmint may add new fields to
the webhooks as products evolve.
Here are some examples of the webhook results (with dummy data):
```json EVM
{
"actionId": "897eadae-ee2d-43f9-a97b-1a9d9c682d6f",
"startedAt": "2023-10-04T15:48:20.000Z",
"completedAt": "2023-10-04T15:48:42.000Z",
"type": "collections.create.succeeded",
"data": {
"chain": "polygon",
"txId": "0x919ec33c1ceffd292d1d0cdd9675ffcc0af31a1f34622edd4865a9ca9fa82aa1",
"collection": {
"id": "897eadae-ee2d-43f9-a97b-1a9d9c682d6f",
"contractAddress": "0x59195995f248450267AD40CAc1d79fAAba290467"
}
},
"resource": "https://crossmint.com/api/2022-06-09/collections/897eadae-ee2d-43f9-a97b-1a9d9c682d6f"
}
```
```json Solana
{
"actionId": "01ac4b77-9bc9-42d3-a110-b0572ec299fd",
"startedAt": "2023-10-04T15:50:12.000Z",
"completedAt": "2023-10-04T15:50:23.000Z",
"type": "collections.create.succeeded",
"data": {
"chain": "solana",
"txId": "2M4tFbGWFPWAjHmZdssoTiTRjxx43nRd3vt9RpQ3wLWsW69duUhvEQrDvsyfafnQNoh6LmDQg4KPLvffgCskkwoV",
"collection": {
"id": "01ac4b77-9bc9-42d3-a110-b0572ec299fd",
"mintAddress": "JCpAQcjqWCwTpRPsMumsXtg3A4SGMXbxVbowu8qrntqt"
}
},
"resource": "https://a5b6-181-167-232-117.ngrok-free.app/api/2022-06-09/collections/01ac4b77-9bc9-42d3-a110-b0572ec299fd"
}
```
```json EVM
{
"actionId": "e0926e73-8212-4074-b934-4d6ac68cfcff",
"startedAt": "2023-10-04T15:57:14.000Z",
"completedAt": "2023-10-04T15:57:36.000Z",
"type": "collections.update.succeeded",
"data": {
"chain": "polygon",
"txId": "0x919ec33c1ceffd292d1d0cdd9675ffcc0af31a1f34622edd4865a9ca9fa82aa1",
"collection": {
"id": "897eadae-ee2d-43f9-a97b-1a9d9c682d6f",
"contractAddress": "0x59195995f248450267AD40CAc1d79fAAba290467"
},
"changes": ["supplyLimit"]
},
"resource": "https://crossmint.com/api/2022-06-09/collections/e0926e73-8212-4074-b934-4d6ac68cfcff",
"timestamp": 1696424259573
}
```
```json EVM
{
"type": "nfts.create.succeeded",
"actionId": "771d7e38-2890-47d7-b733-a1462736b528",
"startedAt": "2023-10-04T19:59:47.000Z",
"completedAt": "2023-10-04T20:00:00.000Z",
"data": {
"chain": "polygon",
"txId": "0x919ec33c1ceffd292d1d0cdd9675ffcc0af31a1f34622edd4865a9ca9fa82aa1",
"collection": {
"id": "default-polygon",
"contractAddress": "0x2DdDDEe8dad8b2ec123F5ceEc3E8dA4E57C0ed29"
},
"recipient": {
"walletAddress": "0x10324e5B8879CA6662ff83617F74b0AaD251b819",
"email": "recipient@crossmint.com"
},
"token": {
"id": "771d7e38-2890-47d7-b733-a1462736b528",
"owner": {
"walletAddress": "0x10324e5B8879CA6662ff83617F74b0AaD251b819"
},
"tokenId": "15"
}
},
"resource": "https://crossmint.com/api/2022-06-09/collections/default-polygon/nfts/771d7e38-2890-47d7-b733-a1462736b528"
}
```
```json Solana
{
"type": "nfts.create.succeeded",
"actionId": "2c5f9ec6-ae68-4e17-a671-db4af2208a2d",
"startedAt": "2023-10-04T20:01:21.000Z",
"completedAt": "2023-10-04T20:01:27.000Z",
"data": {
"chain": "solana",
"txId": "2M4tFbGWFPWAjHmZdssoTiTRjxx43nRd3vt9RpQ3wLWsW69duUhvEQrDvsyfafnQNoh6LmDQg4KPLvffgCskkwoV",
"collection": {
"id": "default-solana",
"mintAddress": "qCTMcsRBYYt1YKDAkJnstjgXJU625YX5LBfwsUi1Mn4"
},
"recipient": {
"walletAddress": "EjLpq6RAxzPuwjcwJ2C6ZjwrFZuqhu2CiVTDzkSSCE5B",
"email": "recipient@crossmint.com"
},
"token": {
"id": "2c5f9ec6-ae68-4e17-a671-db4af2208a2d",
"owner": {
"walletAddress": "EjLpq6RAxzPuwjcwJ2C6ZjwrFZuqhu2CiVTDzkSSCE5B"
},
"mintHash": "Gec66rG8Rj6Q2nqaFpGRvggiAfriMb93o28qGSeeY1gJ"
}
},
"resource": "https://staging.crossmint.com/api/2022-06-09/collections/default-solana/nfts/2c5f9ec6-ae68-4e17-a671-db4af2208a2d",
"timestamp": 1696449687501
}
```
```json EVM
{
"actionId":"cf9985d3-3341-4fd6-bd0e-548ef97a3486",
"startedAt":"2024-02-05T21:48:17.000Z",
"type":"nfts.create.failed",
"data":{
"chain":"polygon",
"collection":{
"id":"297199ba-c763-4464-b592-26c2ca2dbe5d",
"contractAddress":"0x2ADBeb5e1976615883D3c5F07234E38b50e09edB"
},
"contractArguments":{
"key":28
},
"recipient":{
"walletAddress":"0x78359E7dF948834caFEcBE0494B010C6f7f7fA74"
},
"token":{
"id":"cf9985d3-3341-4fd6-bd0e-548ef97a3486"
},
"error":{
"reason":"execution_reverted",
"message":"Minting smart contract reverted. Check 'revertReason' for details",
"revertReason":"execution reverted: Wrong value for key",
"callInfo":{
"functionName":"mintTo",
"arguments":{
"key":28,
"recipient":"0x78359E7dF948834caFEcBE0494B010C6f7f7fA74"
},
"calldata":"0x449a52f800000000000000000000000078359e7df948834cafecbe0494b010c6f7f7fa74000000000000000000000000000000000000000000000000000000000000001c"
}
}
},
"resource":"https://1a7a-181-110-64-58.ngrok-free.app/api/2022-06-09/collections/297199ba-c763-4464-b592-26c2ca2dbe5d/nfts/cf9985d3-3341-4fd6-bd0e-548ef97a3486",
"timestamp":1707158908733
}
```
```json EVM
{
"type": "nfts.update.succeeded",
"actionId": "f7fedd17-2feb-4bc9-88fa-8890ea8f99e8",
"startedAt": "2023-10-04T20:09:27.000Z",
"completedAt": "2023-10-04T20:09:35.000Z",
"data": {
"chain": "polygon",
"txId": "0x919ec33c1ceffd292d1d0cdd9675ffcc0af31a1f34622edd4865a9ca9fa82aa1",
"collection": {
"id": "default-polygon",
"contractAddress": "0x2DdDDEe8dad8b2ec123F5ceEc3E8dA4E57C0ed29"
},
"token": {
"id": "210a95ab-d59c-41ef-9f60-8e41550a753e",
"owner": {
"walletAddress": "0x10324e5B8879CA6662ff83617F74b0AaD251b819"
},
"tokenId": "16"
},
"changes": ["metadata"]
},
"resource": "https://crossmint.com/api/2022-06-09/collections/default-polygon/nfts/f7fedd17-2feb-4bc9-88fa-8890ea8f99e8",
"timestamp": 1696450175660
}
```
```json Solana
{
"type": "nfts.update.succeeded",
"actionId": "57d3cedd-e8e8-4509-88bc-97d6baea478f",
"startedAt": "2023-10-04T20:07:55.000Z",
"completedAt": "2023-10-04T20:08:01.000Z",
"data": {
"chain": "solana",
"txId": "2M4tFbGWFPWAjHmZdssoTiTRjxx43nRd3vt9RpQ3wLWsW69duUhvEQrDvsyfafnQNoh6LmDQg4KPLvffgCskkwoV",
"collection": {
"id": "default-solana",
"mintAddress": "qCTMcsRBYYt1YKDAkJnstjgXJU625YX5LBfwsUi1Mn4"
},
"token": {
"id": "1f3f0959-417d-43a7-95f8-39e6f22d5573",
"owner": {
"walletAddress": "EjLpq6RAxzPuwjcwJ2C6ZjwrFZuqhu2CiVTDzkSSCE5B"
},
"mintHash": "BnyGQcmU4mXMi5NMUuKTjFdYkg79RZoBX3qCWdXZVcyb"
},
"changes": ["metadata"]
},
"resource": "https://crossmint.com/api/2022-06-09/collections/default-solana/nfts/57d3cedd-e8e8-4509-88bc-97d6baea478f",
"timestamp": 1696450081841
}
```
### 3. Pre & post processing
Add your pre and post processing logic when setting up your webhook listener. For example, you can call back to your database when a certain id has succeeded or even use Sendgrid or EmailJS to send an email to a recipient when a mint completes.
### 4. Setting Up Webhooks on the Crossmint Console
Add an endpoint for the event `mint.succeeded` by following [this guide](/introduction/platform/webhooks/add-endpoint).
Once completed, you'll be redirected to the endpoint details page. Here, you can find the signing secret for [verifying webhooks](/introduction/platform/webhooks/verify-webhooks) and view a table of all triggered webhook events.
The final step is to test the endpoint. To do so, mint one or two NFTs with the API and observe the responses to verify setup success.
## Webhook video walkthrough
# Quickstart ⚡
Source: https://docs.crossmint.com/minting/quickstarts/credentials
Mint credentials that users control, share, and verify anywhere in under 5 minutes
In this quickstart you will learn how to create, issue, and verify credentials.
## What are credentials?
A digital credential is an electronic record issued by a trusted source that certifies specific information about a person or entity. Crossmint makes it easy to issue, manage, and verify credentials onchain, following the [W3C VC standard](https://www.w3.org/TR/vc-data-model-2.0/).
For a comprehensive guide on Verifiable Credentials, please visit the [Verifiable Credentials section](/verifiable-credentials/introduction).
Verifiable Credentials is an Enterprise feature. Contact Sales{" "}
for access.
## Integration steps
### 1. Create a Developer Account
### 2. Get an API Key
Within the "Server-side keys" section, click the "Create new key" button in the top right.
Then, check the scopes `credentials.create`, `credentials.read`, and `credentials:templates.create` under the "Verifiable Credentials"
category and create your key. Save this key for the next step.
### 3. Create a Credential Template
To mint a credential, we need to create a credential template that follows an already defined credential type. In this quickstart we will use the already-created `CourseCompletionCertificate` type.
```javascript createTemplate.js
const apiKey = "YOUR_API_KEY";
const env = "staging"; // or "www"
const url = `https://${env}.crossmint.com/api/v1-alpha1/credentials/templates`;
const options = {
method: "POST",
headers: {
accept: "application/json",
"content-type": "application/json",
"x-api-key": apiKey,
},
body: JSON.stringify({
credentials: {
type: "crossmint:bedea4c5-4cea-425b-99c7-797ecbc8bc13:CourseCompletionCertificate",
encryption: "none",
storage: "crossmint",
subject: {
properties: {
course: {
type: "string",
title: "Course",
description: "Course name",
},
grade: {
type: "string",
title: "Grade",
description: "Grade received",
},
},
required: ["course", "grade"],
},
},
metadata: {
name: "Certificate of Completion",
description: "A certificate issued upon completion of a course",
imageUrl: "https://www.crossmint.com/assets/crossmint/logo.png",
},
chain: "polygon-amoy",
}),
};
fetch(url, options)
.then((res) => res.json())
.then((json) => console.log(json))
.catch((err) => console.error("error:" + err));
```
```json JSON
{
"id": "a9e3016b-66f0-40ab-8d72-6546fddc7b72",
"metadata": {
"description": "A certificate issued upon completion of a course",
"name": "Certificate of Completion",
"imageUrl": "ipfs://QmaToZn4VEjF7q4CAudPaNka6AD484xuuEZSXmTLJPDLVE"
},
"fungibility": "non-fungible",
"onChain": { "chain": "polygon-amoy", "type": "erc-721" },
"subscription": { "enabled": false },
"actionId": "a9e3016b-66f0-40ab-8d72-6546fddc7b72"
}
```
Save the `id` from the response as your `TEMPLATE_ID` for the next step.
### 4. Issue a Credential
Now, let's issue a credential using our template:
```javascript issueCredential.js
const apiKey = "YOUR_API_KEY";
const env = "staging"; // or "www"
const templateId = "YOUR_TEMPLATE_ID";
const recipientEmail = "TEST_EMAIL_ADDRESS";
const url = `https://${env}.crossmint.com/api/v1-alpha1/credentials/templates/${templateId}/vcs`;
const options = {
method: "POST",
headers: {
accept: "application/json",
"content-type": "application/json",
"x-api-key": apiKey,
},
body: JSON.stringify({
recipient: `email:${recipientEmail}:polygon-amoy`,
credential: {
// The CourseCompletionCertificate credential type requires course and grade declarations
subject: {
course: "Blockchain 101",
grade: "A",
},
expiresAt: "2034-02-02",
},
}),
};
fetch(url, options)
.then((res) => res.json())
.then((json) => console.log(json))
.catch((err) => console.error("error:" + err));
```
```json JSON
{
"id": "6728f773-61af-4732-a34f-b5a50d8b9872",
"onChain": {
"status": "pending",
"chain": "polygon-amoy",
"contractAddress": "0x45c9597b5441289C134E554990cdb647f65df5FB"
},
"credentialId": "urn:uuid:e6b3dc76-a337-437b-ac1b-3d330e66e1a6",
"actionId": "6728f773-61af-4732-a34f-b5a50d8b9872"
}
```
Save the credential `id` from the response for the next step.
### 5. Retrieve a Credential
To retrieve a credential:
```javascript getCredential.js
const apiKey = "YOUR_API_KEY";
const env = "staging"; // or "www"
const credentialId = "YOUR_CREDENTIAL_ID";
const url = `https://${env}.crossmint.com/api/v1-alpha1/credentials/${credentialId}`;
const options = {
method: "GET",
headers: {
accept: "application/json",
"x-api-key": apiKey,
},
};
fetch(url, options)
.then((res) => res.json())
.then((json) => console.log(json))
.catch((err) => console.error("error:" + err));
```
```json JSON
{
"unencryptedCredential": {
"id": "urn:uuid:e6b3dc76-a337-437b-ac1b-3d330e66e1a6",
"credentialSubject": {
"course": "Blockchain 101",
"grade": "A",
"id": "did:polygon-amoy:0x2da3151C266185c4861b45277dbbe56Cb613963e"
},
"validUntil": "2034-02-02",
"nft": {
"tokenId": "1",
"chain": "polygon-amoy",
"contractAddress": "0x45c9597b5441289C134E554990cdb647f65df5FB"
},
"issuer": {
"id": "did:polygon-amoy:0x1785A5DE9e0F06791393739De496a0a2c9ACA855"
},
"type": ["VerifiableCredential", "Course completion"],
"validFrom": "2025-05-28T14:31:03.514Z",
"@context": ["https://www.w3.org/ns/credentials/v2"],
"proof": {
"verificationMethod": "did:polygon-amoy:0x1785A5DE9e0F06791393739De496a0a2c9ACA855#evmAddress",
"created": "2025-05-28T14:31:03.514Z",
"proofPurpose": "assertionMethod",
"type": "EthereumEip712Signature2021",
"proofValue": "0x17f624a23b620de2867dbefbeb5214e5693a4b470897302f91f870383d4f5ee7754600d1fb72b73c926fed56aac20724ce87d49e0078e0b13f02734a199ceaa61b",
"eip712": [Object]
}
}
}
```
### 6. Verify a Credential
To verify a credential's validity:
```javascript verifyCredential.js
const apiKey = "YOUR_API_KEY";
const env = "staging"; // or "www"
const credentialId = "YOUR_CREDENTIAL_ID";
const url = `https://${env}.crossmint.com/api/v1-alpha1/credentials/verification/verify`;
const options = {
method: "POST",
headers: {
"accept": "application/json",
"content-type": "application/json",
"x-api-key": apiKey,
},
body: JSON.stringify({
// paste credential object here
credential : {
id: "urn:uuid:e6b3dc76-a337-437b-ac1b-3d330e66e1a6",
...
}
})
};
fetch(url, options)
.then((res) => res.json())
.then((json) => console.log(json))
.catch((err) => console.error("error:" + err));
```
```json JSON
{ isValid: true }
```
### 7. Revoke a Credential (Optional)
If needed, you can revoke a credential:
```javascript revokeCredential.js
const apiKey = "YOUR_API_KEY";
const env = "staging"; // or "www"
const credentialId = "YOUR_CREDENTIAL_ID";
const url = `https://${env}.crossmint.com/api/v1-alpha1/credentials/${credentialId}`;
const options = {
method: "DELETE",
headers: {
accept: "application/json",
"x-api-key": apiKey,
},
};
fetch(url, options)
.then((res) => res.json())
.then((json) => console.log(json))
.catch((err) => console.error("error:" + err));
```
```json JSON
{
"actionId": "15bfe43c-3d5d-4d03-9e20-6dbaf01f038f",
"action": "nfts.delete",
"status": "pending",
"data": {
"chain": "polygon-amoy",
"collection": {
"id": "a9e3016b-66f0-40ab-8d72-6546fddc7b72",
"contractAddress": "0x45c9597b5441289C134E554990cdb647f65df5FB"
},
"token": {
"id": "6728f773-61af-4732-a34f-b5a50d8b9872",
"tokenId": "1"
}
},
"startedAt": "2025-05-28T16:53:11.000Z",
"resource": "https://staging.crossmint.com/api/2022-06-09/collections/a9e3016b-66f0-40ab-8d72-6546fddc7b72/nfts/15bfe43c-3d5d-4d03-9e20-6dbaf01f038f"
}
```
## Learn More
For more detailed information about Verifiable Credentials, please visit the dedicated [Verifiable Credentials section](/verifiable-credentials/introduction) which includes comprehensive guides on:
Learn how to define the structure of your credentials.
Create reusable templates for your credentials.
Issue credentials to users.
Verify the authenticity of credentials.
# Quickstart ⚡
Source: https://docs.crossmint.com/minting/quickstarts/ip
Mint IP credentials for creators to secure their work in under 5 minutes
In this quickstart you will learn how to create and manage intellectual property (IP) assets.
Contact [sales](https://www.crossmint.com/contact/sales) to enable this API on your project.
## What are IP credentials?
IP credentials are onchain records of intellectual property rights and authorship, enabled by Story Protocol's infrastructure and issued using Crossmint's APIs.
## Integration steps
### 1. Create a Developer Account
### 2. Get an API Key
Within the "Server-side keys" section, click the "Create new key" button in the top right.
Then, check the necessary scopes under the "Minting API" category: `nfts.create`, `nfts.read`, `collections.create`, `nfts.update` and create your key. Save this key for the next step.
### 3. Create an IP Collection
First, let's create an IP collection to hold our IP assets:
```javascript createIPCollection.js
const apiKey = "YOUR_API_KEY";
const env = "staging"; // or "www"
const url = `https://${env}.crossmint.com/api/v1/ip/collections`;
const options = {
method: "POST",
headers: {
accept: "application/json",
"content-type": "application/json",
"x-api-key": apiKey,
},
body: JSON.stringify({
metadata: {
description: "A collection of intellectual property assets",
name: "My IP Collection",
symbol: "MPA",
},
chain: "story-testnet",
}),
};
fetch(url, options)
.then((res) => res.json())
.then((json) => console.log(json))
.catch((err) => console.error("error:" + err));
```
Here is an example response returned from the API call above:
```json JSON
{
"id": "7f5e653d-2c9d-4025-98c8-8245c128ad10",
"actionId": "7f5e653d-2c9d-4025-98c8-8245c128ad10",
"metadata": {
"name": "My IP Collection",
"symbol": "MPA",
"description": "A collection of intellectual property assets"
},
"onChain": {
"chain": "story-testnet"
}
}
```
Save the collection `id` from the response for the next step.
### 4. Create an IP Asset
Now, let's create an IP asset within our collection:
```javascript createIPAsset.js
const apiKey = "YOUR_API_KEY";
const env = "staging"; // or "www"
const collectionId = "YOUR_COLLECTION_ID";
const url = `https://${env}.crossmint.com/api/v1/ip/collections/${collectionId}/ipassets`;
const options = {
method: "POST",
headers: {
accept: "application/json",
"content-type": "application/json",
"x-api-key": apiKey,
},
body: JSON.stringify({
owner: "email:creator@example.com:story-testnet",
nftMetadata: {
name: "Snowflake Funk",
description: "A disco song for the winter holidays",
image: "https://cdn2.suno.ai/image_large_c001fd6e-d6cd-474f-a7b6-6e6a9b3e2515.jpeg",
},
ipAssetMetadata: {
title: "Snowflake Funk",
createdAt: "2025-02-11T11:13:00",
ipType: "music",
creators: [
{
name: "John Doe",
email: "john.doe@example.com",
crossmintUserLocator: "email:john.doe@example.com:story-testnet",
contributionPercent: 100,
},
],
media: [
{
name: "Snowflake Funk",
url: "https://cdn1.suno.ai/c001fd6e-d6cd-474f-a7b6-6e6a9b3e2515.mp3",
mimeType: "audio/mpeg",
},
],
attributes: [
{
key: "Suno Artist",
value: "InfluentialCoda427",
},
{
key: "Source",
value: "Suno.com",
},
],
},
}),
};
fetch(url, options)
.then((res) => res.json())
.then((json) => console.log(json))
.catch((err) => console.error("error:" + err));
```
Here is an example response returned from the API call above:
```json JSON
{
"id": "49b9e141-8fd8-45dc-9646-13a3439c6f20",
"actionId": "49b9e141-8fd8-45dc-9646-13a3439c6f20",
"nftMetadata": {
"name": "Snowflake Funk",
"image": "https://cdn2.suno.ai/image_large_c001fd6e-d6cd-474f-a7b6-6e6a9b3e2515.jpeg",
"description": "A disco song for the winter holidays"
},
"ipAssetMetadata": {
"title": "Snowflake Funk",
"createdAt": "2025-02-11T11:13:00",
"creators": [
{
"name": "John Doe",
"email": "john.doe@example.com",
"crossmintUserLocator": "email:john.doe@example.com:story-testnet",
"contributionPercent": 100
}
],
"media": [
{
"name": "Snowflake Funk",
"url": "https://cdn1.suno.ai/c001fd6e-d6cd-474f-a7b6-6e6a9b3e2515.mp3",
"mimeType": "audio/mpeg"
}
],
"attributes": [
{
"key": "Suno Artist",
"value": "InfluentialCoda427"
},
{
"key": "Source",
"value": "Suno.com"
}
],
"ipType": "music"
},
"licenseTerms": [
{
"type": "non-commercial-social-remixing"
}
],
"onChain": {
"chain": "story-testnet",
"contractAddress": "0x82a72DfFb175DF8AB6d3C2E3888D5314a50C30D0",
"status": "pending"
}
}
```
Save the IP asset `id` from the response for the next steps.
### 5. Retrieve an IP Asset
To retrieve an IP asset:
```javascript getIPAsset.js
const apiKey = "YOUR_API_KEY";
const env = "staging"; // or "www"
const collectionId = "YOUR_COLLECTION_ID";
const ipAssetId = "YOUR_IP_ASSET_ID";
const url = `https://${env}.crossmint.com/api/v1/ip/collections/${collectionId}/ipassets/${ipAssetId}`;
const options = {
method: "GET",
headers: {
accept: "application/json",
"x-api-key": apiKey,
},
};
fetch(url, options)
.then((res) => res.json())
.then((json) => console.log(json))
.catch((err) => console.error("error:" + err));
```
Here is an example response returned from the API call above:
```json JSON
{
"id": "49b9e141-8fd8-45dc-9646-13a3439c6f20",
"actionId": "49b9e141-8fd8-45dc-9646-13a3439c6f20",
"nftMetadata": {
"name": "Snowflake Funk",
"image": "ipfs://QmYA9HyvoPmxvsMx216MFkoydtrA1sSxX5A5ixeu5S9VKF",
"description": "A disco song for the winter holidays"
},
"ipAssetMetadata": {
"title": "Snowflake Funk",
"createdAt": "2025-02-11T11:13:00",
"creators": [
{
"name": "John Doe",
"email": "john.doe@example.com",
"crossmintUserLocator": "email:john.doe@example.com:story-testnet",
"contributionPercent": 100
}
],
"media": [
{
"name": "Snowflake Funk",
"url": "https://cdn1.suno.ai/c001fd6e-d6cd-474f-a7b6-6e6a9b3e2515.mp3",
"mimeType": "audio/mpeg"
}
],
"attributes": [
{
"key": "Suno Artist",
"value": "InfluentialCoda427"
},
{
"key": "Source",
"value": "Suno.com"
}
],
"ipType": "music"
},
"licenseTerms": [
{
"type": "non-commercial-social-remixing",
"uri": ""
}
],
"onChain": {
"chain": "story-testnet",
"contractAddress": "0x82a72DfFb175DF8AB6d3C2E3888D5314a50C30D0",
"status": "success",
"ipAssetId": "0xe20936B1C974E7C550b483243719A1B1886D2c6c",
"tokenId": "1",
"txId": "0x4e505bcd429960d3031bd8d1f27bb7ffd2cfa251498c12c16cf2375a14d2bd51",
"owner": "0x1a042BBEFb116072E6AEF8304f9B7D15aA2b4BCF",
"explorerLink": "https://aeneid.explorer.story.foundation/ipa/0xe20936B1C974E7C550b483243719A1B1886D2c6c"
}
}
```
### 6. Update an IP Asset
If needed, you can update an IP asset:
```javascript updateIPAsset.js
const apiKey = "YOUR_API_KEY";
const env = "staging"; // or "www"
const collectionId = "YOUR_COLLECTION_ID";
const ipAssetId = "YOUR_IP_ASSET_ID";
const url = `https://${env}.crossmint.com/api/v1/ip/collections/${collectionId}/ipassets/${ipAssetId}`;
const options = {
method: "PATCH",
headers: {
accept: "application/json",
"content-type": "application/json",
"x-api-key": apiKey,
},
body: JSON.stringify({
ipAssetMetadata: {
title: "Snowflake Funk",
createdAt: "2025-02-11T11:13:00",
ipType: "music",
creators: [
{
name: "John Doe",
email: "john.doe@example.com",
crossmintUserLocator: "email:john.doe@example.com:story-testnet",
contributionPercent: 90,
},
{
name: "Frank L",
crossmintUserLocator: "email:frank.l@example.com:story-testnet",
contributionPercent: 10,
},
],
},
}),
};
fetch(url, options)
.then((res) => res.json())
.then((json) => console.log(json))
.catch((err) => console.error("error:" + err));
```
Here is an example response returned from the API call above:
```json JSON
{
"id": "75a45061-febb-4344-84d6-959276a5696a",
"actionId": "75a45061-febb-4344-84d6-959276a5696a",
"nftMetadata": {
"name": "Snowflake Funk",
"image": "ipfs://QmYA9HyvoPmxvsMx216MFkoydtrA1sSxX5A5ixeu5S9VKF",
"description": "A disco song for the winter holidays"
},
"ipAssetMetadata": {
"title": "Snowflake Funk",
"createdAt": "2025-02-11T11:13:00",
"creators": [ ... ],
"ipType": "music"
},
"licenseTerms": [ { "type": "non-commercial-social-remixing", "uri": "" } ],
"onChain": {
"chain": "story-testnet",
"contractAddress": "0x82a72DfFb175DF8AB6d3C2E3888D5314a50C30D0",
"status": "pending"
}
}
```
## Learn More
For more detailed information about IP assets, please refer to the API reference:
Learn how to create IP collections.
Create IP assets within collections.
Update existing IP assets.
Retrieve IP assets from collections.
# Quickstart ⚡
Source: https://docs.crossmint.com/minting/quickstarts/nfts
Mint and send a unique NFT in under 5 minutes
In this quickstart you will learn how to create a unique NFT and deliver it to a wallet or email address.
## Integration steps
### 1. Create a Developer Account
### 2. Get an API Key
Within the "Server-side keys" section, click the "Create new key" button in the top right.
Then, check the scopes `nfts.create` and `nfts.read` under the "Minting API"
category and create your key. Save this key for the next step.
### 3. Mint an NFT
We're almost there! With our key created, we're now going to write a small
function that creates an NFT and delivers it to a user.
Create a file (e.g. `mintNFT.js`) and enter this code into it:
```javascript mintNFT.js
const apiKey = "YOUR_API_KEY";
const chain = "polygon-amoy"; // or "ethereum-sepolia", "base-sepolia", etc.
const env = "staging"; // or "www"
const recipientEmail = "TEST_EMAIL_ADDRESS";
const recipientAddress = `email:${recipientEmail}:${chain}`;
const url = `https://${env}.crossmint.com/api/2022-06-09/collections/default/nfts`;
const options = {
method: "POST",
headers: {
accept: "application/json",
"content-type": "application/json",
"x-api-key": apiKey,
},
body: JSON.stringify({
recipient: recipientAddress,
metadata: {
name: "Crossmint Test NFT",
image: "https://picsum.photos/400",
description: "My first NFT using Crossmint",
},
}),
};
fetch(url, options)
.then((res) => res.json())
.then((json) => console.log(json))
.catch((err) => console.error("error:" + err));
```
This code creates an NFT, uploads it to the blockchain, and delivers it to a user wallet, attached to the email address provided. Before running it, be sure to fill in values for:
* `YOUR_API_KEY` with the key obtained in the prior step.
* `TEST_EMAIL_ADDRESS` with an email address you control, for testing.
Now, run the `mintNFT.js` script.
```bash
node mintNFT.js
```
After a few seconds, it should return a response indicating the mint has
started processing. Check the full response and save its `actionId` property, as you'll use it later.
Here is an example response returned from the API call above:
```json JSON
{
"id": "b3f61f22-c30e-424d-a5ab-d0cbc5c41aab",
"onChain": {
"status": "pending",
"chain": "polygon-amoy",
"contractAddress": "0x921Bc21bf3Fd6568cdC2C904F75b83556062c3d0"
},
"actionId": "b3f61f22-c30e-424d-a5ab-d0cbc5c41aab"
}
```
### 4. Confirm Delivery of the NFT
The mint has started processing. However, blockchains can take a few seconds (or,
at times of extreme network congestion, even minutes) to confirm the operation.
Before showing the user a success screen, the next step is checking the
status of the mint.
To do this, grab the `actionId` received at the end of step 3 and use it
alongside your API key in one of the snippets below.
```javascript mintStatus.js
const apiKey = "";
const env = "staging"; // or "www"
const actionId = "";
const url = `https://${env}.crossmint.com/api/2022-06-09/actions/${actionId}`;
const options = {
method: "GET",
headers: { "X-API-KEY": apiKey },
};
fetch(url, options)
.then((response) => response.json())
.then((response) => console.log(response))
.catch((err) => console.error(err));
```
```bash cURL
# Replace "staging" with "www" for production, and fill in your api key and mint action id
ENV="staging"
API_KEY=""
MINT_ACTION_ID=""
curl --header "x-api-key: $API_KEY" \
-X GET \
https://${ENV}.crossmint.com/api/2022-06-09/actions/${MINT_ACTION_ID}
```
Here is an example response from calling the status API:
```json JSON
{
"actionId": "b3f61f22-c30e-424d-a5ab-d0cbc5c41aab",
"action": "nfts.create",
"status": "success",
"data": {
"collection": {...},
"recipient": {...},
"token": {...}
},
"startedAt": "2025-05-27T02:41:08.000Z",
"completedAt": "2025-05-27T02:41:40.000Z",
"resource": "https://staging.crossmint.com/api/2022-06-09/collections/default-polygon-amoy/nfts/b3f61f22-c30e-424d-a5ab-d0cbc5c41aab"
}
```
Pay attention to the "status" field. Once it says "success":
**Congratulations. You have minted your first NFT** 🥷 🎉
For scalable production applications, consider using [webhooks](/minting/nfts/integrate/webhooks-and-status-apis) to
determine when your NFT has been minted, instead of periodically polling for its status via the API.
### 1. Create a Developer Account
### 2. Get an API Key
Within the "Server-side keys" section, click the "Create new key" button in the top right.
Then, check the scopes `nfts.create` and `nfts.read` under the "Minting API"
category and create your key. Save this key for the next step.
### 3. Mint an NFT
We're almost there! With our key created, we're now going to write a small
function that creates an NFT and delivers it to a user.
Create a file (e.g. `mintNFT.js`) and enter this code into it:
```javascript mintNFT.js
const apiKey = "YOUR_API_KEY";
const chain = "solana";
const env = "staging"; // or "www"
const recipientEmail = "TEST_EMAIL_ADDRESS";
const recipientAddress = `email:${recipientEmail}:${chain}`;
const url = `https://${env}.crossmint.com/api/2022-06-09/collections/default-solana/nfts`;
const options = {
method: "POST",
headers: {
accept: "application/json",
"content-type": "application/json",
"x-api-key": apiKey,
},
body: JSON.stringify({
recipient: recipientAddress,
metadata: {
name: "Crossmint Test NFT",
image: "https://picsum.photos/400",
description: "My first NFT using Crossmint",
},
}),
};
fetch(url, options)
.then((res) => res.json())
.then((json) => console.log(json))
.catch((err) => console.error("error:" + err));
```
This code creates an NFT, uploads it to the Solana blockchain, and delivers it to a user wallet, attached to the email address provided. Before running it, be sure to fill in values for:
* `YOUR_API_KEY` with the key obtained in the prior step.
* `TEST_EMAIL_ADDRESS` with an email address you control, for testing.
Now, run the `mintNFT.js` script.
```bash
node mintNFT.js
```
After a few seconds, it should return a response indicating the mint has
started processing. Check the full response and save its `actionId` property, as you'll use it later.
Here is an example response returned from the API call above:
```json JSON
{
"id": "cace8d7d-e4dd-483d-a780-faf6aa9f761a",
"onChain": {
"status": "pending",
"chain": "solana"
},
"actionId": "cace8d7d-e4dd-483d-a780-faf6aa9f761a"
}
```
### 4. Confirm Delivery of the NFT
The mint has started processing. However, blockchains can take a few seconds (or,
at times of extreme network congestion, even minutes) to confirm the operation.
Before showing the user a success screen, the next step is checking the
status of the mint.
To do this, grab the `actionId` received at the end of step 3 and use it
alongside your API key in one of the snippets below.
```javascript mintStatus.js
const apiKey = "";
const env = "staging"; // or "www"
const actionId = "";
const url = `https://${env}.crossmint.com/api/2022-06-09/actions/${actionId}`;
const options = {
method: "GET",
headers: { "X-API-KEY": apiKey },
};
fetch(url, options)
.then((response) => response.json())
.then((response) => console.log(response))
.catch((err) => console.error(err));
```
```bash cURL
# Replace "staging" with "www" for production, and fill in your api key and mint action id
ENV="staging"
API_KEY=""
MINT_ACTION_ID=""
curl --header "x-api-key: $API_KEY" \
-X GET \
https://${ENV}.crossmint.com/api/2022-06-09/actions/${MINT_ACTION_ID}
```
Here is an example response from calling the status API:
```json JSON
{
"actionId": "cace8d7d-e4dd-483d-a780-faf6aa9f761a",
"action": "nfts.create",
"status": "success",
"data": {
"chain": "solana",
"txId": "5KQHjcEq7DWnD1Rzo7RW7rknY3NFeKsJ9Lxkrd1DBPPwxbv9k4JAgxELWW5rqWMd5sXrHDwYzsRMeUok3tqYvTLa",
"collection": {...},
"recipient": {...},
"token": {...}
},
"startedAt": "2025-05-27T03:04:23.000Z",
"completedAt": "2025-05-27T03:04:49.000Z",
"resource": "https://staging.crossmint.com/api/2022-06-09/actions/cace8d7d-e4dd-483d-a780-faf6aa9f761a"
}
```
Pay attention to the "status" field. Once it says "success":
**Congratulations. You have minted your first NFT** 🥷 🎉
For scalable production applications, consider using [webhooks](/minting/nfts/integrate/webhooks-and-status-apis) to
determine when your NFT has been minted, instead of periodically polling for its status via the API.
### 1. Create a Developer Account
### 2. Get an API Key
Within the "Server-side keys" section, click the "Create new key" button in the top right.
Then, check the scopes `nfts.create` and `nfts.read` under the "Minting API"
category and create your key. Save this key for the next step.
### 3. Mint a Compressed NFT
We're almost there! With our key created, we're now going to write a small
function that creates a compressed NFT and delivers it to a user.
Compressed NFTs are a new standard on the Solana blockchain, for minting NFTs with the lowest cost amongst L1 and L2 blockchains, and the highest throughput (thousands of NFTs per second).
Create a file (e.g. `mintCompressedNFT.js`) and enter this code into it:
```javascript mintCompressedNFT.js
const apiKey = "YOUR_API_KEY";
const chain = "solana";
const env = "staging"; // or "www"
const recipientEmail = "TEST_EMAIL_ADDRESS";
const recipientAddress = `email:${recipientEmail}:${chain}`;
const url = `https://${env}.crossmint.com/api/2022-06-09/collections/default-solana/nfts`;
const options = {
method: "POST",
headers: {
accept: "application/json",
"content-type": "application/json",
"x-api-key": apiKey,
},
body: JSON.stringify({
recipient: recipientAddress,
metadata: {
name: "Crossmint Compressed NFT",
image: "https://picsum.photos/400",
description: "My first compressed NFT using Crossmint",
},
compressed: true,
reuploadLinkedFiles: false
}),
};
fetch(url, options)
.then((res) => res.json())
.then((json) => console.log(json))
.catch((err) => console.error("error:" + err));
```
This code creates a compressed NFT, uploads it to the Solana blockchain, and delivers it to a user wallet, attached to the email address provided. Before running it, be sure to fill in values for:
* `YOUR_API_KEY` with the key obtained in the prior step.
* `TEST_EMAIL_ADDRESS` with an email address you control, for testing.
Now, run the `mintCompressedNFT.js` script.
```bash
node mintCompressedNFT.js
```
Current Protocol Limitations:
* There's a 10-30 second delay between when a compressed NFT is minted and it shows in wallets.
After a few seconds, it should return a response indicating the mint has
started processing. Check the full response and save its `actionId` property, as you'll use it later.
Here is an example response returned from the API call above:
```json JSON
{
"actionId": "de26f73e-b0ae-4ac6-8784-39f20527d39d",
"onChain": {
"status": "pending",
"chain": "solana"
},
"id": "de26f73e-b0ae-4ac6-8784-39f20527d39d"
}
```
### 4. Confirm Delivery of the NFT
The mint has started processing. However, blockchains can take a few seconds (or,
at times of extreme network congestion, even minutes) to confirm the operation.
Before showing the user a success screen, the next step is checking the
status of the mint.
To do this, grab the `actionId` received at the end of step 3 and use it
alongside your API key in one of the snippets below.
```bash cURL
# Replace "staging" with "www" for production, and fill in your api key and mint action id
ENV="staging"
API_KEY=""
MINT_ACTION_ID=""
curl --header "x-api-key: $API_KEY" \
-X GET \
https://${ENV}.crossmint.com/api/2022-06-09/actions/${MINT_ACTION_ID}
```
```javascript mintStatus.js
const apiKey = "";
const env = "staging"; // or "www"
const actionId = "";
const url = `https://${env}.crossmint.com/api/2022-06-09/actions/${actionId}`;
const options = {
method: "GET",
headers: { "X-API-KEY": apiKey },
};
fetch(url, options)
.then((response) => response.json())
.then((response) => console.log(response))
.catch((err) => console.error(err));
```
Here is an example response from calling the status API:
```json JSON
{
"actionId": "de26f73e-b0ae-4ac6-8784-39f20527d39d",
"action": "nfts.create",
"status": "success",
"data": {
"chain": "solana",
"txId": "dLFcyYtgFrrX7VkXh8U8JUmECNykH7VASzovNzM67NPRypCzMkTnx1ffv7dB99N4YrAT2mDRqszGofKunnazbXX",
"collection": {...},
"recipient": {...},
"token": {...}
},
"startedAt": "2025-05-27T03:09:47.000Z",
"completedAt": "2025-05-27T03:09:52.000Z",
"resource": "https://staging.crossmint.com/api/2022-06-09/actions/de26f73e-b0ae-4ac6-8784-39f20527d39d"
}
```
Pay attention to the "status" field. Once it says "success":
**Congratulations. You have minted your first compressed NFT** 🥷 🎉
Other explorers, like Solscan, still have not added support.
For scalable production applications, consider using [webhooks](/minting/nfts/integrate/webhooks-and-status-apis) to
determine when your NFT has been minted, instead of periodically polling for its status via the API.
## View your NFTs
1. If the NFTs were delivered to an **email address**, the recipient can see them by:
* Logging into their wallet from Crossmint's [website](https://www.crossmint.com). For staging, they must use [https://staging.crossmint.com](https://staging.crossmint.com).
* From your website if you use [embedded wallets](/wallets/introduction). See the API for [getting the NFTs](/api-reference/wallets/get-nfts-from-wallet) in a wallet.
2. If the NFTs were delivered to a **wallet address**, the user will be able to see them there directly, connecting to testnet if needed, or on the testnet blockchain explorer.
And voilá, there's your NFT! Now think of all the cool things you can build
with this, at scale :)
## Launching in Production
For production, the steps are almost identical, but some changes are required:
1. Create a developer account on the [production console](https://www.crossmint.com/console).
2. Add credits to your account from [Billing & Usage](https://www.crossmint.com/console/billing).
3. Then, create a production key on the [API Keys](https://www.crossmint.com/console/projects/apiKeys) page with the
same API scopes.
4. Modify all code snippets with `const env = "www"`, so they use the production APIs. You may also need to change the
`chain` variable to match your production blockchain.
5. Check the guide with [best practices](/minting/advanced/best-practices)
## Learn More
Learn how to create and manage NFT collections.
Check out more advanced options for minting digital assets.
Update and delete tokens after minting.
# Quickstart ⚡
Source: https://docs.crossmint.com/minting/quickstarts/sfts
Mint and send limited sets of identical digital assets in under 5 minutes
In this quickstart you will learn how to create semi-fungible tokens (SFTs) and deliver them to a wallet or email address.
## What are SFTs?
SFTs (semi-fungible tokens) follow the ERC-1155 standard. Each token is a replica of a predefined template. Each collection (smart contract) can contain multiple templates, which can contain many tokens.
This API only supports EVM chains self-serve. Contact us if you need support for another chain.
## Integration steps
### 1. Create a Developer Account
### 2. Get an API Key
Within the "Server-side keys" section, click the "Create new key" button in the top right.
Then, check the scopes `nfts.create`, `nfts.read`, and `collections.create` under the "Minting API"
category and create your key. Save this key for the next step.
### 3. Create an SFT collection
With our key created, we're now going to create an SFT collection to hold our templates.
```javascript createCollection.js
const apiKey = "YOUR_API_KEY";
const env = "staging"; // or "www"
const url = `https://${env}.crossmint.com/api/2022-06-09/collections`;
const options = {
method: "POST",
headers: {
accept: "application/json",
"content-type": "application/json",
"x-api-key": apiKey,
},
body: JSON.stringify({
chain: "polygon-amoy",
fungibility: "semi-fungible",
metadata: {
name: "My SFT Collection",
imageUrl: "https://www.crossmint.com/assets/crossmint/logo.png",
description: "A new collection with its own dedicated smart contract",
},
}),
};
fetch(url, options)
.then((res) => res.json())
.then((json) => console.log(json))
.catch((err) => console.error("error:" + err));
```
```json JSON
{
"id": "5263650e-6d43-4ed3-9e31-0cf593d076a4",
"metadata": {
"name": "My SFT Collection",
"description": "A new collection with its own dedicated smart contract",
"imageUrl": "https://www.crossmint.com/assets/crossmint/logo.png",
"symbol": "XMINT"
},
"fungibility": "semi-fungible",
"onChain": {
"chain": "polygon-amoy",
"type": "erc-1155"
},
"actionId": "5263650e-6d43-4ed3-9e31-0cf593d076a4"
}
```
Save the `id` from the response as your `COLLECTION_ID` for the next steps.
### 4. Create a template within that collection
Now, let's create a template within our collection:
```javascript createTemplate.js
const apiKey = "YOUR_API_KEY";
const env = "staging"; // or "www"
const collectionId = "YOUR_COLLECTION_ID";
const url = `https://${env}.crossmint.com/api/2022-06-09/collections/${collectionId}/templates`;
const options = {
method: "POST",
headers: {
accept: "application/json",
"content-type": "application/json",
"x-api-key": apiKey,
},
body: JSON.stringify({
onChain: {
tokenId: "1",
},
supply: {
limit: 10,
},
metadata: {
name: "My template",
image: "https://www.crossmint.com/assets/crossmint/logo.png",
description: "A new token template for my ERC1155 collection",
},
}),
};
fetch(url, options)
.then((res) => res.json())
.then((json) => console.log(json))
.catch((err) => console.error("error:" + err));
```
```json JSON
{
"templateId": "58b0c1aa-e457-48dd-bb55-5a27e6a92f74",
"metadata": {
"name": "My template",
"image": "ipfs://bafkreigbqsmxzkbjgbwtj6exfdt5z3t3swgoysf7hr6vjzddqnmykj6x2u",
"description": "A new token template for my ERC1155 collection"
},
"onChain": {
"tokenId": "1"
},
"supply": {
"limit": "10",
"minted": "0"
}
}
```
Save the `templateId` from the response for the next step.
### 5. Mint an SFT from a template
Now, let's mint an SFT from our template and send it to a wallet or email address:
```javascript mintSFT.js
const apiKey = "YOUR_API_KEY";
const env = "staging"; // or "www"
const collectionId = "YOUR_COLLECTION_ID";
const templateId = "YOUR_TEMPLATE_ID";
const recipientEmail = "TEST_EMAIL_ADDRESS";
const url = `https://${env}.crossmint.com/api/2022-06-09/collections/${collectionId}/sfts`;
const options = {
method: "POST",
headers: {
accept: "application/json",
"content-type": "application/json",
"x-api-key": apiKey,
},
body: JSON.stringify({
templateId: templateId,
recipient: `email:${recipientEmail}:polygon-amoy`,
amount: 1,
}),
};
fetch(url, options)
.then((res) => res.json())
.then((json) => console.log(json))
.catch((err) => console.error("error:" + err));
```
```json JSON
{
"actionId": "a91c15e3-60f2-4a45-bf1a-cee508981667",
"action": "nfts.create",
"status": "pending",
"data":
{
"chain": "polygon-amoy",
"collection":
{
"id": "84e3d617-9c1b-4e7a-9686-522a9ea7c520",
"contractAddress": "0x9b8ab8949bd7E73E61945b88F7fe12151f98ad3C"
},
"recipient":
{
"walletAddress": "0xcFDc00Cf926A5053f9Cdf004e6DF17e6dEB2E146",
"email": "test@example.com"
},
"token":
{
"id": "a91c15e3-60f2-4a45-bf1a-cee508981667"
}
},
"startedAt": "2024-01-02T22:05:01.000Z",
"resource": "https://staging.crossmint.com/api/2022-06-09/actions/a91c15e3-60f2-4a45-bf1a-cee508981667"
}
```
### 6. Confirm Delivery of the SFT
The mint has started processing. However, blockchains can take a few seconds (or,
at times of extreme network congestion, even minutes) to confirm the operation.
Before showing the user a success screen, the next step is checking the
status of the mint.
To do this, grab the `actionId` received at the end of step 5 and use it
alongside your API key in one of the snippets below.
```javascript mintStatus.js
const apiKey = "";
const env = "staging"; // or "www"
const actionId = "";
const url = `https://${env}.crossmint.com/api/2022-06-09/actions/${actionId}`;
const options = {
method: "GET",
headers: { "X-API-KEY": apiKey },
};
fetch(url, options)
.then((response) => response.json())
.then((response) => console.log(response))
.catch((err) => console.error(err));
```
```bash cURL
# Replace "staging" with "www" for production, and fill in your api key and mint action id
ENV="staging"
API_KEY=""
MINT_ACTION_ID=""
curl --header "x-api-key: $API_KEY" \
-X GET \
https://${ENV}.crossmint.com/api/2022-06-09/actions/${MINT_ACTION_ID}
```
Here is an example response from calling the status API:
```json JSON
{
"actionId": "a91c15e3-60f2-4a45-bf1a-cee508981667",
"action": "nfts.create",
"status": "success",
"data": {
"collection": {},
"recipient": {},
"token": {}
},
"startedAt": "2024-01-02T22:05:01.000Z",
"completedAt": "2024-01-02T22:06:04.000Z",
"resource": "https://staging.crossmint.com/api/2022-06-09/actions/a91c15e3-60f2-4a45-bf1a-cee508981667"
}
```
Pay attention to the "status" field. Once it says "success":
**Congratulations. You have minted your first SFT** 🥷 🎉
For scalable production applications, consider using [webhooks](/minting/nfts/integrate/webhooks-and-status-apis) to
determine when your SFT has been minted, instead of periodically polling for its status via the API.
## View your SFTs
1. If the SFTs were delivered to an **email address**, the recipient can see them by:
* Logging into their wallet from Crossmint's [website](https://www.crossmint.com). For staging, they must use [https://staging.crossmint.com](https://staging.crossmint.com).
* From your website if you use [embedded wallets](/wallets/introduction). See the API for [getting the NFTs](/api-reference/wallets/get-nfts-from-wallet) in a wallet.
2. If the SFTs were delivered to a **wallet address**, the user will be able to see them there directly, connecting to testnet if needed, or on the testnet blockchain explorer.
And voilá, there's your SFT! Now think of all the cool things you can build
with this, at scale :)
## Launching in Production
For production, the steps are almost identical, but some changes are required:
1. Create a developer account on the [production console](https://www.crossmint.com/console).
2. Add credits to your account from [Billing & Usage](https://www.crossmint.com/console/billing).
3. Then, create a production key on the [API Keys](https://www.crossmint.com/console/projects/apiKeys) page with the
same API scopes.
4. Modify all code snippets with `const env = "www"`, so they use the production APIs. You may also need to change the
`chain` variable to match your production blockchain.
5. Check the guide with [best practices](/minting/advanced/best-practices)
## Learn More
Learn how to create and manage SFT collections.
Check out more advanced options for minting.
Update and delete tokens after minting.
# Access Controls
Source: https://docs.crossmint.com/payments/advanced/accesslists
Control who can buy your NFTs
## Access Lists
Accesslist support is a premium feature. To get started, [contact sales](https://www.crossmint.com/contact/sales)
Crossmint allows you to whitelist both wallet and email addresses. Once the team
has approved your request, you will need to provide the following information:
1. Your Crossmint `clientId` or `collectionId` for the collection.
2. The list of wallet and email addresses to be included in the accesslist.
If you whitelist users' email addresses, Crossmint will create wallets associated with those email addresses and
provide them to you for inclusion in the accesslist. Users will then be able to authenticate during the purchase and
execute the transaction.
You can set up accesslists using Merkle Trees or inserting the list of whitelisted addresses directly on the smart contract:
### A. Merkle Tree Accesslists
While using Merkle Trees is more gas-efficient, it involves a slightly more complex setup.
Here is an example accesslist mint function:
```solidity Solidity
//SPDX-License-Identifier: Unlicense
pragma solidity ^0.8.0;
import "@openzeppelin/contracts/utils/cryptography/MerkleProof.sol";
import "@openzeppelin/contracts/token/ERC721/ERC721.sol";
import "@openzeppelin/contracts/access/Ownable.sol";
contract Accesslist is ERC721, Ownable {
bytes32 public merkleRoot;
uint256 public nextTokenId;
mapping(address => bool) public claimed;
constructor() ERC721("ExampleNFT", "NFT") {
merkleRoot = 0x0;
}
function isWhiteListed(bytes32[] memory proof, bytes32 leaf) public view returns(bool) {
return MerkleProof.verify(proof, merkleRoot, leaf);
}
function setMerkleRoot(bytes32 merkleRoot_) external onlyOwner {
merkleRoot = merkleRoot_;
}
function mint(address to, bytes32[] calldata merkleProof) public payable {
require(claimed[to] == false, "already claimed");
claimed[to] = true;
require(
isWhiteListed(
merkleProof,
keccak256(abi.encodePacked(to))
),
"invalid merkle proof"
);
nextTokenId++;
_mint(to, nextTokenId);
}
}
```
### B. Mapping-Based Accesslists
The most straightforward method of whitelisting involves maintaining
a mapping of the whitelisted addresses within your smart contract.
This approach is faster but consumes more gas and savvy developers
may be able to determine the addresses of the accesslist.
```solidity Solidity
mapping(address => uint256) public whitelistMapping;
```
```solidity Solidity
function presale(address _to, uint256 _count) external payable {
// ensure _to address has tokens left to mint
require(whitelistMapping[_to] > 0, "no whitelist tokens for user");
// decrement mapping for user
whitelistMapping[_to] -= _count;
// presale minting logic here
}
```
You can set up accesslists on your Candy Machine using Merkle Trees or SPL Tokens
### A. Merkle Tree Accesslists
Simply send the user IDs to Crossmint. Once you have the Merkle proof, you can pass it into the Crossmint Hosted Checkout `lineItems.callData` as a string, as in the example below:
```jsx React
```
### B. SPL Token-based Accesslists
You can whitelist wallets by airdropping them SPL tokens.
## Geofencing
Geofencing support is a premium feature only available to customers on a paid plan. To get started, [contact
sales](https://www.crossmint.com/contact/sales)
Crossmint supports geofencing capabilities through our Customer Success Engineering (CSE) team. Our CSE team can work with you to block transactions from specific countries or geographic regions via Stripe rules.
To set up geofencing for your project, please contact our sales team to discuss your specific requirements and implementation details.
# Bring Your Own Collection
Source: https://docs.crossmint.com/payments/advanced/bring-your-own-collection
Start accepting payments into your contract
Crossmint has a pre-audited library of [smart contracts](/minting/nfts/integrate/create-collections) that serve most use cases. However, if you have custom needs, you can also bring your own.
The Checkout has been battle-tested at scale with Crossmint's collections, and may result in a more reliable
experience than using an untested contract, or at least require less trouble-shooting.
* When you require very custom functionality not supported by Crossmint's contracts.
* If you're developing a marketplace.
* If you have an accesslist.
Check out the step by step guide for registering a collection
## Contracts Supported
### Pre-requisites
* Your contract must be ERC-721, ERC-721A, or ERC-1155 compliant.
* The minting function must allow minting directly to an address that is different from the one that invoked the contract. And it must contain at least one parameter that specifies that recipient address.
* A single address must be able to call the mint function unlimited times but does not need to be able to hold unlimited NFTs.
For Xion blockchain contracts, please refer to our [Xion Contract Requirements](/minting/advanced/xion-contracts) documentation.
### Contract Registration
You may register contracts manually from the console or via API.
To register a contract manually, simply go to the console, click on `Token collections` and follow the steps on the wizard.
When you compile your smart contract there will be a corresponding abi file with an `.abi` or `.json` extension.
Inside this file, you'll see JSON property named abi, which describes the functions in your smart contract. Here's an example of a very simple abi file. Yours will likely have more function descriptions.
```json
// Example generated abi file for smart contract
{
"abi": [
{
"inputs": [],
"stateMutability": "nonpayable",
"type": "constructor"
},
{
"inputs": [
{
"internalType": "address",
"name": "_to",
"type": "address"
}
],
"name": "mintTo",
"outputs": [],
"stateMutability": "payable",
"type": "function"
}
]
}
```
Copy the JSON array object that comes after the string `abi` and paste it into the `Contract ABI` text box in the developer console. The content you paste in should begin with `[` and end with `]`.
Whether your ABI was retrieved automatically or you pasted it in manually you need to specify the:
* Mint function
* Recipient address parameter name
* \[Optional] Quantity of NFTs to mint parameter name
Crossmint will attempt to automatically select these values for you, but it's important to ensure they are set correctly. Especially if you're setting up a USDC mint function as the list of options will be longer.
Proxy contracts are an advanced feature. You should use this only if you are certain that your contracts adhere to this pattern. This is crucial because Crossmint requires the actual NFT contract address when you register a mint/buy/purchase/claim function in a sales contract or revenue splitter.
If you don't specify the NFT contract address, our system won't be able to extract token URI information or facilitate transfers. Set this up only if it isn't a transparent proxy, which is common for upgradeable contracts.
Instant support for:
* **Primaries**: Candy Machine v3, Metaplex Instant Sales, Magic Eden's Launchpad
* **Secondaries**: Auction House, Tensor, Magic Eden API, Hyperspace
Only the integrations listed above are available at the moment. No custom integrations supported temporarily except for large enterprise use cases.
# Component Properties
Source: https://docs.crossmint.com/payments/advanced/component-properties
Understand the properties available on the Checkout
If you are using our previous version of embedded checkout, please refer to the [old component properties
guide](/payments/v2/advanced/component-properties)
## Common Properties
These properties are shared between both the Embedded and Hosted checkout components.
Specifies the NFTs to purchase. Can be a single item or array of items.
Collection identifier in one of these formats:
* `crossmint:<_YOUR_COLLECTION_ID_>[:_TEMPLATE_ID_]` - For collections created in Crossmint Console
* Template ID is optional and requires template minting to be enabled
* If template minting is disabled and a template ID is provided, the mint will fail with an error
* `:` - For collections using direct contract addresses (e.g., `polygon-amoy:0xF3d2d7b5666f579DcE385b2d53c54AB1b09Ef563`)
When using template minting, append the templateId to the collection locator: `crossmint:collectionId:templateId`.
Template minting must be enabled in the Crossmint Console or the mint will fail with an error.
See the [Mint to Specific Template guide](/payments/advanced/mint-to-specific-template) for details on enabling template minting and error handling.
For secondary sales (buying existing NFTs). Token identifier in one of these formats:
* EVM chains: `::`
* Solana: `:`
Using `tokenLocator` doesn't require registering the collection in Crossmint Console.Use either `collectionLocator` (for primary sales) or `tokenLocator` (for secondary sales), not both.
Arguments passed to your contract's mint function:
```solidity Solidity
// Example mint function
function mint(
address to, // Auto-filled by Crossmint
uint256 quantity,
uint256 totalPrice
) public payable {
// ...
}
```
Parameter names must match your contract's function arguments exactly.Do not pass the recipient argument (e.g. `to`) in callData. Crossmint handles this automatically.
Configuration for payment methods.
Crypto payment settings:
```tsx
{
enabled: true, // Enable/disable crypto payments
defaultChain: "ethereum" | "polygon" | "solana", // Optional: preferred blockchain
defaultCurrency: "eth" | "matic" | "sol" | 'usdc' // Optional: preferred currency
}
```
Card & wallet payment settings:
```tsx
{
enabled: true, // Enable/disable fiat payments
defaultCurrency: "usd" | "eur" | "gbp", // Optional: preferred currency
}
```
Embedded Checkout supports additional payment method customization. See our [Embedded Checkout payment methods guide](/payments/embedded/guides/payment-methods) for details.
Optional email address where purchase receipt will be sent
Sets the default payment tab: `fiat` or `crypto`
Delivery details for the NFTs. You must specify either email OR wallet address, not both:
NFTs delivered to user's Crossmint wallet linked to this email
NFTs delivered directly to this blockchain address
When not provided, user will be prompted during checkout.
Sets the checkout interface language.
`en-US` `de-DE` `es-ES` `fr-FR` `it-IT` `ja-JP` `ko-KR` `pt-PT` `ru-RU` `th-TH` `tr-TR` `uk-UA` `vi-VN` `zh-CN` `zh-TW` `Klingon`
## Specific Properties & Hooks
The hosted checkout button is only available for React applications. For full customization options, please use our [Headless Checkout](/payments/headless/overview).
The following properties are available for the `CrossmintHostedCheckout` component:
Customization options for the hosted checkout. See our [UI Customization guide](/payments/pay-button/guides/ui-customization) for complete details.
**Notable appearance options:**
* Display mode: `display: "popup" | "new-tab"` (default: "popup")
* Background overlay: `overlay.enabled: false` to disable the gray background
* Button theme: `theme.button: "light" | "dark" | "crossmint"` (default: "light")
* Checkout theme: `theme.checkout: "light" | "dark"` (default: "light")
The embedded checkout is only available for React applications. For full customization options, please use our [Headless Checkout](/payments/headless/overview).
The following properties are available for the `CrossmintEmbeddedCheckout` component:
Extends the common payment configuration with additional options.
Extended fiat payment settings:
```tsx
{
enabled: true, // Enable/disable fiat payments
defaultCurrency: "usd" | "eur" | "gbp", // Optional: preferred currency
allowedMethods: {
card: boolean, // Credit/debit cards
applePay: boolean, // Apple Pay
googlePay: boolean // Google Pay
}
}
```
Customization options for the checkout UI. See our [UI Customization guide](/payments/embedded/guides/ui-customization) for complete details.
**Notable appearance options:**
* Hide destination input: `rules.DestinationInput.display: "hidden"`
* Hide receipt email input: `rules.ReceiptEmailInput.display: "hidden"`
If inputs are hidden, you must provide the corresponding values via recipient/payment props.
The following React hooks are available for use with the Embedded Checkout:
The `useCrossmintCheckout` hook is used to access the current order and checkout state.
All Crossmint hooks must be used within components wrapped by both `CrossmintProvider` and `CrossmintCheckoutProvider`:
```tsx
{/* Hooks can be used here */}
```
The following properties are available from the `useCrossmintCheckout` hook:
The current order object containing all order details.
Unique identifier for the order
Current phase of the order: `quote` | `payment` | `delivery` | `completed`
Array of items being purchased.
Blockchain network for the NFT
Number of NFTs being purchased
```tsx
{
name: string;
description: string;
imageUrl: string;
collection: {
name: string;
description: string;
imageUrl: string;
};
}
```
```tsx
{
status: "valid" | "item-unavailable" | "expired" | "requires-recipient";
charges: {
unit: { currency: string; amount: string; };
gas: { currency: string; amount: string; };
};
totalPrice: { currency: string; amount: string; };
}
```
NFT delivery status and details:
```tsx
// When completed:
{
status: "completed";
txId: string;
tokens: [{
locator: string;
contractAddress: string;
tokenId: string;
mintHash: string;
}];
recipient: {
walletAddress: string;
locator: string;
email: string;
};
}
// When in progress:
{
status: "awaiting-payment" | "in-progress" | "failed";
recipient: {
walletAddress: string;
locator: string;
email: string;
};
}
```
Order quote status and pricing:
```tsx
{
status: "valid" | "expired" | "requires-recipient" | "all-line-items-unavailable";
quotedAt: string;
expiresAt: string;
totalPrice: {
currency: string;
amount: string;
};
}
```
# Dynamic Price and Quantity
Source: https://docs.crossmint.com/payments/advanced/dynamic-quantity-and-price
Details about implementing dynamic functionality into the Checkout
If you are using our previous version of the hosted checkout, please refer to the [old dynamic pricing and quantity
guide](/payments/v2/advanced/dynamic-quantity-and-price)
See the below examples to understand how to implement dynamic pricing or quantity into your dApp.
The examples below use the [Hosted Checkout](/payments/pay-button/overview), but the same approach is compatible
with the [Embedded Checkout](/payments/embedded/overview) as well.
```jsx React
import { useState } from 'react';
import { CrossmintProvider, CrossmintHostedCheckout } from "@crossmint/client-sdk-react-ui";
function App() {
const [mintAmount, setMintAmount] = useState(1);
const nftCost = 0.001;
const apiClientId = '_YOUR_API_CLIENT_ID_';
const collectionId = '_YOUR_COLLECTION_ID_';
const handleDecrement = () => {
if (mintAmount <= 1) return;
setMintAmount(mintAmount - 1);
}
const handleIncrement = () => {
if (mintAmount >= 3) return;
setMintAmount(mintAmount + 1);
}
return (
<>
>
);
}
export default App;
```
# Improving Conversion
Source: https://docs.crossmint.com/payments/advanced/improving-conversion
Best practices to maximize checkout conversion
Here are a selection of best practices you can follow to optimize conversion on your checkout flow.
## 1. Safely allow high-risk transactions by enabling escrow
Escrow features only affect credit card conversion
Crossmint offers the highest credit card approval rate in the industry: a 95-98% approval rate, compared to 55% industry
benchmark.{" "}
To protect sellers against credit card fraud, Crossmint runs a proprietary anti-fraud algorithm that scores every prospective buyer, and determines whether they can purchase or not. On occasion, some payments flagged as risky may actually come from a legitimate buyer, if they were for example using an abnormal number of cards or purchasing from an unexpected location or VPN.
Crossmint allows you to turn on an optional "escrow" feature, where certain high risk transactions **will** be allowed, but the user won't receive their item until they complete a challenge post purchase. This usually **increases conversion 1-2%** on average.
If you're using the Embedded Checkout this message will be returned in the `payment:process.rejected` event.
Enabling escrow requires speaking to the [Crossmint team](https://www.crossmint.com/contact/sales) or your assigned Customer Success Engineer.
### How does escrow work?
With escrow enabled, high-risk transactions go through a different flow.
Crossmint will approve the transaction, but deposit the NFT in temporary custody until the buyer completes a quick, always automatic, verification process. This improves conversion while adding an extra step to only the riskiest transactions that would otherwise be blocked.
Crossmint dynamically scales the challenge based on the riskiness of the buyer - for some, a simple email verificaiton; for the riskiest buyers, a KYC verification. This ensures legitimate buyers can buy your NFT's, no matter their payment method, increasing your overall conversion.
You, the seller, get paid regardless of if the buyer fails the challenge. Crossmint takes the transaction risk and
verification burden for you.
Escrow works on all collections created via Crossmint's smart contracts.
External collections, imported into Crossmint console, require manual review before enabling escrow, to ensure the NFT is transferable post purchase.
{/* INTERNAL NOTE - if the customer fails, we keep the NFT in escrow and try to resell it. Essentially we reposses the item NFT. */}
{/* INTERNAL NOTE - Sometimes we refund the buyer if they fail, sometimes we don't if they're super risky. There's no hard and fast rule. */}
## 2. Ensure your checkout has the right locale
Improper locales can significantly reduce conversion. Double check that your checkout is configured to work in the locales you have customers.
You can manage the locale in your [integrated checkout components](/docs.crossmint.com/payments/advanced/component-properties#mintconfig), or your [payment order objects.](/docs.crossmint.com/payments/headless/guides/order-lifecycle/quote-phase#update-the-locale)
## 3. Choose the best payment methods
You may have data that shows your customers convert better with one payment method over another one. Customizing your checkout to feature these preferred payment methods by default is a good way to improve your conversion.
**Embedded Checkout** - Set the default payment method as your customers most preferred one (i.e. Apple Pay, Sol, etc.)
{/* INTERNAL NOTE - we don't support this in embedded V2 as of Aug 7th 2024. But embedded V3 SDKwill ship soon, and will offer the default payment as a parameter. TODO - update this with the right prop once shipped */}
**Headless Checkout** - you have full control over your UI. Put the payment method your customers prefer as default option, and pre-fill as much information as you can.
## 4. Further customize your checkout flow
You may know your customer very well, and what exactly increases conversion for them: large images, progress bars, loyalty point reward offers.
Building these bespoke checkout experiences can increase your conversion. [Embedded](/docs.crossmint.com/payments/embedded/overview) or [headless checkout](/docs.crossmint.com/payments/headless/overview) are more customizable checkout tools.
# Currency & Language Localization
Source: https://docs.crossmint.com/payments/advanced/localization
Sell to anyone, anywhere
Translate the checkout to the user's language and allow them to pay on their local currency.
If you are using our previous version of embedded checkout, please refer to the [old localization
guide](/payments/v2/advanced/localization)
The default checkout is on English and USD. Crossmint will automatically detect the location of the buyer and adjust
language and currency accordingly, unless otherwise specified by you.
## Currencies and Languages Available
| Variable | Possible Values | Description |
| ---------- | --------------------------------------------------------------------------------------------------------------------------------- | ----------------------------------- |
| `locale` | `en-US` `de-DE` `es-ES` `fr-FR` `it-IT` `ja-JP` `ko-KR` `pt-PT` `ru-RU` `th-TH` `tr-TR` `uk-UA` `vi-VN` `zh-CN` `zh-TW` `Klingon` | Language displayed to the user |
| `currency` | `USD` `AUD` `EUR` `GBP` `HKD` `INR` `JPY` `KRW` `SGD` `VND` | Fiat currency displayed to the user |
## How to Adjust the Currency and Language
You can customize the language and currency settings in all our checkout options. Here are some examples:
The hosted checkout is only available for React applications.
```tsx React
```
The embedded checkout is only available for React applications.
```tsx React
```
```json JSON
{
"locale": "en-US", //change the value as per your requirements
"payment": {
"method": "stripe-payment-element",
"currency": "usd" //change the value as per your requirements
}
}
```
# Marketplaces & Launchpads
Source: https://docs.crossmint.com/payments/advanced/marketplaces-and-launchpads
Add fiat and cross-chain crypto payments to your platform
If you are using our previous version of the hosted checkout, please refer to the [old multiple digital asset
purchases guide](/payments/v2/advanced/marketplaces-and-launchpads)
Crossmint offers additional services to marketplaces and launchpads,
including:
* Custom branding and email receipts
* Dedicated Slack channel with Crossmint's support team
* Custom SLAs
* APIs to register new collections programmatically
* Increased purchase limits
* Cart mode and ability to sweep the floor
...and more
### Integrating Crossmint into a marketplace
Integrating Crossmint into a marketplace can be as simple as
adding five lines of code, depending on the level of customization required.
The following snippet would be sufficient to render a button that enables
the purchase of one of your listings with credit card.
```jsx EVM
```
```jsx Solana
```
[Contact sales](https://www.crossmint.com/contact/sales) to get started.If you are building a new marketplace, use one of the supported contracts for a faster integration. If you are looking for help building a marketplace, [contact us](https://www.crossmint.com/contact/sales) and the Crossmint team will introduce you to the right partner.
### FAQs
Crossmint supports a wide range of contracts across chains, including:
| Blockchain | Contract |
| :--------- | :----------------------------------------------------------------------------------------------------------- |
| EVM | Reservoir, Rarible, Seaport, OpenSea, Zora, LooksRare, X2Y2, 0x, Foundation, CoinbaseNFT, Sudoswap, Manifold |
| Solana | Auction House, Magic Eden API, Hyperspace, Exchange.art |
Custom integrations available only for enterprise clients.
You can see a live implementation of the payment button on [Tensor](https://tensor.trade/).
The default transaction limit is 7,000 USD. If you need a higher limit, [contact us](https://www.crossmint.com/contact/sales)
### Integrating Crossmint into a launchpad
The integration is identical to that of the standard digital asset checkout. However, Crossmint offers additional services to improve the creator experience, including the ability to register collections via API.
[Contact sales](https://www.crossmint.com/contact/sales) to get started.
### FAQs
Crossmint powers most major launchpads across chains. You can see in action on [Manifold](https://app.manifold.xyz/c/sleeping-potato) and [Highlight](https://highlight.xyz/mint/6525a4b606bc6fa5b8acdcfa).
For primary sales, Crossmint requires creators to do light KYC and confirm their project meets Crossmint's [content policy](https://drive.google.com/file/d/1kXv5gX7C8xHJFDAnCQTNUmXrDP05YYk1/view). There are multiple options to achieve this:
* You can conduct project verification yourself.
* You can send creators to register their collection at Crossmint.com and share their collectionID with you, so you can pass it to the digital asset checkout.
* (Coming soon) You can use Crossmint's collection verification SDK to verify creators directly on your site.
# Mint to Specific Template
Source: https://docs.crossmint.com/payments/advanced/mint-to-specific-template
Specify which NFT template to mint from during checkout (for Managed collections only)
## Overview
When minting NFTs from a collection with multiple templates, you can specify which template to mint to using your Crossmint integration. This feature must be explicitly enabled in the Crossmint Console.
This gives you control over exactly which template gets minted when processing a purchase, rather than relying on random template selection.
## Supported Collection Types
Template minting is supported for Managed EVM collections only:
* Managed ERC-721 and ERC-1155 collections created in the Crossmint Console
Template minting is not available for:
* Solana collections
* Aptos collections
## Enabling Template Minting
Follow these steps in the Crossmint Console to enable template-specific minting:
1. Go to your collection in the Crossmint Console
2. Navigate to the "Payments" section
3. Under "NFT Template Settings", enable "Mint to specific NFT Template"
## Using Template IDs
If template-specific minting is disabled for your collection and you pass a template ID in the collection locator,
the request will fail with an error. Make sure to enable this feature in the Console before using template IDs.
To see all your available templates, navigate to the "NFTs" section in the Console for your managed collection.
You can also get all your available templates for a collection using the [NFT Template API](/api-reference/minting/template/get-all-templates).
Once enabled, specify which template to mint by adding the template ID to your collection locator. The collection locator format without templateId is:
```
crossmint:
```
and with templateId is:
```
crossmint::
```
The `templateId` portion is optional with mint to specific template enabled. If omitted, the system will use your collection's default minting behavior.
Here's how to implement template minting in your integration:
Add the template ID to your collection locator string:
```jsx
```
Add the template ID to your collection locator string when creating an order:
```json
{
"payment": {
"method": "stripe-payment-element" // or your preferred payment method
},
"lineItems": {
// For a specific template:
"collectionLocator": "crossmint::",
// Or for random template selection:
// "collectionLocator": "crossmint:",
"callData": {
"totalPrice": "0.001"
}
}
}
```
## Error Handling
When implementing template minting, handle these potential error cases:
1. **Template Minting Disabled**
* Error message: "Error - Mint to specific template must be enabled in Crossmint console"
* Occurs when: Using a template ID while the feature is disabled in the console
* Resolution: Enable template minting in the console settings
2. **Invalid Template ID**
* Error message: Transaction fails with template validation error
* Occurs when: The specified template ID doesn't exist in the collection
* Resolution: Verify the template ID exists in your collection
3. **No Code Storefront**
* Mint to specific template is not currently supported on No Code Storefront. If you'd like this feature, please reach out to your CSE rep
Here's how to handle these errors in your code:
```jsx
try {
{
if (error.message.includes("must be enabled")) {
// Template minting is disabled
console.error("Please enable template minting in the console");
} else if (error.message.includes("template")) {
// Invalid template ID
console.error("Invalid template ID provided");
}
}}
/>
} catch (error) {
// Handle other errors
console.error("Minting failed:", error);
}
```
```typescript
try {
const response = await fetch("/api/create-order", {
method: "POST",
body: JSON.stringify({
lineItems: {
collectionLocator: `crossmint:${collectionId}:${templateId}`,
callData: {
totalPrice: "0.001"
}
}
})
});
if (!response.ok) {
const error = await response.json();
if (error.message.includes("must be enabled")) {
// Template minting is disabled
throw new Error("Please enable template minting in the console");
} else if (error.message.includes("template")) {
// Invalid template ID
throw new Error("Invalid template ID provided");
}
throw error;
}
} catch (error) {
// Handle the error appropriately
console.error("Order creation failed:", error);
}
```
# Production Launch
Source: https://docs.crossmint.com/payments/advanced/production-launch
Follow this checklist to ensure you are ready for launch
If you are using our previous version of the hosted checkout, please refer to the [old production launch
guide](/payments/v2/advanced/production-launch)
### From Staging to Production
Crossmint provides two developer [environments](/introduction/platform/staging-vs-production): staging and production. It's recommended to test end-to-end on staging before moving to production.
Once staging is working:
1. Create or register an identical collection in production.
2. Update the client-side `apiKey` and `collectionId` values to the production ones.
3. Ensure your production API key has the `orders.create` scope enabled.
```jsx React
```
### Smart contract
Before you launch, please ensure that the following parameters and criteria are configured in your smart contract properly.
1. Price per NFT - ensure that the value is configured correctly.
2. Conditions for claim - double check the starting time, closing time, recipient address, revenue split, and other claim conditions are in order.
3. Accesslists and permissions - confirm that the accesslist is up-to-date and the appropriate permissions are set.
### Account Verification
To enable credit card payments on primaries, sellers are
required to complete a
fast KYC
process.
You only have to verify a project once, and can create as many collections
as you wish within that project. New projects require additional verification.
Cross-chain payments do not require account verification. Sellers on marketplaces are also not required to KYC.Verify your account as soon as you can, as it may require manual review. You can verify it anytime, even before having your collection ready.If you require fast-track review, please upgrade to the Pro subscription plan on the [billing tab](https://www.crossmint.com/console/billing) of the console
Account Verification requires a valid government ID and a selfie. Ensure all photos are well lit but without glare, and uncover your face removing eyewear and pulling long hair behind ears.
Crossmint offers a collection registration API and tools to verify creators and collections at scale. To learn more, [contact us](https://www.crossmint.com/contact/sales).
### Collection Verification
You must verify your collection to ensure it meets Crossmint's [content policy](https://www.crossmint.com/content-policy).
Please apply for collection verification as soon as possible as it may require manual review. Submit links to the social media of you project to accelerate a prompt review.Crossmint does not support the sale of securities, investment contracts, or any of the other categories specified on the content policy.If you require fast-track review, please upgrade to the Pro subscription plan on the [billing tab](https://www.crossmint.com/console/billing) of the console
Crossmint offers a collection registration API and tools to verify creators and collections at scale. To learn more, [contact us](https://www.crossmint.com/contact/sales).
### Transaction limits
The lower bound limit is USD \$0.75 per purchase for primaries and secondaries, and the upper bound limit is USD \$1,500 for primaries, and USD \$7,000 per purchase for secondaries (marketplaces). Those limits are per purchase. Users can make multiple purchases with total amounts surpassing those thresholds.
If you require higher limits, [contact sales](https://www.crossmint.com/contact/sales).
# Receipt Customization
Source: https://docs.crossmint.com/payments/advanced/receipt-customization
Customize your users' order receipt
Customizing the order receipt that gets sent to your users' email addresses is possible under our Enterprise plan.
## Elements that can be customized
* **Subject**: the subject of the email.
* **Header**: the header of the email.
* **Body**: the body of the receipt within the email.
* **Company logo**: you can add your company logo.
* **Remove Crossmint's links**: you can also remove Crossmint's social links and buttons (included in the default receipt sent).
* **Remove transaction hash**: you can also remove the transaction hash (included in the default receipt sent).
## Elements that cannot be customized
* You cannot include the user's name in the receipt as this information is not always available.
* You cannot remove the "Payment powered by Crossmint" message on the footer for compliance.
Please contact your Crossmint customer success engineer and provide them with the above information.
Here is an example of the default purchase receipt that is emailed to users:
Here is an example of a customized purchase receipt that is emailed to users:
# Collection Registration and Verification API
Source: https://docs.crossmint.com/payments/advanced/registration-and-verification-api
Launchpads now use Crossmint's API to register and verify a collection.
Crossmint provides an API to facilitate collection registration and verification. This functionality is for launchpads that want to use Crossmint's checkout and allow their users to go through the KYC and collection verification flow.
## Before you get started:
Contact your Crossmint customer success engineer to request the `collections.write` scope be added to an existing API key. You will need to provide the projectId associated with the API key you will be using.
Your contract also needs to meet certain requirements. Please refer to the [Bring your Own Collection](/payments/advanced/bring-your-own-collection) documentation page for further information.
Please do not share your API key secret with the Crossmint team or anyone else.
## Collection Registration and Verification process
Once a user has created a collection on your launchpad, you can optionally choose to register the collection with Crossmint to enable Credit Card payments. This API abstracts away much of the complexity involved from the user when they perform KYC and the collection verification process.
As the launchpad, you will pass information about the collection as parameters to the API. Crossmint will then return a URL where the user can complete the KYC and collection verification. This API call's structure is as follows:
Sample code for the collection registration and verification API. Click on "Response" to see what a successful response will look like.
```jsx JavaScript
// Define the API URL
const apiUrl = "https://staging.crossmint.com/api/v1-alpha1/collections";
// Set up the request body with actual data instead of placeholders
const requestBody = {
chain: "ethereum", // replace with actual chain name
contractType: "erc-721", // choose between "erc-721" or "erc-1155" or "thirdweb-drop" or "candy-machine"
args: {
contractAddress: "0x123...", // replace with actual contract address
mintFunctionName: "mintUSDC(address,uint256)", // specify the mint function
abi: [], // provide the actual contract ABI array
toParamName: "toAddress", // specify the 'to' parameter name in the mint function
erc20MintCurrency: "usdc", // the ERC20 currency to be used for minting
},
metadata: {
title: "", // replace '' with the actual collection name
description: "", // replace `` with the actual collection's description
imageUrl: "", // replace '' with actual URL to an image
},
ownership: "external", // optional - if you are regestering the collection on behalf of a creator or yourself, choose "external". Else, choose "self".
category: "Art", // specify the verification category - this expedites the collection review
scopes: ["payments:credit-card"], // required scopes- "payments:cross-chain" or "payments:credit-card", must specify at least one
};
// Set up the request options
const requestOptions = {
method: "POST",
headers: {
'Content-Type': 'application/json',
'X-API-KEY': '', // replace '' with the API Key that has the scope `collections.write`
},
body: JSON.stringify(requestBody), // Convert the JavaScript object to a JSON string
};
// Make the fetch request
fetch(apiUrl, requestOptions)
.then((response) => response.json()) // Parsing the JSON response
.then((data) => console.log("Success:", data))
.catch((error) => console.error("Error:", error));
```
```json Response (Successful)
{
"isClaimed": false,
"claimUrl": "https://www.crossmint.com/claim/collection/";
"collectionId": "",
}
```
The returned URL must be the URL that your user needs to be directed to. The user can complete the verification with that URL.
## Get Collection status
You can check the status of your user's verification with the get collection status endpoint. Upon a successful request, the verification `status` for the `seller` and `collection` may have either of the following values:
* `verified` - The user has successfully completed the verification.
* `failed` - The verification failed.
* `crossmint-review` - It is being reviewed by the Crossmint team.
* `unverified` - The user has not initiated or completed the verification process.
```jsx JavaScript
// Replace '' with the collectionId returned in the successful POST response
const collectionId = 'your_collection_id'; // Replace 'your_collection_id' with the actual ID
const apiUrl = `https://staging.crossmint.com/api/v1-alpha1/collections/${collectionId}`;
// Set up the request options
const requestOptions = {
method: 'GET',
headers: {
'X-API-KEY': '', /// replace '' with your API Key
'Content-Type': 'application/json',
}
};
// Make the fetch request
fetch(apiUrl, requestOptions)
.then(response => {
if (!response.ok) {
throw new Error('Network response was not ok: ' + response.statusText);
}
return response.json(); // Parse the JSON from the response
})
.then(data => console.log('Success:', data)) // Handle the parsed data
.catch(error => console.error('Error:', error)); // Handle any errors
```
```json Response (Successful)
{
"isClaimed": true,
"verificationStatus": {
"seller": {
"status": "verified"
};
"collection": {
"status": "verified"
};
};
"claimUrl": null,
"collectionId": ""
}
```
***
## FAQs
You can find all the possible inputs below:
```json VerificationCategory inputs
VerificationCategory {
LOYALTY: "loyalty",
ART: "art",
MUSIC: "music",
GAMING: "gaming",
TICKETING: "ticketing",
CHARITY: "charity",
OTHER: "other",
}
```
The verification requirement varies by the payment type selected for the collection.
* Credit card: Seller and collection status must be “verified”.
* Crypto: Only collection status must be “verified”.
# Purchases of Multiple NFTs
Source: https://docs.crossmint.com/payments/advanced/selling-multiple-nfts
Allow users to purchase multiple NFTs in a single order
If you are using our previous version of embedded checkout, please refer to the [old multiple NFT purchases
guide](/payments/v2/advanced/selling-multiple-nfts)
You can enable users to purchase multiple NFTs in a single transaction using either `CrossmintEmbeddedCheckout` or `CrossmintPayButton`:
```tsx
```
For EVM contracts, ensure the attribute name in `callData` matches the parameter name in your mint function. For example: If your mint function has the signature: `mintTo(address _to, uint256 _amount)` then use `_amount` instead of `quantity`.
```tsx
```
```tsx
```
All line items must use the same `collectionLocator` and be on the same blockchain.
```tsx
```
For EVM contracts, ensure the attribute name in `callData` matches the parameter name in your mint function. For example: If your mint function has the signature: `mintTo(address _to, uint256 _amount)` then use `_amount` instead of `quantity`.
```tsx
```
```tsx
```
All line items must use the same `collectionLocator` and be on the same blockchain.
***
### FAQ
**Fiat purchases**
When a user submits an order, Crossmint puts a hold on their credit card and attempts the purchase of the NFTs. If the transaction fails, the funds are released instantly (though it may take some time to be reflected on the bank statement) so the customer is never charged.
If an order results in a mix of successful and failed purchase attempts, Crossmint will only charge for the transactions that went through and return the rest instantly. Users will receive an email receipt with the final transaction amount.
**Crypto purchases**
If a transaction fails, Crossmint will return the full amount to the buyer. Any gas fees incurred will be subsidized by Crossmint.
{" "}
Yes, all NFTs in a single order must be on the same blockchain.
# Specify Recipient
Source: https://docs.crossmint.com/payments/advanced/specify-recipient
Select where the NFT should be delivered
The checkout flow will ask users where they want the NFTs to be delivered. If they don't have a wallet, Crossmint will create one on-the-fly, accessible from [crossmint.com](https://www.crossmint.com) or from your website, if you use [embedded wallets](/wallets/introduction).
However, if you already know the wallet address of the user, you can pass it to the checkout component.
Specifying the recipient would force delivery to that address. Users will not be able to modify it on the checkout.
## Specifying the Recipient of the NFT
The implementation differs slightly between the Hosted and Embedded checkouts.
Add a `mintTo` property to the button component:
```jsx React
```
```jsx Vanilla JS
```
Add a `recipient` object with properties `email` and `wallet`. If `email` is not provided, the user will be asked for it for delivery of the purchase receipt:
```jsx React
```
```jsx Vanilla JS
```
# Checking Supported Tokens
Source: https://docs.crossmint.com/payments/advanced/supported-tokens
Learn how to check if a memecoin or token is supported by Crossmint Checkout
## Introduction
Before integrating a memecoin or token using Crossmint's checkout, it's important to verify that it's supported by Crossmint. This guide will show you how to use the Crossmint API to check if a specific token is supported and what features are available for it.
## Prerequisites
Get your API keys from the [Crossmint Console](https://www.crossmint.com/console/projects/apiKeys)
[More info on creating API keys here](/introduction/platform/api-keys#how-to-get-and-use-api-keys)
Make sure the `orders.create` scope is enabled for your API key.
## Getting Started
The Supported Tokens API allows you to query the status of any token to determine if it's supported by Crossmint and what features are available.
* **Endpoint**: `https://www.crossmint.com/api/v1-alpha2/tokens/:tokenLocator`
* **Method**: GET
* **Authentication**: Requires either a server or client API key
### Token Locator Format
Currently, memecoin checkout only supports the Solana network.
The token locator follows this format:
```
network:tokenAddress
```
Example:
* TRUMP: `solana:6p6xgHyF7AeE6TZkSmFsko444wqoP15icUSqi2jfGiPN`
## Checking Token Support
### Using JavaScript
Here's how to check if a token is supported using JavaScript:
```javascript
// Example usage
const apiKey = "your-api-key"; // Replace with your actual API key
const tokenLocator = "solana:6p6xgHyF7AeE6TZkSmFsko444wqoP15icUSqi2jfGiPN"; // Example: TRUMP token
const checkTokenSupport = async (apiKey, tokenLocator) => {
try {
const response = await fetch(`https://www.crossmint.com/api/v1-alpha2/tokens/${tokenLocator}`, {
method: "GET",
headers: {
"X-API-KEY": apiKey,
"Content-Type": "application/json",
},
});
const data = await response.json();
return data;
} catch (error) {
console.error("Error checking token support:", error);
throw error;
}
};
checkTokenSupport(apiKey, tokenLocator)
.then((result) => {
console.log("Token support details:", result);
if (result.available) {
console.log("This token is supported by Crossmint!");
} else {
console.log("This token is not currently supported.");
}
console.log("Available features:", result.features);
})
.catch((err) => {
console.error("Failed to check token support:", err);
});
```
### Sample Response
A successful response will look similar to this:
```json
{
"token": "solana:6p6xgHyF7AeE6TZkSmFsko444wqoP15icUSqi2jfGiPN",
"available": true,
"features": {
"creditCardPayment": true
}
}
```
## Integrating with Your Checkout Flow
Once you've confirmed that a token is supported, you can use the information from the API response to customize your checkout experience.
### Example: Pre-checkout Validation
Here's an example of how to incorporate token support checking before initiating a checkout:
```javascript
const initiateCheckout = async (apiKey, tokenLocator, amount, recipientWallet) => {
// First, check if the token is supported
const tokenSupport = await checkTokenSupport(apiKey, tokenLocator);
if (!tokenSupport.available) {
throw new Error("This token is not currently supported by Crossmint.");
}
if (!tokenSupport.features.creditCardPayment) {
throw new Error("Credit card payment is not available for this token.");
}
// If we get here, the token is supported with credit card checkout
// Proceed with creating an order
const orderResponse = await fetch("https://www.crossmint.com/api/2022-06-09/orders", {
method: "POST",
headers: {
"X-API-KEY": apiKey,
"Content-Type": "application/json",
},
body: JSON.stringify({
lineItems: {
tokenLocator: tokenLocator,
executionParameters: {
mode: "exact-in",
amount: amount,
maxSlippageBps: "500",
},
},
payment: {
method: "stripe-payment-element",
receiptEmail: "user@example.com", // Replace with user's email
},
recipient: {
walletAddress: recipientWallet,
},
}),
});
return await orderResponse.json();
};
```
## Best Practices
1. **Cache Results (with caution)**: Token support status can change, but for frequently accessed tokens, consider caching results for a short period (e.g., 1 hour) to reduce API calls.
2. **Handle Errors Gracefully**: Implement proper error handling to provide clear feedback to users when a token is not supported.
3. **Check Before Displaying Options**: Only display payment methods that are actually available for the token.
## Next Steps
Now that you can check token support, learn how to implement a credit card checkout for memecoins
Understand the lifecycle of orders in Crossmint's checkout flow
## FAQ
Yes, if you'd like to request support for a token that is currently unsupported, please contact our support team
or your account manager.
Transactions for unsupported tokens will fail. This is why it's crucial to check token support before initiating
a checkout process.
No, each token may have different available payment features. The API response includes a `features` object that
specifies which payment methods are available for each token.
The API is rate-limited to 50 requests per second. For most applications, this should be more than sufficient.
# Testing Tips
Source: https://docs.crossmint.com/payments/advanced/testing-tips
This document is intended to share some of the best practices and tips for testing.
## Limits in Staging
In order to preserve testnet ETH/tokens, Crossmint imposes very low upper bound limits on NFT prices in the staging
environment. The default limit on production is USD $0.75 - $1,500 per transaction.
To avoid issues, set the `totalPrice` and the onchain NFT price to no more than:
* Ethereum (Sepolia): 0.000005 ETH (this applies for other EVM chains as well)
* Polygon (Amoy): 0.005 MATIC
* Solana (Devnet): 0.001 SOL
* USDC (all chains): \$10
* Other chains: the equivalent of \$0.10 in the native token
The minimum credit card charge amount is \$0.50. Even though the price of the NFT at the above rates will often be
less the \$0.01, the checkout will still show \$0.50. This will be less of an issue on production when you're
charging full price.
## Test Credit Card Numbers
When testing the Checkout and credit card payments on staging you'll need to use test card numbers. You can use these cards to test the flow end-to-end without actually processing real payments.
You can use the following test credit card numbers:
* `4242424242424242` (Visa)
* `4000056655665556` (Visa Debit)
* `5555555555554444` (Mastercard)
* `5200828282828210` (Mastercard Debit)
For `CVV` or `CVC`, use any 3 digit number
For `Expiry Date` or `MM/YY`, enter any future date
### Advanced Card Testing
If you want to simulate purchases from [different countries](https://stripe.com/docs/testing?testing-method=card-numbers#international-cards), [decline conditions](https://stripe.com/docs/testing?testing-method=card-numbers#declined-payments), or other [brands](https://stripe.com/docs/testing?testing-method=card-numbers#cards) refer to the [Stripe documentation](https://stripe.com/docs/testing?testing-method=card-numbers) for more test card numbers.
## Reviewing Orders in the Developer Console
You can get insights into the purchases being made against your collection by navigating to the Orders tab for your collection in the Developer Console. You can use this to get insights about orders in production, but also to see the status of orders when testing out your integration in the staging environment.
When looking for pre-completion phase orders while testing [Headless Checkout](/payments/headless/overview), you'll
need to enter the order ID in the search box. This is because the console view purposefully has a reduced list of
status options for filtering.
# USDC Support
Source: https://docs.crossmint.com/payments/advanced/usdc-support
How to set up Crossmint if your collection is denominated in USDC
By denominating your collection in USDC, you can eliminate price volatility, and offer a more accessible experience
to users.
If you are using our previous version of embedded checkout, please refer to the [old USDC support
guide](/payments/v2/advanced/usdc-support)
## Ensure you are using a supported USDC token
First of all, make sure your collection is denominated in one of the USDC token addresses supported by Crossmint.
USDC.e is only supported on previously registered integrations on Polygon mainnet. Please use the native USDC
address for new projects.
If you need some testnet USDC you can mint it freely from the contract or from this faucet app that uses the same
testnet token contracts as the Checkout tools.
[Crossmint Testnet USDXM Faucet](https://usdc-faucet.vercel.app/)
## Validate your collection meets the requirements
In addition to the standard requirements, keep in mind:
1. **The mint function should be `nonpayable`.**
2. **The USDC token has 6 decimals** instead of 18 like ETH, Matic, and most other tokens.
3. **The `totalPrice` attribute in the `callData` of your `lineItems` should be in units of USDC**. If your intended price is 100 USD, then you will set `totalPrice` to `100` e.g. `totalPrice="100"`.
4. **Your ERC-20 transfer call must request the funds from `msg.sender`** instead of the address parameter. This allows Crossmint to pay from our fleet of treasury wallets and deliver the NFTs directly to the user's wallet. See an example mint function below.
```solidity Solidity
function mintUSDC(address _to) public {
// pre payment logic here
// note that you need to transfer from msg.sender, NOT the _to address
tokenInstance.transferFrom(msg.sender, address(this), priceUSDC );
// actual minting logic here
}
```
```tsx
```
The `totalPrice` attribute in the `callData` of your `lineItems` should be in units of USDC. If your intended price is 100 USD, then you will set `totalPrice` to `100` e.g. `totalPrice="100"`.
Add a claim phase with currency type `USDC`. In staging. you must use `Custom ERC-20` and specify one of the token address listed above. In mainnet, you should select the default USDC option.
Denominate your candy machine on USDC and Crossmint will automatically detect it. You can learn how on this [guide](https://medium.com/crossmint-tech/how-to-create-a-fixed-price-usdc-nft-drop-on-solana-2ab251e61384).
# Webhooks
Source: https://docs.crossmint.com/payments/advanced/webhooks
Track order lifecycle events and payment status with webhooks
# Webhooks Overview
Webhooks allow you to track the status of payments and order lifecycle events in your application. They provide real-time notifications for various events like payment processing, NFT minting, and order fulfillment.
## Webhook Systems by Checkout Version
Crossmint offers different webhook systems for Checkout V2 and V3:
### Checkout V2 Webhooks (Legacy)
The Checkout V2 webhook system provides basic payment tracking with a single event type:
* `purchase.succeeded` - Triggered when an NFT has been successfully purchased and delivered
### Checkout V3 Webhooks (Current)
The Checkout V3 webhook system offers comprehensive order lifecycle tracking with multiple event types:
**Quote Phase**
* `orders.quote.created` - Triggered when a new order is created
* `orders.quote.updated` - Triggered when order details are modified
**Payment Phase**
* `orders.payment.succeeded` - Triggered when payment is successfully processed
* `orders.payment.failed` - Triggered when payment fails
**Delivery Phase**
* `orders.delivery.initiated` - Triggered when delivery begins
* `orders.delivery.completed` - Triggered when delivery succeeds
* `orders.delivery.failed` - Triggered when delivery fails
## Setting Up Webhooks
### 1. Create an endpoint route
Using a standard nodejs API server, create an endpoint.
You can test locally by installing [ngrok](https://ngrok.com/docs/getting-started/) and creating a routed endpoint
to a specified port. > **Note**: Use ngrok only for testing. In production, ensure your endpoint is properly secured
with HTTPS and appropriate access controls.
### 2. Configure the endpoint
Your endpoint should:
* Handle POST requests only
* Parse webhook events from the request body
* Respond with a `200` status code to acknowledge receipt
Your server must return a 2xx HTTP status quickly so the webhook is marked as delivered.
Example handler:
```javascript
// endpoint.js
export default function handler(req, res) {
if (req.method === "POST") {
console.log(`[webhook] Event received:`, req.body);
}
res.status(200).json({});
}
```
Don't be strict with payload validations as Crossmint may add new fields to the webhooks as products evolve.
Your server must return a 2xx HTTP status quickly so the webhook is marked as delivered.
### 3. Example Webhook Responses
```json EVM
{
"type": "purchase.succeeded",
"status": "success",
"walletAddress": "",
"projectId": "",
"collectionId": "",
"clientId": "",
"txId": "",
"contractAddress": "",
"tokenIds": [], // only present for EVM collections
"passThroughArgs": "" // only if whPassThroughArgs set
}
```
```json Solana
{
"type": "purchase.succeeded",
"status": "success",
"walletAddress": "",
"clientId": "",
"txId": "",
"mintAddress": "",
"passThroughArgs": ""
}
```
```json
{
"type": "orders.quote.created",
"payload": {
"totalPrice": {
"amount": "0.50",
"currency": "usd"
},
"lineItems": [
{
"metadata": {
"title": "Collection Name",
"description": "Collection Description",
"imageUrl": "https://..."
},
"price": {
"amount": "0.50",
"currency": "usd"
},
"quantity": 1
}
]
}
}
```
```json
{
"type": "orders.payment.succeeded",
"payload": {
"orderIdentifier": "7723139d-fba3-474d-8e52-0ac7512d5c7b",
"paymentMethodType": "credit-card",
"totalPrice": {
"amount": "0.50",
"currency": "usd"
}
}
}
```
```json
{
"type": "orders.delivery.completed",
"payload": {
"orderIdentifier": "7723139d-fba3-474d-8e52-0ac7512d5c7b",
"txId": "0x2e69f11dae7869b92e3d5eaf4cadd50c48b5c6803d1232815f979d744521ad4c",
"contractAddress": "0xE04Cf294985282Ddc088E6433c064cfB85eD9EdA",
"tokenIds": ["3"],
"recipient": {
"walletAddress": "0x..."
}
}
}
```
### 4. Pass Custom Arguments (Optional)
Custom arguments (whPassThroughArgs) are only supported in Checkout V2 webhooks. This feature is not available in
Checkout V3 webhooks (orders.\*).
You can pass custom arguments through Checkout V2 webhooks to track additional information:
* User IDs (If you want additional security, sign this ID with a custom key, or send it as a signed JWT, and verify its integrity later on your server)
* Timestamps
* Product SKUs
* Custom metadata
Example of passing arguments:
```jsx
function NFTSalePage() {
const whArgs = {
uid: 123424,
sku: 123123123,
metadata: { custom: "data" },
};
const whArgsSerialized = JSON.stringify(whArgs);
return (
);
}
```
Then, extract them on the server:
```javascript
export default function handler(req, res) {
const { whPassThroughArgs } = req.body;
if (whPassThroughArgs) {
const whArgsDeserialized = JSON.parse(whPassThroughArgs);
console.log(whArgsDeserialized);
}
res.status(200).json({});
}
```
### 5. Pre & Post Processing
Add your pre and post processing logic when setting up your webhook listener. For example, you can call back to your database when a certain id has succeeded or even use Sendgrid or EmailJS to send an email to a recipient when a mint completes.
### 6. Configure in Crossmint Console
1. Navigate to the [Webhooks page](https://www.crossmint.com/console/webhooks) in the console
2. Click **Add Endpoint**
3. Enter your endpoint URL
4. Select the webhook events to receive
5. Click **Create**
### 6. Security
For security, verify webhook signatures using the signing secret from your endpoint details page:
See the [Verify Webhooks](/introduction/platform/webhooks/verify-webhooks) guide for implementation details.
## Testing Webhooks
1. Use test card number `4242 4242 4242 4242` for successful payments
2. Use `4000 0000 0000 4954` to test payment failures
3. Monitor webhook deliveries in the [Console](https://www.crossmint.com/console/webhooks)
# Apple Pay Integration Guide
Source: https://docs.crossmint.com/payments/embedded/guides/apple-pay
Learn how to enable Apple Pay on your site for Checkout
To enable Apple Pay on your site, follow these steps:
## Prerequisites
1. **HTTPS Hosting**: Your site must be hosted on HTTPS to ensure secure transactions.
2. **Domain Validation**: Provide your domain to our support team for validation.
## Download the Apple Validation File
Before proceeding, download the Apple Developer Merchant ID Domain Association File:
[Download the Apple Developer Merchant ID Domain Association File](https://stripe.com/files/apple-pay/apple-developer-merchantid-domain-association)
## Setup Instructions
### Step 1: Host the Apple Developer Merchant ID Domain Association File
You need to host the following endpoint on your server and return the Apple `.txt` validation file as plain text:
```
https://[your-domain]/.well-known/apple-developer-merchantid-domain-association
```
### Example Setup Using Next.js App Router
**Option 1: Using the Public Folder**
1. **Create a Public Folder**: In your Next.js project, create the `.well-known` folder inside your public directory.
2. **Add the Validation File**: Paste the Apple verification txt with no extension in `public/.well-known/`.
Filename: `apple-developer-merchantid-domain-association`
**Option 2: Using a Route**
1. **Create the Route Structure**: In your Next.js project, create a folder at:
Path: `app/.well-known/apple-developer-merchantid-domain-association/`
2. **Add a `route.ts` File**: Inside the folder, create a `route.ts` file with the following content:
```typescript route.ts
import { NextResponse } from "next/server";
export async function GET() {
return new NextResponse("TXT-CONTENT", {
headers: {
"Content-Type": "text/plain",
},
});
}
```
Replace `'TXT-CONTENT'` with the actual content of your Apple validation file.
### Example Setup Using Next.js Page Router
1. **Create a Public Folder**: In your Next.js project, create the `.well-known` folder inside your public directory.
2. **Add the Validation File**: Paste the Apple verification txt with no extension in `public/.well-known/`.
Filename: `apple-developer-merchantid-domain-association`
### Example Setup Using Vite
1. **Create a Public Folder**: In your Vite project, create the `.well-known` folder inside your public directory.
2. **Add the Validation File**: Paste the Apple verification txt with no extension in `public/.well-known/`.
Filename: `apple-developer-merchantid-domain-association`
### Step 2: Test Apple Pay
Test Apple Pay on Safari (macOS) or any iOS device once setup is complete.
## Local Testing
We recommend using [ngrok](https://ngrok.com/) to test your setup locally. Ngrok allows you to expose your local server to the internet securely. If possible, use a fixed domain with ngrok for consistent testing.
***
For further assistance, please contact our support team.
# Custom Payer
Source: https://docs.crossmint.com/payments/embedded/guides/custom-payer
Learn how to integrate your own wallet solution with Crossmint's embedded checkout
## Overview
While Crossmint provides built-in wallet support, you can also integrate your own wallet solution using the `payer` prop. This is useful when:
* You're already using a wallet connection solution (like RainbowKit, Web3Modal, or ConnectKit)
* You want to customize the transaction signing flow
* You need to support specific wallets or chains
## Quick Integration
Here's a simple example using [wagmi](https://wagmi.sh/) and [viem](https://viem.sh/):
```tsx
import { CrossmintEmbeddedCheckout } from "@crossmint/client-sdk-react-ui";
import { useAccount, useWalletClient } from "wagmi";
import { Hex, parseTransaction } from "viem";
function Checkout() {
const { data: walletClient } = useWalletClient();
const { address } = useAccount();
// Map of supported chains to their IDs
const chainIds = {
"base-sepolia": 84532,
"polygon-amoy": 80002,
} as const;
if (!address || !walletClient) {
return
Connect your wallet to continue
;
}
return (
{
await walletClient.switchChain({
id: chainIds[chain],
});
},
handleSignAndSendTransaction: async (serializedTx) => {
try {
const tx = parseTransaction(serializedTx as Hex);
const hash = await walletClient.sendTransaction({
to: tx.to,
value: tx.value,
data: tx.data ?? "0x",
gas: tx.gas,
chainId: tx.chainId,
});
return { success: true, txId: hash };
} catch (error) {
return {
success: false,
errorMessage: error instanceof Error ? error.message : "Transaction failed",
};
}
},
},
},
// Disable fiat payment
fiat: { enabled: false },
}}
/>
);
}
```
When the user clicks the hosted checkout button, our SDK will first call `handleChainSwitch` to ensure the correct
network is set, then `handleSignAndSendTransaction` to complete the purchase.
## Payer Configuration
The `payer` prop accepts the following configuration:
| Property | Type | Description |
| ------------------------------ | -------------------------------------------------------- | ------------------------------------------------------------------------------------------------------------------------------------------------------------------------- |
| `address` | `string` | The wallet address of the payer |
| `initialChain` | `PayerSupportedBlockchains` | The initial blockchain (e.g. "polygon", "ethereum", "base-sepolia") |
| `supportedChains` | `PayerSupportedBlockchains[]` | Optional list of supported chains. Defaults to `initialChain` if not specified |
| `handleChainSwitch` | `(chain: PayerSupportedBlockchains) => Promise` | Function to handle chain switching |
| `handleSignAndSendTransaction` | `(serializedTx: string) => Promise` | Function to handle transaction signing and sending, where `TransactionResponse` is either `{ success: true, txId: string }` or `{ success: false, errorMessage: string }` |
## Popular Wallet Solutions
You can integrate Crossmint with popular Web3 solutions:
### RainbowKit
```tsx
import { useConnectModal } from "@rainbow-me/rainbowkit";
// Similar implementation as above, but using RainbowKit's hooks
```
### Web3Modal
```tsx
import { useWeb3Modal } from "@web3modal/react";
// Similar implementation as above, but using Web3Modal's hooks
```
## Best Practices
1. **Error Handling**: Always return clear error messages in `handleSignAndSendTransaction`
2. **Chain Support**: Be explicit about supported chains to avoid runtime errors
3. **User Experience**: Show loading states during chain switches and transactions
4. **Wallet Connection**: Ensure wallet is connected before showing checkout
## Related Resources
* [Payment Methods](/payments/embedded/guides/payment-methods)
* [React Hooks](/payments/embedded/guides/hooks)
* [Testing Tips](/payments/advanced/testing-tips)
# React Hooks
Source: https://docs.crossmint.com/payments/embedded/guides/hooks
Learn how to use React hooks to control and customize your Embedded Checkout experience
If you are using our previous version of embedded checkout, please refer to the [old events
guide](/payments/v2/embedded/events)
## Complete Example
Here's a full example showing how to implement a custom checkout experience:
```tsx
import {
CrossmintProvider,
CrossmintCheckoutProvider,
CrossmintEmbeddedCheckout,
useCrossmintCheckout,
} from "@crossmint/client-sdk-react-ui";
function CheckoutPage() {
return (
);
}
function CheckoutStatus() {
const { order } = useCrossmintCheckout();
if (!order) {
return
Loading...
;
}
switch (order.phase) {
case "completed":
return
Purchase complete!
;
case "delivery":
return
Delivering your NFTs...
;
case "payment":
return
Processing payment...
;
case "quote":
return
Preparing your order...
;
}
}
```
## Migration from Previous Version
If you're migrating from the previous version, note these key differences:
* The event system has been replaced with the `useCrossmintCheckout` hook
* Order status is now accessed through the hook instead of event listeners
* Custom UI is built using React components instead of event handlers
* Components must be wrapped with required providers
The new hook-based approach provides a more React-friendly experience and better TypeScript support compared to the
previous event system.
## Related Resources
* [UI Customization](/payments/embedded/guides/ui-customization)
* [Payment Methods](/payments/embedded/guides/payment-methods)
* [Order Lifecycle](/payments/headless/guides/order-lifecycle)
* [Testing Tips](/payments/advanced/testing-tips)
# Payment Methods
Source: https://docs.crossmint.com/payments/embedded/guides/payment-methods
Enable a complete payment suite for your digital asset checkout - from traditional credit cards and digital wallets to cross-chain crypto payments, all through a single integration
If you are using our previous version of embedded checkout, please refer to the [old crypto payments
guide](/payments/v2/embedded/pay-with-crypto)
## Overview
Crossmint's Embedded Checkout makes it easy to accept multiple payment methods. Users can pay:
* With credit/debit cards
* Using Apple Pay or Google Pay
* Using ETH, SOL, USDC, EURC, or other supported tokens
* Using cross-chain crypto on supported chains
## Quick Integration
Enable all payment methods with just a few lines of code:
```jsx
```
## Fiat Payments
### Credit Cards & Digital Wallets
Embedded Checkout provides a seamless fiat payment experience supporting:
* All major credit and debit cards
* Apple Pay for iOS/Safari users
* Google Pay for Android/Chrome users
You can configure which fiat payment methods to enable:
```jsx
payment={{
fiat: {
enabled: true,
// By default, all payment methods are enabled if you don't specify any.
allowedMethods: {
card: true, // Enable/disable credit cards
applePay: true, // Enable/disable Apple Pay
googlePay: true, // Enable/disable Google Pay
},
defaultCurrency: "usd" // Set default currency
}
}}
```
## Crypto Payments
### Native Wallet Support
Embedded Checkout works with any Web3 wallet, including:
* MetaMask
* Coinbase Wallet
* WalletConnect
* Phantom
Users can pay with ETH, SOL, stablecoins (USDC, EURC), or other supported tokens on their preferred chain. Enable crypto payments with:
```jsx
payment={{
crypto: {
enabled: true,
defaultChain: "ethereum", // Optional: Set default blockchain
defaultCurrency: "usdc" // Optional: Set default currency (usdc, eurc, eth)
}
}}
```
## Cross-Chain Support
The checkout supports paying with funds from any supported blockchain, even if the digital asset is on a different chain. For example, a user could pay for a digital asset on Polygon using ETH from their Ethereum wallet. The checkout handles all necessary conversions automatically.
## Customizing the Default Experience
Set a default payment method to guide users:
```jsx
payment={{
defaultMethod: "fiat", // or "crypto"
crypto: {
enabled: true
},
fiat: {
enabled: true
}
}}
```
### Test Price Limits and Test Credit Cards
When building your applications using the staging environment, you can use various test credit cards numbers to see the entire process end-to-end, without actually having to transact using a real credit card. Check out the Testing Tips page for more info on [price limits](/payments/advanced/testing-tips#limits-in-staging) and [test card numbers](/payments/advanced/testing-tips#test-credit-card-numbers).
## Best Practices
* Enable Multiple Payment Methods: Offer both fiat and crypto options to maximize conversion
* Set Default Currency: Choose a default that matches your target market
* Test All Flows: Use test cards and test wallets to verify the complete payment experience
* Handle Events: Use the `useCrossmintCheckout` hook to track payment status and handle completion
## Related Resources
* [Price Limits](/payments/advanced/testing-tips#limits-in-staging)
* [Test Credit Card Numbers](/payments/advanced/testing-tips#test-credit-card-numbers)
* [Order Lifecycle](/payments/headless/guides/order-lifecycle)
* [Customizing Appearance](/payments/embedded/guides/ui-customization)
* [React Hooks](/payments/embedded/guides/hooks)
# UI Customization
Source: https://docs.crossmint.com/payments/embedded/guides/ui-customization
Learn how to customize the Embedded Checkout UI to match your brand identity and design system
If you are using our previous version of embedded checkout, please refer to the [old UI customization
guide](/payments/v2/embedded/ui-customization)
## Quick Start
The checkout UI can be customized using the `appearance` prop:
```jsx
```
## Customization Options
### Custom Fonts
Load custom fonts using the `fonts` array:
```jsx
appearance={{
fonts: [
{ cssSrc: "https://fonts.googleapis.com/css2?family=Inter:wght@400;500;600&display=swap" },
{ cssSrc: "https://fonts.googleapis.com/css2?family=Roboto:wght@400;500;700&display=swap" }
]
}}
```
### Global Variables
Control the overall look and feel with these global variables:
```jsx
appearance={{
variables: {
// Typography
fontFamily: "Inter, system-ui, sans-serif",
fontSizeUnit: "16px",
// Spacing
spacingUnit: "1rem",
borderRadius: "8px",
// Colors
colors: {
borderPrimary: "#E0E0E0",
backgroundPrimary: "#FFFFFF",
textPrimary: "#000000",
textSecondary: "#666666",
danger: "#FF0000",
warning: "#FFA500",
accent: "#0074D9"
}
}
}}
```
### Component Rules
Control the visibility of specific inputs:
```jsx
appearance={{
rules: {
DestinationInput: {
display: "hidden" // Hides the wallet address input
},
ReceiptEmailInput: {
display: "hidden" // Hides the email input
}
}
}}
```
When hiding inputs, make sure to provide the corresponding values via props:
* For hidden `DestinationInput`, provide `recipient.walletAddress`
* For hidden `ReceiptEmailInput`, provide `payment.receiptEmail`
Customize label styling:
```jsx
appearance={{
rules: {
Label: {
font: {
family: "Inter",
size: "14px",
weight: "500",
},
colors: {
text: "#333333",
},
},
},
}}
```
Style input fields:
```jsx
appearance={{
rules: {
Input: {
borderRadius: "8px",
font: {
family: "Inter",
size: "16px",
weight: "400",
},
colors: {
text: "#000000",
background: "#FFFFFF",
border: "#E0E0E0",
boxShadow: "none",
placeholder: "#999999",
},
hover: {
colors: {
border: "#0074D9",
},
},
focus: {
colors: {
border: "#0074D9",
boxShadow: "0 0 0 2px rgba(0,116,217,0.2)",
},
},
},
},
}}
```
Customize tab appearance:
```jsx
appearance={{
rules: {
Tab: {
borderRadius: "4px",
font: {
family: "Inter",
size: "14px",
weight: "500",
},
colors: {
text: "#666666",
background: "transparent",
},
selected: {
colors: {
text: "#000000",
background: "#F5F5F5",
},
},
hover: {
colors: {
background: "#F0F0F0",
},
},
},
},
}}
```
Style primary buttons:
```jsx
appearance={{
rules: {
PrimaryButton: {
borderRadius: "8px",
font: {
family: "Inter",
size: "16px",
weight: "600"
},
colors: {
text: "#FFFFFF",
background: "#0074D9"
},
hover: {
colors: {
background: "#0063B8"
}
},
disabled: {
colors: {
text: "#FFFFFF",
background: "#CCCCCC"
}
}
}
}
}}
```
## Common Examples
### Modern Dark Theme
```jsx
appearance={{
variables: {
fontFamily: "Inter, system-ui, sans-serif",
colors: {
backgroundPrimary: "#1A1A1A",
textPrimary: "#FFFFFF",
textSecondary: "#A0A0A0",
borderPrimary: "#333333",
accent: "#7928CA"
}
},
rules: {
Input: {
colors: {
background: "#2D2D2D",
border: "#404040",
text: "#FFFFFF",
placeholder: "#666666"
}
},
PrimaryButton: {
colors: {
background: "#7928CA",
text: "#FFFFFF"
},
hover: {
colors: {
background: "#6B24B2"
}
}
}
}
}}
```
### Minimal Light Theme
```jsx
appearance={{
variables: {
fontFamily: "system-ui, sans-serif",
borderRadius: "4px",
colors: {
backgroundPrimary: "#FFFFFF",
textPrimary: "#000000",
borderPrimary: "#E0E0E0",
accent: "#000000"
}
},
rules: {
Input: {
borderRadius: "4px",
colors: {
background: "#F5F5F5",
border: "transparent"
},
focus: {
colors: {
border: "#000000",
boxShadow: "none"
}
}
},
PrimaryButton: {
borderRadius: "4px",
colors: {
background: "#000000",
text: "#FFFFFF"
}
}
}
}}
```
## Related Resources
* [Payment Methods](/payments/embedded/guides/payment-methods)
* [React Hooks](/payments/embedded/guides/hooks)
* [Order Lifecycle](/payments/headless/guides/order-lifecycle)
* [Testing Tips](/payments/advanced/testing-tips)
# Overview
Source: https://docs.crossmint.com/payments/embedded/overview
Create seamless purchases with a fully customizable checkout experience
For an overview of our checkout solution, please refer to the [introduction](/payments/introduction). This guide specifically covers embedded checkout features.
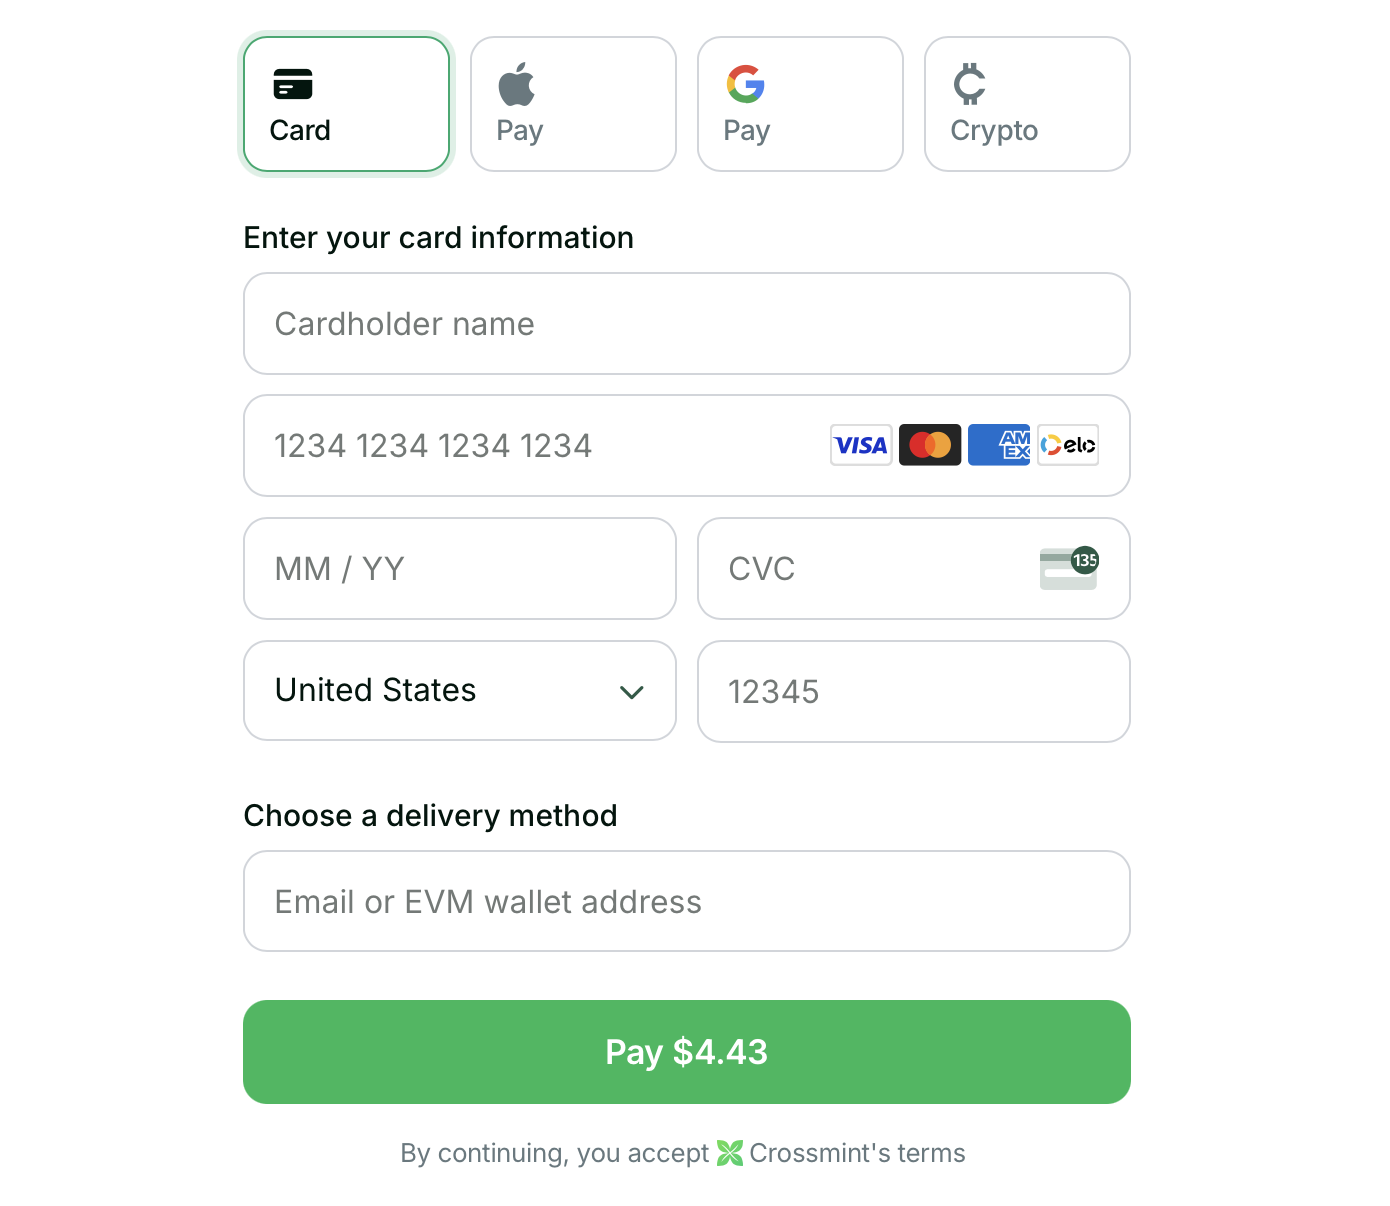
See the embedded checkout in action on the [Crossmint Playground](https://playground.crossmint.com/checkout/embedded).
## When is the Embedded Checkout the best fit?
* **You want to insert the checkout into your site**
* **You want high level of control over the UI/UX**
## Get Started
Start selling digital assets in 5 minutes.
Contact our sales team for advanced support.
## Advanced Topics
# Quickstart ⚡
Source: https://docs.crossmint.com/payments/embedded/quickstart
Embed a onchain checkout into a web app in under 5 minutes
If you are using our previous version of embedded checkout, please refer to the [old quickstart
guide](/payments/v2/embedded/quickstart)
## Introduction
In this guide, you will create a web app with Next.js which allows customers to buy NFTs with credit card and crypto payments, using Crossmint's embedded checkout. Crossmint also supports payments for [crypto onramp](/payments/headless/guides/onramp), [memecoins](/payments/headless/quickstarts/credit-card-memecoin), and other onchain assets (ERC20 tokens, ERC721 tokens, and ERC1155 tokens).
If you want to get started immediately, you can clone a repo with a functioning embedded checkout here: [https://github.com/Crossmint/crossmint-embedded-demo](https://github.com/Crossmint/crossmint-embedded-demo). If you want to get started step by step, continue following the guide below.
### Basic Integration
Perfect for getting started quickly with a simple checkout flow.
Create `.env.local` in your project root:
```sh
NEXT_PUBLIC_CLIENT_API_KEY="_YOUR_CLIENT_API_KEY_" # From API Keys page
NEXT_PUBLIC_COLLECTION_ID="_YOUR_COLLECTION_ID_" # From Collection details page
```
Create `/src/app/page.tsx` with:
```tsx
"use client";
import { CrossmintProvider, CrossmintEmbeddedCheckout } from "@crossmint/client-sdk-react-ui";
export default function Home() {
const clientApiKey = process.env.NEXT_PUBLIC_CLIENT_API_KEY as string;
const collectionId = process.env.NEXT_PUBLIC_COLLECTION_ID as string;
return (
);
}
```
Navigate to the directory your package.json is to run the app
```bash
cd embedded-checkout/crossmint-embedded-checkout-demo
```
### Advanced Integration
Need purchase tracking, multiple NFT purchases at once, or more customization? Here's a complete setup with additional features:
```tsx
"use client";
import { useEffect } from "react";
import {
CrossmintProvider,
CrossmintCheckoutProvider,
CrossmintEmbeddedCheckout,
useCrossmintCheckout,
} from "@crossmint/client-sdk-react-ui";
// Component with purchase tracking
function Checkout() {
const { order } = useCrossmintCheckout();
const collectionId = process.env.NEXT_PUBLIC_COLLECTION_ID as string;
useEffect(() => {
if (order && order.phase === "completed") {
console.log("Purchase completed!");
// Handle successful purchase
}
}, [order]);
return (
);
}
// Main component with providers
export default function Home() {
const clientApiKey = process.env.NEXT_PUBLIC_CLIENT_API_KEY as string;
return (
);
}
```
This advanced example showcases: - Multiple NFTs in one checkout - Purchase status tracking - Preferred payment
methods and currencies - Email-based NFT delivery - Language settings Learn more in our guides: - [Payment
Methods](/payments/embedded/guides/payment-methods) - [Multi-purchases](/payments/advanced/selling-multiple-nfts) -
[React Hooks](/payments/embedded/guides/hooks)
### Testing Your Integration
This demo uses the staging environment: - Use [test credit
cards](/payments/advanced/testing-tips#test-credit-card-numbers) for payments - Get test USDC from our
[faucet](/payments/advanced/testing-tips#getting-test-tokens) - Check [price
limits](/payments/advanced/testing-tips#limits-in-staging) for staging
## All Set!
You've successfully integrated card and crypto payments with the Crossmint Embedded Checkout!
Remember this demo is built on staging, so the digital assets will show up on the testnets. To launch on production,
check the [production launch checklist](/payments/advanced/production-launch). You will need to contact
[Sales](https://www.crossmint.com/contact/sales) to enable the embedded checkout on production.
## Next Steps
### Customize the UI and Behavior Further
Learn how to customize the look and feel of your checkout
Configure available payment options for your users
Use React hooks to build custom checkout experiences
### Advanced Topics
# Upgrade to V3
Source: https://docs.crossmint.com/payments/embedded/upgrade/v3
Learn how to migrate to the latest version, V3, of Crossmint's Embedded Checkout
export const PackageManagerCommand = ({npm, pnpm, yarn, command, packageName}) => {
const PACKAGE_MANAGER_COMMANDS = {
"add-package": {
npm: `npm install ${packageName}`,
pnpm: `pnpm add ${packageName}`,
yarn: `yarn add ${packageName}`
},
install: {
npm: "npm install",
pnpm: "pnpm install",
yarn: "yarn install"
}
};
let prefixes = (() => {
if (Object.keys(PACKAGE_MANAGER_COMMANDS).includes(command)) {
return PACKAGE_MANAGER_COMMANDS[command];
} else if (command) {
console.warn(`[PackageManagerCommand] Unknown command: ${command}`);
}
return {
npm: "",
pnpm: "",
yarn: ""
};
})();
return
{prefixes.npm}{npm}
{prefixes.pnpm}{pnpm}
{prefixes.yarn}{yarn}
;
};
## Overview
The latest version of Crossmint's Embedded Checkout, Embedded V3, introduces a new architecture focused on simplicity and developer experience. Migrating your existing checkout integration is straightforward and can typically be completed in under 15 minutes. This guide will walk you through each step.
### Which Version Am I Using?
Only two versions of Embedded Checkout exist, each using its own distinct component:
* **V3**: The new `` component
* **V2**: The legacy `` component
The Embedded Checkout V3 component is available in `@crossmint/client-sdk-react-ui@1.12.0` and above. Make sure to
update your dependencies to the latest version.
## What's New in V3?
React hooks, TypeScript support, and simpler APIs
Sell multiple NFTs in a single checkout with individual delivery tracking
More customization options and better payment method support
## Key Changes
Embedded Checkout V3 introduces powerful new features focused on making your life easier:
1. **Simpler Developer Experience**: More intuitive and idiomatic component API - less code, easier to understand
2. **Built-in Order Management**: Complete order status UI out of the box - no more manual event handling (but fully customizable if needed)
3. **React Hooks for State Management**: Replace event listeners with hooks for better control over the order lifecycle and checkout state
4. **Multi-Item Support**: Sell multiple NFTs in a single checkout with individual delivery tracking for each item
5. **Better UI Customization**: Includes more UI customization options - now you can control every aspect of the checkout's appearance
6. **Advanced Cross-chain Support**: Streamlined payment flows with expanded cross-chain capabilities
### Component Renaming
The main checkout component has been renamed from `CrossmintPaymentElement` to `CrossmintEmbeddedCheckout` to better reflect its purpose and capabilities. This component now supports multiple line items, advanced payment methods, and enhanced UI customization.
### Provider Architecture
The new Embedded Checkout V3 uses [React Context](https://react.dev/learn/passing-data-deeply-with-context) providers to manage state and configuration. The `CrossmintProvider` handles API authentication and environment setup using a client-side API key (more details in [Step 1](#1-get-a-client-api-key)), while `CrossmintCheckoutProvider` manages order state and checkout flow.
```tsx
```
### Property Updates
Key property changes in Embedded Checkout V3:
* Introduces new `lineItems` property for multi-item support
* Uses `callData` object in each line item, replacing the previous `mintConfig` property
* Supports primary sales through `collectionLocator` with format `crossmint:${collectionId}` or `${chain}:${contractAddress}`
* Supports secondary sales through `tokenLocator` with format `${chain}:${contractAddress}:${tokenId}`
* Replaces `uiConfig` with `appearance` - see our [UI Customization guide](/payments/embedded/guides/ui-customization)
* Determines environment automatically from your API key
* Replaces event handlers with React hooks - see our [Hooks guide](/payments/embedded/guides/hooks)
### React Hooks for State Management
Events have been replaced with React hooks, providing better TypeScript support and a more intuitive development experience:
```tsx
// Old - Event-based system
{
switch (event.type) {
case "payment:process.succeeded":
console.log("Payment successful!");
break;
case "payment:process.failed":
console.log("Payment failed:", event.payload.error);
break;
}
}}
/>;
// New - Hook-based system
function Checkout() {
const { order } = useCrossmintCheckout();
useEffect(() => {
switch (order?.phase) {
case "completed":
console.log("Purchase complete!");
break;
case "delivery":
console.log("Delivering NFTs...");
break;
case "payment":
console.log("Processing payment...");
break;
}
}, [order]);
}
```
### Multiple Line Items Support
Embedded Checkout V3 supports checking out multiple items (with different token IDs or collections) at once. Each line item has its own delivery status, allowing for granular tracking of each of the line items:
```tsx
```
### Secondary Sales Support
Embedded Checkout V3 introduces a cleaner way to handle secondary sales using the new `tokenLocator` property:
```tsx
// EVM secondary sale
// Solana secondary sale
```
When handling multiple items (e.g., marketplace or multi-item sales), each item has its own delivery status. If one
item fails to deliver, others may still complete successfully. Make sure to handle each item's status independently:
```tsx
function CheckoutStatus() {
const { order } = useCrossmintCheckout();
return (
);
}
```
### Orders API Integration
The new version integrates with our [Orders API](/api-reference/orders/overview), enabling programmatic access to order status, history, and management. This allows you to build custom experiences and integrate with your backend systems.
## Migration Steps
### 1. Get a Client API Key
Create a client-side API key with the `orders.create` scope enabled. [More info on creating API keys here](/introduction/platform/api-keys#how-to-get-and-use-api-keys).
### 2. Update Dependencies
Upgrade the Crossmint React SDK to version `1.12.0` or above.
### 3. Update Import Statements
```tsx
// Old
import { CrossmintPaymentElement } from "@crossmint/client-sdk-react-ui";
// New
import { CrossmintProvider, CrossmintEmbeddedCheckout } from "@crossmint/client-sdk-react-ui";
```
### 4. Update Environment Variables
Change your Crossmint environment variables (e.g. in your `.env.local` file or Vercel configuration):
```bash
# Old
NEXT_PUBLIC_PROJECT_ID="_YOUR_PROJECT_ID_" # No longer needed - derived from the API key
NEXT_PUBLIC_COLLECTION_ID="_YOUR_COLLECTION_ID_"
NEXT_PUBLIC_ENVIRONMENT="staging" # No longer needed - derived from the API key
# New
NEXT_PUBLIC_CLIENT_API_KEY="_YOUR_CLIENT_API_KEY_" # From API Keys page
NEXT_PUBLIC_COLLECTION_ID="_YOUR_COLLECTION_ID_" # From Collection details page
```
The `projectId` and `environment` values are now automatically derived from the client-side API key.
### 5. Update Component Structure
Instead of a single react component, ``, the new checkout now has
one provider, `` that can be added in your layout page, or the same page you
have checkout on, and one react component, that has been renamed to ``.
The properties in the react component have changed:
* `projectId` and `environment` are no longer needed
* You now specify which items to buy using `lineItems`, an array of items that support both `collectionLocator` (for primary sales with formats `"crossmint:${collectionId}"` or `${chain}:${contractAddress}`) and `tokenLocator` (for secondary sales with the format `${chain}:${contractAddress}:${tokenId}`). Each item includes `callData` that takes the same object previously passed to `mintConfig`
#### Primary Sales
```tsx
// Old
// New
```
#### Secondary Sales
```tsx
// Old - EVM Secondary Sale
// New - EVM Secondary Sale
// Old - Solana Secondary Sale
// New - Solana Secondary Sale
```
Don't forget to add payment configuration to enable crypto/fiat payments:
```tsx
payment={{
crypto: { enabled: true },
fiat: { enabled: true }
}}
```
## Advanced Features
Once you have the basic setup working, V3 now supports these additional features:
### Payment Methods
Enable crypto and fiat payment options, and set preferred chains and currencies for your users. Learn more in our [Payment Methods guide](/payments/embedded/guides/payment-methods).
```tsx
payment={{
crypto: {
enabled: true,
defaultChain: "polygon",
},
fiat: {
enabled: true,
allowedMethods: {
card: true,
applePay: true,
googlePay: true,
}
}
}}
```
To enable Apple Pay, you'll need to follow our [Apple Pay setup guide](/payments/embedded/guides/apple-pay). Apple
Pay is now rendered directly on your site in V3, which requires domain verification through Apple.
### UI Customization
Customize colors, typography, and component styles to match your brand. Learn more in our [UI Customization guide](/payments/embedded/guides/ui-customization).
```tsx
appearance={{
variables: {
fontSizeUnit: '1rem',
borderRadius: '8px',
colors: {
backgroundPrimary: '#ffffff',
textPrimary: '#000000',
}
}
}}
```
### Order Tracking
Embedded Checkout V3 now makes it easier to track order status using React hooks. Learn more in our [React hooks guide](/payments/embedded/guides/hooks).
Wrap your checkout component with `CrossmintCheckoutProvider` and use the `useCrossmintCheckout` hook:
```tsx
import {
CrossmintProvider,
CrossmintCheckoutProvider,
CrossmintEmbeddedCheckout,
useCrossmintCheckout,
} from "@crossmint/client-sdk-react-ui";
const clientApiKey = process.env.NEXT_PUBLIC_CLIENT_API_KEY;
const collectionId = process.env.NEXT_PUBLIC_COLLECTION_ID;
function Checkout() {
const { order } = useCrossmintCheckout();
useEffect(() => {
if (order && order.phase === "completed") {
console.log("Purchase completed!");
// Handle successful purchase
}
}, [order]);
return (
);
}
// Wrap with both providers
function App() {
return (
);
}
```
Learn more about available hooks in our [React hooks guide](/payments/embedded/guides/hooks).
### Complete Example
A complete example combining all features:
```tsx
```
## Related Resources
* [Quickstart Guide](/payments/embedded/quickstart)
* [Custom Payer Guide](/payments/embedded/guides/custom-payer)
* [Payment Methods](/payments/embedded/guides/payment-methods)
* [UI Customization](/payments/embedded/guides/ui-customization)
# Create/Deploy an NFT Collection
Source: https://docs.crossmint.com/payments/guides/create-collection
Easily deploy a collection in the console and enable payments
The easiest way to get started with selling or airdropping NFTs is to use the developer console to deploy and manage your NFT contracts.
## Create a Crossmint NFT Collection
This guide will deploy an ERC-721 contract on the Polygon Amoy testnet. Currently, you can also deploy to the mainnets and testsnets for Polygon, Base, Optimism, and Solana directly from the console. Additional chains are supported when deploying via the [create-collection API](/api-reference/minting/collection/create-collection).
This information is displayed in the Hosted Checkout, Storefront, and Claim pages. You can edit it later.
You can select both options if you want to sell NFTs and also allow users to claim them for free. If you want to use this collection exclusively with the [Minting Tools](/minting/introduction), select the `Airdrop NFTs` option only.
Crossmint has staging and production [environments](/introduction/platform/staging-vs-production) to facilitate working in testnets or mainnets.
When creating a new collection on production you'll need some API credits to cover the gas cost of contract deployment.
#### NFT Price
Enter the price you want to charge for your NFT. When using the staging environment, please set very low test prices to help use preserve our testnet currency. Everything works the same in staging and production, so you can test your collection with low prices in staging and then deploy to production with higher prices.
In production, there is a lower bound limit of USD $0.75, and an upper bound limit of USD $1,500 per transaction. You can find more information if you need to [increase this limit](/payments/advanced/production-launch#default-transaction-limit).
#### USDC
Several chains support USDC for the currency. This option is useful for price stability and to receive payouts in a stable token. You can find more info on [configuring USDC here](/payments/advanced/usdc-support).
### Fee Sponsorship
This option enables you to control who pays the fees of the NFT purchase including gas and credit card transaction fees. The default option is "Buyer", which means that if you set a price of 10 USDC, the final price the buyer pays will be 10 USDC plus fees.
If you want to provide a consistent price for your customers, select the "You" option to sponsor the fees. When you sponsor the fees they will be deducted from the amount the buyer pays and the remainder will be paid to the recipient wallet you set in the next step.
#### Recipient Address
Enter the wallet address where you want to receive payments. This is the address where Crossmint will send the proceeds from NFT sales.
Want to split payments across multiple addresses? Use a [splits.org](https://splits.org) address as the payout recipient.
Make sure you review the Content policy. When launching in production you'll need to submit collection verification information to ensure your collection is compliant with our Content Policy. You can find more information about everything required for your production launch in the [Production Launch](/payments/advanced/production-launch) section.
## Adding NFTs
This is **required** before you can sell or airdrop the NFTs. Without this step there is not any actual information to use for creating the NFTs yet. You can create unique NFT metadata per token or an Open Edition style NFT where all tokens share the same metadata.
#### NFT Name
The name of your NFT (max 32 characters).
#### Supply
For unique per NFT, enter 1. You will need to configure the metadata for each NFT. You can do this via the developer console individually. For projects with many unique NFTs you should use the [Create Template API](/api-reference/minting/template/create-template) with a script.
For an Open Edition NFT, enter the total quantity, or select the Unlimited checkbox. This will be the only metadata you need to configure.
#### Description
The description of your NFT (max 64 characters).
#### Image
Upload an image for your NFT.
Recommended image formats are: JPEG, PNG, WEBP, or GIF. In most cases, the medium in which NFTs are displayed don't require extremely high resolution files. Strike a balance and lean towards file sizes that do not require significant bandwidth to download (below 10 MB for example).
#### Attributes `optional`
Additional attributes of the NFT. Add as few or as many as you like. You can refer to the [OpenSea metadata standards](https://docs.opensea.io/docs/metadata-standards#attributes) page for detailed explanations of how to use these in your project.
Click the `Create NFT` button to complete.
You can download an example of how your file should be structured here: [batch-upload-example.zip](https://www.crossmint.com/assets/examples/batch-upload-example.zip).
You can upload a maximum of 1000 items at a time. For collections that require more than 1000 tokens, you can repeat the batch upload process multiple times.
The CSV should include a header row with the following fields:
* `name` - The name for the token.
* `image` - The filename of the image, which will be uploaded in the next step.
* `description` - A description for the token.
* `supply ` - How many of the token should be available.
* `animation_url` - (optional)
You can add attributes via additional columns in the spreadsheet. For example, to add an attribute named `weapon`, include an additional column with the attribute name for the header row. You can refer to the example file linked above to see this in action.
Once you have your CSV ready, upload it to move on to the next step for media files.
The image file names must match the value(s) in the `image` column of the uploaded CSV file. These files should be in a flat folder structure for upload (no sub-folders).
Click the "Upload media files" button and then select all of the images referenced in the `metadata.csv` file you uploaded in the previous step.
Click the "Upload" button to upload the CSV and media files. If any media files are missing you'll be notified which ones they are in the UI.
If you need to upload additional token metadata click the "New batch upload" button. Otherwise select "View my NFTS" to close the modal and view the metadata for your tokens.
You can also perform bulk uploading by calling the [create-template](/api-reference/minting/template/create-template) API using a script that loops through your `metadata.csv` file. You'll need to have an [API key](/introduction/platform/api-keys#how-to-get-and-use-api-keys) with the `nfts.create` scope enabled.
Below is an example script that will keep your request volume below the 120/min [rate limit](/introduction/platform/api-keys#rate-limits).
This code example is available as a repository on GitHub also:
[crossmint/bulk-uploader](https://github.com/Crossmint/bulk-uploader)
Before running this script you'll need to upload your media files to a service that can host the files, such as [Pinata](https://www.pinata.cloud/).
The `image` column of your `metadata.csv` should include the full URL to the file instead of only a file name like the batch upload option above.
```javascript bulkUploader.js
const fs = require("fs");
const csv = require("csv-parser");
require("dotenv").config();
const collectionId = process.env.COLLECTION_ID;
const apiKey = process.env.API_KEY;
const apiUrl = `https://staging.crossmint.com/api/2022-06-09/collections/${collectionId}/templates`;
// Rate limiting setup
const rateLimit = 100; // requests per minute
const interval = 60000 / rateLimit; // interval in milliseconds
async function sendRequest(data) {
try {
const response = await fetch(apiUrl, {
method: "POST",
headers: {
"Content-Type": "application/json",
"X-API-KEY": `${apiKey}`,
},
body: JSON.stringify(data),
});
const responseData = await response.json();
console.log("Success:", responseData);
} catch (error) {
console.error("Error:", error.message);
}
}
// Read and process the CSV file
function processFile() {
let promise = Promise.resolve();
fs.createReadStream("metadata.csv")
.pipe(csv())
.on("data", (row) => {
promise = promise.then(() => {
const postData = {
metadata: {
name: row.name,
image: row.image, // this should be a publicly accessible URL
description: row.description,
},
supply: { limit: Number(row.supply) },
reuploadLinkedFiles: false, // this is optional
};
return sendRequest(postData).then(() => new Promise((resolve) => setTimeout(resolve, interval)));
});
})
.on("end", () => {
promise.then(() => {
console.log("Finished processing file.");
});
});
}
processFile();
```
Run the script to bulk upload your template metadata.
```node
node bulkUploader.js
```
## Send a Test NFT
Once you have added metadata you can send a test NFT to yourself or another user. The interface to mint and send from the console supports email and wallet address for the recipient.
You can mint and send a test NFT to an email address or wallet to make sure everything is working as expected.
If you enter an email address the NFT will be sent to a unique Crossmint custodial wallet associated with that email address. The owner of this email can log in to Crossmint to view their NFT. The wallet option will send directly to the wallet address.
Crossmint does ***not*** send an email to the user when you airdrop NFTs from the console.
That's all there is to it. Check below for recommended next steps.
4. If you selected the Airdrop NFTs option when deploying your collection you should checkout the [No Code Claims Page](/minting/nfts/integrate/set-up-a-claims-page)
to learn how to enable a claims page for your collection.
# Register External Collection
Source: https://docs.crossmint.com/payments/guides/register-collection
Import custom and/or third party contracts
The first section of this guide is EVM specific. For Solana, we support the metaplex standard. Importing a candy
machine is very similar. Jump below for specific details about [importing a Solana candy
machine](/payments/guides/register-collection#solana-candy-machine).
## EVM Smart Contract Requirements
Please note that currently only importing EVM and SOL primary contracts is self-serve. If you wish to import EVM or
SOL secondary contracts, or Aptos and Sui contracts, please [contact
sales](https://www.crossmint.com/contact/sales?utm_source=devrel\&utm_medium=docs\&utm_campaign=backlinks). For Xion
blockchain contracts, please refer to our [Xion Contract Requirements](/minting/advanced/xion-contracts)
documentation.
## Import a Custom Contract
This information is displayed in the Hosted Checkout, Storefront, and Claim pages. You can edit it later.
Remember, Crossmint has staging and production [environments](/introduction/platform/staging-vs-production). When working in the staging environment, choose the mainnet name. For example, if your contract is on the Polygon Amoy testnet, select Polygon.
Enter the address of your contract and the console will determine the contract type automatically.
Notice in the screenshot that the example has the same contract address that was entered in previous step. This indicates a basic setup where the purchase function is within the regsitered NFT contract. The only reason to change this is if purchases should be sent to a different contract address that is not the same as the NFT contract.
Most developers do not need to change this. If you are unsure, leave it as is. Transparent upgradeable contracts also do not need to use this setting and should use the beacon address in the previous step.
As long as your contract is verified on the block explorer we can query the ABI automatically. If you have not verified your contract, you must enter the ABI manually.
Unless you specifically deployed a contract that supports USDC you must leave the native currency selected. If you are unsure, leave it as is.
If you selected the native currency in previous step this will be a very short list. If you have multiple mint functions in your contract that you want to accept payments for, you must register each one separately.
USDC mint functions typically are NOT `payable`. Change currency selector to USDC to populate mint function list with valid options.
The mint function must accept an address parameter and mint to that address. If your mint function lacks this you'll need to deploy a new contract or modify your existing contract.
After the mint function has been selected this will be a short list built from the function parameters of type `address`. If you have multiple options here ensure you select the correct one. Doing this incorrectly will result in the purchased NFTs being sent to the wrong address and they likely will not be recoverable.
This will be a short list built from the function parameters of type `uint256`. If you have multiple options here ensure you select the correct one. Doing this incorrectly will result in the NFT checkout tools not being able to properly mint the correct quantity of NFTs.
Crossmint supports Candy Machine v3. The initial setup is the same as above. The only difference is selecting Solana for the blockchain and entering a candy machine ID instead of a contract address.
Find the ID in the `cache.json` file in the folder where you deployed your Candy Machine
# Buy API
Source: https://docs.crossmint.com/payments/headless/guides/buy-api
Use headless checkout to buy anything onchain, across all chains, with any currency
# Buy API Integration Guide
This guide explains how to use Crossmint's [headless checkout](/payments/headless/overview) APIs to enable purchases for any asset listed onchain in the supported marketplaces below. Unlike regular Crossmint checkout integrations, this API can be used without previously registering a collection in the Crossmint console.
## Overview
The secondaries marketplace integration allows you to purchase NFTs listed on supported secondaries marketplaces
## Supported Marketplaces
| Blockchain | Supported Marketplaces |
| ---------- | -------------------------------------------------------------------------------------------------------- |
| Ethereum | OpenSea (Seaport), Rarible, LooksRare, X2Y2, Foundation, Manifold, Zora, Blur, SuperRare, NFTX, Sudoswap |
| Polygon | OpenSea (Seaport), Magic Eden, Rarible, OKX, Element |
| Optimism | OpenSea (Seaport), Zora, OKX |
| Arbitrum | OpenSea (Seaport), OKX |
| Base | OpenSea (Seaport), Zora, Element |
| Zora | OpenSea (Seaport), Zora |
| Avalanche | OpenSea (Seaport), OKX, Element |
| BSC | OKX, Element |
| Solana | Magic Eden, Tensor |
## Integration Steps
### 1. Create an Order
To create an order for secondaries marketplace purchases, you'll need to specify the NFTs you want to purchase using the `lineItems` array, as you would in normal headless, but instead of using `collectionLocator` you will use `tokenLocator`. Each line item should include:
* `tokenLocator` Identifies the NFT's location (contract address or mint hash)
Example:
The `tokenLocator` follows this format:
* For EVM chains (Ethereum, Polygon, etc): `::`
* Example: `ethereum:0x1234...5678:123`
* `blockchain`: The chain name (ethereum, polygon, etc)
* `contractAddress`: The NFT contract address
* `tokenId`: The specific token ID to purchase
* For Solana: `solana:`
* Example: `solana:7nE9...X4p5`
* `mintHash`: The NFT's mint hash/address
#### Token Locator Format Requirements
##### EVM Chain Format
* Pattern: `^(ethereum|polygon|optimism|arbitrum|base|zora|avalanche|bsc):[0-9a-fA-F]{40}:\d+$`
* Contract Address: Must be 40 hexadecimal characters (without '0x' prefix)
* Token ID: Must be a valid integer
* Chain names are case-sensitive and must be lowercase
* Maximum total length: 128 characters
Example valid formats:
```json
"ethereum:71c7656ec7ab88b098defb751b7401b5f6d8976f:1234"
"polygon:b794f5ea0ba39494ce839613fffba74279579268:1"
```
##### Solana Format
* Pattern: `^solana:[1-9A-HJ-NP-Za-km-z]{32,44}$`
* Mint Hash: Must be a valid base58-encoded string
* Chain name must be lowercase "solana"
* Maximum total length: 64 characters
Example valid format:
```json
"solana:7nE9XwXs3XgpH8rnXMFvQYWZTXUFJyZC4rZ5CPX4X4p5"
```
Invalid token locator formats will result in a validation error with HTTP status code 400. Common validation errors include:
* Incorrect chain name spelling or casing
* Invalid contract address length or characters
* Missing or malformed token ID
* Invalid Solana mint hash format
```json cURL
curl --request POST \
--url https://staging.crossmint.com/api/2022-06-09/orders \
--header 'Content-Type: application/json' \
--header 'X-API-KEY: YOUR_API_KEY' \
--data '{
"recipient": {
"email": "@"
},
"payment": {
"method": "solana",
"currency": "sol",
"payerAddress": ""
},
"lineItems": [{
"tokenLocator": "arbitrum:0x372f82......6570f4:123"
}]
}'
```
```javascript JavaScript
const options = {
method: "POST",
headers: {
"X-API-KEY": "YOUR_API_KEY",
"Content-Type": "application/json",
},
body: JSON.stringify({
recipient: {
email: "@",
},
payment: {
method: "solana",
currency: "sol",
payerAddress: "",
},
lineItems: [
{
tokenLocator: "arbitrum:0x372f82......6570f4:123",
},
],
}),
};
fetch("https://staging.crossmint.com/api/2022-06-09/orders", options)
.then((response) => response.json())
.then((response) => console.log(response))
.catch((err) => console.error(err));
```
This example demonstrates:
* Creating an order to purchase an NFT from a marketplace
* Using cross-chain payment (paying with SOL for an NFT on Arbitrum)
* Specifying an email recipient for delivery
* Using the `tokenLocator` format for marketplace purchases
After creating the order, you'll need to handle the payment and delivery phases as outlined in the [Order Lifecycle](/payments/headless/guides/order-lifecycle/) guide.
## Error Handling
As outlined in the [Delivery Phase](/payments/headless/guides/order-lifecycle/delivery-phase#error-handling) of the order lifecycle guides, it is important to keep track of the delivery for each item passed when you created the order and report back to the user on the status of the order.
Each line item is attempted and processed independently. If one line item fails, others will still go through and be fulfilled. If any items are undeliverable, the buyer will be automatically refunded for that specific portion of their order.
# Client or Server
Source: https://docs.crossmint.com/payments/headless/guides/client-or-server
Understand the reasons to use client-side or server-side API keys
The headless checkout supports both server-side and client-side API keys. It's important that you select the right key for your implementation.
## When to use a server-side API key
* Testing in the [API Playground](/api-reference/headless/create-order) of the documentation
* Testing with cURL requests or running scripts from your command line
* Building applications that make API calls to your own backend, which then make the actual API call to Crossmint
The key consideration here is if the API request is coming from a server environment.
### Server Side Example Code
The sample code below is from a NextJS application. The `component.tsx` file is simplified to only show the relevant
logic. The client-side component sends an API request to the application's backend, which then proxies the request
to Crossmint. This is because the example is using a server-side API key, which requires making requests from a
server environment.
```tsx component.tsx (client-side)
const createOrder = async (orderInput: any) => {
try {
const res = await fetch(`/orders`, {
method: "POST",
headers: {
"Content-Type": "application/json",
},
body: JSON.stringify(orderInput),
});
const order = await res.json();
setOrder(order.order);
} catch (e) {
console.error(e);
throw new Error("Failed to create order");
}
};
```
```typescript route.ts (server-side)
import { callCrossmintAPI } from "@/app/utils/crossmint";
import { NextRequest, NextResponse } from "next/server";
export async function POST(req: NextRequest, res: NextResponse) {
try {
const body = await req.json();
console.log("create order: ", body);
const apiResponse = await callCrossmintAPI("/orders", {
method: "POST",
body,
});
return NextResponse.json(apiResponse, { status: 200 });
} catch (error) {
console.log("failed to create order");
return NextResponse.json({ message: "Error creating order" }, { status: 500 });
}
}
```
```typescript crossmint.ts
const crossmintBaseUrl = process.env.CROSSMINT_API_URL;
const crossmintAPIHeaders = {
accept: "application/json",
"content-type": "application/json",
"x-api-key": process.env.CROSSMINT_API_KEY!,
};
const callCrossmintAPI = async (endpoint: string, options: { method: string; body?: any; params?: any }) => {
const url = `${crossmintBaseUrl}/${endpoint}`;
const { body, method } = options;
const response = await fetch(url, {
body: body ? JSON.stringify(body) : null,
method,
headers: crossmintAPIHeaders,
});
const json = await response.json();
return json;
};
export { callCrossmintAPI };
```
## When to use a client-side API key
* Your application will be making API requests to Crossmint directly from a broswer
When you create client-side API keys you must add the authorized origins that can use the key. For example, in
testing you'll need to indicate `http://localhost:3000` (or similar local dev URLs) as authorized origins, or the
request will be denied.
There is one additional step when using a client-side API key in your application with headless checkout. The first call will be to create the order. The response will include a `clientSecret` property that you must persist in state and then pass as an additional header in subsequent API requests to the [update-order](/api-reference/headless/edit-order) or [get-order](/api-reference/headless/get-order) routes.
### Client Side Example Code
```tsx create-order
// note the end of try block where the clientSecret is saved to local state
const createOrder = async (orderInput: any) => {
try {
const res = await fetch(`https://staging.crossmint.com/api/2022-06-09/orders`, {
method: "POST",
headers: {
"Content-Type": "application/json",
"x-api-key": process.env.NEXT_PUBLIC_CLIENT_SIDE_KEY,
},
body: JSON.stringify(orderInput),
});
const order = await res.json();
setOrder(order.order);
setClientSecret(order.clientSecret);
} catch (e) {
console.error(e);
throw new Error("Failed to create order");
}
};
```
```tsx update-order
// note the `authorization` header, which contains previously saved clientSecret
const updateOrder = async (orderInput: any) => {
try {
const res = await fetch(`https://staging.crossmint.com/api/2022-06-09/orders/${order.orderId}`, {
method: "PATCH",
headers: {
"Content-Type": "application/json",
"x-api-key": process.env.NEXT_PUBLIC_CLIENT_SIDE_KEY,
authorization: clientSecret,
},
body: JSON.stringify(orderInput),
});
const updatedOrder = await res.json();
setOrder(updatedOrder);
} catch (e) {
console.error(e);
throw new Error("Failed to update order");
}
};
```
```tsx get-order
// note the `authorization` header, which contains previously saved clientSecret
const getOrder = async () => {
try {
const res = await fetch(`https://staging.crossmint.com/api/2022-06-09/orders/${order.orderId}`, {
method: "GET",
headers: {
"Content-Type": "application/json",
"x-api-key": process.env.NEXT_PUBLIC_CLIENT_SIDE_KEY,
authorization: clientSecret,
},
});
const refreshedOrder = await res.json();
setOrder(refreshedOrder);
return refreshedOrder.lineItems[0].delivery.status;
} catch (e) {
console.error(e);
throw new Error("Failed to fetch order");
}
};
```
# Design Your UI
Source: https://docs.crossmint.com/payments/headless/guides/design-your-ui
How to get started with setting up your UI
This guide will walk you through the basic steps of implementing a user interface integrated with the Headless Checkout. The first step in the process will be to create an Order via API call.
You can create an order on load and add the recipient later, or wait to create the order when you have the recipient info ready. Creating the order immediately helps obtain the price quote for display. Let's proceed with that approach in mind.
## Building Your App
There are four key components you'll need to represent in the UI for your users.
1. Purchase Preview - a visual explanation of what they are buying and the price
2. Wallet Connection - cross-chain payments will require the ability to connect a wallet
3. Payment Status - keeping the user updated about the payment acceptance
4. Delivery Status - progress of delivery and information upon completion/failure
### Purchase Preview
It is common to create an order upon initial render for your user, and then update the details of that order as the adjustments are made by the user. You'll need to create a function in your application that can call the create-order API and save the response.
After you create the `order` you'll get back metadata related to the `collectionId` you pass in the [create-order](/api-reference/headless/create-order) call. You can use this metadata to build the preview highlighted in the screenshot below.
```jsx
useEffect(() => {
if (order != null) {
return;
}
createOrder({
payment: {
method: "ethereum-sepolia",
currency: "eth",
},
locale: "en-US",
lineItems: {
collectionLocator: "crossmint:YOUR_CROSSMINT_COLLECTION_ID",
callData: {
totalPrice: "0.001",
},
},
});
}, [order]);
```
### Wallet Connection
To enable the cross-chain payments feature, you'll need to provide an easy way for users to connect their wallet. This guide will not go into detail about how to add any specific tools, since there are a variety available and the implementation of each is unique to the tool.
However, you will want to set up your app to listen for changes to the primary connected wallet and selected network so that the order is updated automatically.
Once the user has connected their wallet they might still change the primary connected account or network. You need to listen for these changes and update the order.
Note the dependency array at the end of this `useEffect` watches `primaryWallet` and `selectedNetwork`. If any of these change your app needs to refresh the order with the new values.
```jsx
useEffect(() => {
if (order == null || primaryWallet == null) {
return;
}
const currentRecipient = order.lineItems[0].delivery.recipient?.walletAddress;
const isSameWallet = currentRecipient === primaryWallet.address;
const isSameNetwork = order.payment.method === selectedNetwork;
if (isSameWallet && isSameNetwork) {
return;
}
updateOrder({
recipient: {
walletAddress: primaryWallet.address,
},
payment: {
method: selectedNetwork,
currency: "eth",
payerAddress: primaryWallet.address,
},
});
}, [primaryWallet, selectedNetwork]);
```
# Multiple Line Items
Source: https://docs.crossmint.com/payments/headless/guides/multiple-line-items
How to handle orders with multiple NFTs at once
The Headless Checkout multiple line items feature is used to build more elaborate purchase experiences, which require multiple NFT purchases at once. Multiple line items is currently only supported for NFTs.
Currently, there is a maximum limit of 15 NFTs per order.
Example use cases include:
* A marketplace where a buyer can add multiple NFTs to a cart and make the purchase in a single transaction.
* Enabling the purchase of multiple distinct tokens from an ERC-1155 contract in a single transaction.
## Marketplace Sales
The following example requires that you have a custom `collectionId` that supports secondary sales provisioned for you by your Crossmint Customer Success Engineer. For more information on marketplace and launchpad support, check [this guide](/payments/advanced/marketplaces-and-launchpads).
If you need to contact the team about getting set up with reservoir-powered secondary sales support [contact the team](https://www.crossmint.com/contact/sales).
### Multiple `lineItems` for Secondary Sales
To enable a multi item purchase, you simply need to pass an array of `lineItems` instead of a single object when creating an order.
The below examples demonstrate how to create a multiple line item order for secondary sales:
```shell cURL
curl --request POST \
--url https://staging.crossmint.com/api/2022-06-09/orders \
--header 'Content-Type: application/json' \
--header 'X-API-KEY: _YOUR_API_KEY_' \
--data '{
"recipient": {
"email": "testy@crossmint.com"
},
"locale": "en-US",
"payment": {
"receiptEmail": "testy@crossmint.com",
"method": "ethereum-sepolia",
"currency": "eth"
},
"lineItems": [
{
"collectionLocator": "crossmint:_YOUR_SECONDARY_SALES_COLLECTION_ID_",
"callData": {
"contractAddress": "0x___CONTRACT_ADDRESS_OF_TOKEN",
"tokenId": "234"
}
},
{
"collectionLocator": "crossmint:_YOUR_SECONDARY_SALES_COLLECTION_ID_",
"callData": {
"contractAddress": "0x___ANOTHER_TOKEN_CONTRACT",
"tokenId": "567"
}
}
]
}'
```
```javascript JavaScript
const options = {
method: 'POST',
headers: {'X-API-KEY': '_YOUR_API_KEY_', 'Content-Type': 'application/json'},
body: '{
"recipient": {
"email": "test@crossmint.com"
},
"locale": "en-US",
"payment": {
"receiptEmail": "test@crossmint.com",
"method": "ethereum-sepolia",
"currency": "eth",
"payerAddress": "0x1234_payer_address"
},
"lineItems": [
{
"collectionLocator": "crossmint:_YOUR_SECONDARY_SALES_COLLECTION_ID_",
"callData": {
"contractAddress": "0x___CONTRACT_ADDRESS_OF_TOKEN",
"tokenId": "234"
}
},
{
"collectionLocator": "crossmint:_YOUR_SECONDARY_SALES_COLLECTION_ID_",
"callData": {
"contractAddress": "0x___ANOTHER_TOKEN_CONTRACT",
"tokenId": "567"
}
}
]
}'
};
fetch('https://staging.crossmint.com/api/2022-06-09/orders', options)
.then(response => response.json())
.then(response => console.log(response))
.catch(err => console.error(err));
```
After this step you will collect payment from the buyer as outlined in the [Order Lifecycle](/payments/headless/guides/order-lifecycle/) section.
## Primary Sales of Multiple Items
Headless checkout currently only supports a single `collectionId` per order. This means the most common scenario where it makes sense to create a multiple line item order for primary sales is an ERC-1155 semi-fungible contract. This type of NFT contract supports minting distinct tokens by specifying the `tokenId`, whereas in ERC-721 style contract every token is unique and thus you only need to pass a quantity parameter to mint multiple. Using multiple line items for a standard ERC-721 contract would result in multiple mint transactions against the contract when only one is required.
If you have a custom ERC-721 contract that supports the minter being able to specify which token they want to mint
you could use the example(s) below to enable them to purchase multiple and specific tokens in the same transaction.
This is an uncommon pattern for ERC-721 contracts though.
In the following example, the use case is purchasing two unique tokens from an ERC-1155 contract. You can see that the `_id` passed in the `callData` of each `lineItem` is unique (1 and 2).
```shell cURL
curl --request POST \
--url https://staging.crossmint.com/api/2022-06-09/orders \
--header 'Content-Type: application/json' \
--header 'X-API-KEY: _YOUR_API_KEY_' \
--data '{
"recipient": {
"email": "testy@crossmint.com"
},
"locale": "en-US",
"payment": {
"receiptEmail": "testy@crossmint.com",
"method": "ethereum-sepolia",
"currency": "eth"
},
"lineItems": [
{
"collectionLocator": "crossmint:_YOUR_COLLECTION_ID_",
"callData": {
"_id_": "1",
"_quantity": "1"
}
},
{
"collectionLocator": "crossmint:_YOUR_COLLECTION_ID_",
"callData": {
"_id_": "2",
"_quantity": "1"
}
},
]
}'
```
```javascript JavaScript
const options = {
method: 'POST',
headers: {'X-API-KEY': '_YOUR_API_KEY_', 'Content-Type': 'application/json'},
body: '{
"recipient":
{
"email": "testy@crossmint.com"
},
"locale": "en-US",
"payment":
{
"receiptEmail": "testy@crossmint.com",
"method": "ethereum-sepolia",
"currency": "eth",
"payerAddress": "0x1234_payer_address"
},
"lineItems": [
{
"collectionLocator": "crossmint:_YOUR_COLLECTION_ID_",
"callData": {
"_id_": "1",
"_quantity": "1"
}
},
{
"collectionLocator": "crossmint:_YOUR_COLLECTION_ID_",
"callData": {
"_id_": "2",
"_quantity": "1"
}
},
]
}'
};
fetch('https://staging.crossmint.com/api/2022-06-09/orders', options)
.then(response => response.json())
.then(response => console.log(response))
.catch(err => console.error(err));
```
As in the secondary sales example above, you'll need to handle the remaining steps of the order lifecycle in your UI - payment, delivery, etc.
## Error Handling
As outlined in the [Delivery Phase](/payments/headless/guides/order-lifecycle/delivery-phase#error-handling) of the order lifecycle guides, it is important to keep track of the delivery for each item passed when you created the order and report back to the user on the status of the order.
Each line item is attempted and processed independently. If one line item fails, others will still go through and be fulfilled. If any items are undeliverable, the buyer will be automatically refunded for that specific portion of their order.
{/* TODO July 31st, 2024 - link to status error codes once QA is complete */}
# Order Complete Phase
Source: https://docs.crossmint.com/payments/headless/guides/order-lifecycle/completed-phase
Completion phase of the order lifecycle
The final phase in the order lifecycle is order completion. This occurs once payment has been successful and the delivery phase is finished.
For a multi-item order, as long as at least one item was fulfilled successfully the order is considered successful. If all items fail to deliver in an order then the order status is failed.
To determine the order completion status simply check the `order.phase` property. This will be set to `completed` for a successful order or `failed` if all items were unable to be delivered.
For a multi-item order you'll need to loop through the `lineItems` array returned in the get order response to
ensure the `delivery.status` is `completed` for each item.
### Recommendations
Think through and implement the call to action that makes sense for your buyers.
#### Where can they access the purchased item?
If the token was minted to their Crossmint wallet you can provide a direct link and/or render a representation of it. Refer to the [wallet UI components](/wallets/advanced/wallet-ui-components) page for some details on how to accomplish this.
Even if they minted directly to an existing wallet you can provide a link to display the token in Crossmint. Use the following URL format to display NFTs within Crossmint:
`https://www.crossmint.com/user/collection/::`
For info on the values to use for `` refer to the [supported chains](/introduction/supported-chains) page.
#### What are the next steps?
Can they stake, trade, or utilize the purchase in some way? Tell them how!
#### Handling Order failure
If there were any issues with delivery explain what happened and ensure they know that refunds are automatic. Anyone who purchases through Crossmint and has an issue with delivery can contact our support team for assistance.
# Pay with Card
Source: https://docs.crossmint.com/payments/headless/guides/order-lifecycle/credit-card-payment-phase
Payment acceptance phase of the order lifecycle for credit cards
The order lifecycle can be summarized as follows:
Your application determines recipient info for the buyer. It can be an email wallet or wallet address. Create or
update an order with this info to proceed to next step.
The API response returned from create/update order call(s) will include a `payment.preparation` object that your
application uses to render the Stripe payment element.
Use the `stripePublishableKey` and `stripeClientSecret` returned in the API response to render the credit card
checkout form.
The buyer completes checkout via credit card.
Your application will poll the GET order status and update the UI as the order progresses to the next phase.
During the initial `quote` phase of the order the payment status will be `requires-quote`.
Once the quote phase is completed, the order enters the payment phase and will have the status `awaiting-payment`, which indicates that the order is ready to be paid.
See below the full list of possible statuses:
| Payment Status | Explanation |
| ----------------------------------- | -------------------------------------------------- |
| `requires-quote` | still in the quote phase |
| `awaiting-payment` | ready to submit payment |
| `completed` | order is in the delivery or order completion phase |
| `completed` with `payment.refunded` | payment was completed but has been refunded |
### Render the Stripe Payment Element
When the order is ready to accept payment, the API response will include an `order.payment.preparation` object, which contains two important properties to render the payment element. These properties are named: `stripePublishableKey` and `stripeClientSecret`. You can use these with the [Stripe Payment Element](https://docs.stripe.com/payments/payment-element) package to collect the user's credit card payment.
```json
{
"clientSecret": "_YOUR_CLIENT_SECRET_",
"order": {
"orderId": "5ddc0090-7f63-4f6a-b68d-a91f8253b02e",
"phase": "payment",
"locale": "en-US",
"lineItems": [], // removed for brevity
"quote": {
"status": "valid",
"quotedAt": "_timestamp_",
"expiresAt": "_timestamp_",
"totalPrice": {
"amount": "0.5",
"currency": "usd"
}
},
"payment": {
"status": "awaiting-payment",
"method": "stripe-payment-element",
"currency": "usd",
"preparation": {
"stripeClientSecret": "pi_returned_secret_",
"stripePublishableKey": "pk_test_publishable_key_value"
}
}
}
}
```
### Handle Payment Confirmation
### Poll for Status Updates
### Handling Refunded Payments
When polling for order status, you may encounter a situation where `payment.status` is `completed` but the order also contains a `payment.refunded` property. This indicates that the payment was initially successful but has since been refunded.
```json
{
"order": {
"payment": {
"status": "completed",
"refunded": {
"amount": "1.00",
"currency": "usd",
"txId": "0x1234abcd...",
"chain": "ethereum"
}
}
}
}
```
The `payment.refunded` object includes the following fields:
* `amount`: The amount that was refunded
* `currency`: The currency of the refund
* `txId`: The on-chain transaction ID the refund was sent in
* `chain`: The blockchain where the refund transaction occurred
When you encounter this state, your application should:
1. Display an appropriate message to the user indicating that their payment was refunded
2. Provide the transaction ID (`txId`) so users can verify the refund on-chain
3. Prevent any further actions related to the order (such as delivery expectations)
4. Provide options for the user to place a new order if desired
This state typically occurs when there was an issue with processing the order after payment was received, such as insufficient liquidity for memecoin purchases or compliance issues.
# Pay with Crypto
Source: https://docs.crossmint.com/payments/headless/guides/order-lifecycle/crypto-payment-phase
Payment acceptance phase of the order lifecycle for pay with crypto
An overview of the process works as follows:
Your user selects the chain, token, and wallet they want to pay from via your application and you create or
update an existing order with this information.
The API response returned from create or update order will include a `serializedTransaction` that your
application uses to request payment from the user's wallet.
After your application initiates the payment request the user must confirm the transaction.
Your application will poll the GET order status and update the UI as the order progresses to the next phase.
During the initial `quote` phase of the order the payment status will be `requires-quote`.
Once the quote phase is completed, the order enters the payment phase.
For most orders the payment phase will begin with the status `awaiting-payment`, which indicates that the order is ready to be paid. However, it can also begin with `requires-crypto-payer-address` if this information is missing.
See below the full list of possible statuses:
| Payment Status | Explanation |
| ----------------------------------------- | ------------------------------------------------------------------- |
| `requires-quote` | still in the quote phase |
| `requires-crypto-payer-address` | `payment.payerAddress` is missing |
| `crypto-payer-insufficient-funds` | `payerAddress` cannot cover purchase for chain/currency given |
| `crypto-payer-insufficient-funds-for-gas` | `payerAddress` cannot cover the blockchain fees for the transaction |
| `awaiting-payment` | ready to submit payment |
| `completed` | order is in the delivery or order completion phase |
| `completed` with `payment.refunded` | payment was completed but has been refunded |
### Setting the Payer Address
The order must know the address that will be sending the crypto payment. This enables Crossmint's payment listeners to associate incoming transactions with the correct order. To update the order with the payer address, call the update API as demonstrated below:
`PATCH` `/api/2022-06-09/orders/`
```json
{
"payment": {
"currency": "eth",
"method": "base-sepolia",
"payerAddress": "0x1234abcd…"
}
}
```
The `payerAddress` is the wallet the user will be sending the payment from. Note that you must send the entire payment object even if the currency and/or method values are not changing.
### Submitting the Payment
When you've fully prepared the order such that the payment status is `awaiting-payment` you'll have everything necessary to request the crypto payment from your user. The details will be returned in the `order.payment.preparation` property.
```json
{
"orderId": "c167db0f-0cb9-4c59-80d3-aface6bcb338",
"phase": "payment",
"locale": "en-US",
"lineItems": [], // removed for brevity
"quote": // removed for brevity
"payment": {
"status": "awaiting-payment",
"method": "base-sepolia",
"currency": "eth",
"preparation": {
"chain": "base-sepolia",
"payerAddress": "0x6C3b3225759Cbda68F96378A9F0277B4374f9F06",
"serializedTransaction": "0x02f9015083014a34238489173700848917387582653d94a105c311fa72b8fb78c992ecbdb8b02ea5bd394d868644e0f88d81b9011e2d2d2d2d2d2d424547494e204d454d4f2d2d2d2d2d2d65794a68624763694f694a49557a49314e694973496e523563434936496b705856434a392e65794a756232356a5a534936496a4e6b5954673159324a6b4c546c6a4e4459744e4459774f4331694d44686a4c5746694e6d557a595746684e4468694d794973496d39795a4756795357526c626e52705a6d6c6c63694936496d4d784e6a646b596a426d4c54426a596a6b744e474d314f5330344d47517a4c57466d59574e6c4e6d4a6a596a4d7a4f434973496d6c68644349364d5463784f446b784d7a63774f48302e75574365534961563642504b6f6935724d7939394c2d4b56303256644d4d343442343934724c4352656f632d2d2d2d2d2d454e44204d454d4f2d2d2d2d2d2dc0"
}
}
}
```
The `order.payment.preparation` property contains details about the chain that Crossmint is expecting the payment to be received on, the payer address, and a `serializedTransaction` that you can use to open a payment request in the user's wallet. See examples of how to parse the response and request transaction confirmation from the user below:
```jsx
import { parseTransaction } from "viem";
import { useSendTransaction } from "wagmi";
const { sendTransactionAsync } = useSendTransaction();
const signAndSendTransaction = async (serializedTransaction) => {
const txn = parseTransaction(serializedTransaction)
try {
await sendTransactionAsync(txn);
} catch (error) {
console.error("Error sending transaction:", error);
}
};
```
```jsx
import bs58 from "bs58";
import { useConnection, useWallet } from "@solana/wallet-adapter-react";
const { connection } = useConnection();
const { sendTransaction } = useWallet();
const signAndSendTransaction = async (serializedTransaction) => {
const transaction = Transaction.from(bs58.decode(serializedTransaction));
try {
await sendTransaction(transaction, connection);
} catch (error) {
console.error("Error sending transaction:", error);
}
}
```
You should **never** alter the values in the parsed transaction object. Simply parse the transaction object as shown
in the example above. Changing any of these values may result in Crossmint not being able to validate the payment.
Calling the `signAndSendTransaction` function in the code snippet(s) above will open the user's wallet and enable them to confirm the crypto payment.
### Awaiting Payment Confirmation
We recommend a polling interval of about 2500ms and never below 500ms.
You can use client-side or server-side API keys to implement headless checkout. Check the code samples for the type
of API key you're using in your application.
```tsx
const getOrderPaymentStatus = async () => {
const apiUrl = "https://staging.crossmint.com/api/2022-06-09";
try {
const res = await fetch(`${apiUrl}/orders/${order.orderId}`, {
method: "GET",
headers: {
"Content-Type": "application/json",
"x-api-key": process.env.NEXT_PUBLIC_CROSSMINT_API_KEY,
authorization: clientSecret, // saved from response of create order call
},
});
const refreshedOrder = await res.json();
setOrder(refreshedOrder);
return refreshedOrder.payment.status;
} catch (e) {
console.error(e);
throw new Error("Failed to fetch order");
}
};
const pollPaymentStatus = async () => {
const intervalId = setInterval(async () => {
const status = await getOrderPaymentStatus();
console.log("payment status: ", status);
if (status === "completed") {
clearInterval(intervalId);
}
}, 2500);
// Set a timeout to stop polling after 60 seconds
setTimeout(() => {
clearInterval(intervalId);
console.log("Taking longer than expected...");
}, 60000);
};
```
The sample code below is from a NextJS application. The `component.tsx` file is simplified to only show the relevant
logic. The client-side component sends an API request to the application's backend, which then proxies the request
to Crossmint. This is because the example is using a server-side API key, which requires making requests from a server environment.
```tsx component.tsx (client-side)
const getOrderPaymentStatus = async () => {
try {
const res = await fetch(`/orders/${order.orderId}`, {
method: "GET",
headers: {
"Content-Type": "application/json",
},
});
const refreshedOrder = await res.json();
setOrder(refreshedOrder);
return refreshedOrder.payment.status;
} catch (e) {
console.error(e);
throw new Error("Failed to fetch order");
}
};
const pollPaymentStatus = async () => {
const intervalId = setInterval(async () => {
try {
const status = await getOrderPaymentStatus();
console.log("payment status: ", status);
if (status === "completed") {
clearInterval(intervalId);
}
} catch (e) {
clearInterval(intervalId);
console.error("Error polling payment status: ", e);
}
}, 2500);
// Set a timeout to stop polling after 60 seconds
setTimeout(() => {
clearInterval(intervalId);
console.log("Taking longer than expected...");
}, 60000);
};
```
```typescript route.ts (server-side)
import { callCrossmintAPI } from "@/app/utils/crossmint";
import { NextRequest, NextResponse } from "next/server";
export async function GET(req: NextRequest, { params }: { params: { orderId: string } }) {
if (params.orderId) {
const order = await callCrossmintAPI(`/orders/${params.orderId}`, {
method: "GET",
});
return NextResponse.json(order, { status: 200 });
} else {
return NextResponse.json({ error: true, message: "Missing orderId" }, { status: 400 });
}
}
```
```typescript crossmint.ts
const crossmintBaseUrl = process.env.CROSSMINT_API_URL;
const crossmintAPIHeaders = {
accept: "application/json",
"content-type": "application/json",
"x-api-key": process.env.CROSSMINT_API_KEY!,
};
const callCrossmintAPI = async (endpoint: string, options: { method: string; body?: any; params?: any }) => {
const url = `${crossmintBaseUrl}/${endpoint}`;
const { body, method } = options;
const response = await fetch(url, {
body: body ? JSON.stringify(body) : null,
method,
headers: crossmintAPIHeaders,
});
const json = await response.json();
return json;
};
export { callCrossmintAPI };
```
Once the payment is confirmed, you can move on to the delivery phase of the order lifecycle.
### Handling Refunded Payments
When polling for order status, you may encounter a situation where `payment.status` is `completed` but the order also contains a `payment.refunded` property. This indicates that the payment was initially successful but has since been refunded.
```json
{
"order": {
"payment": {
"status": "completed",
"refunded": {
"amount": "1.23",
"currency": "eth",
"txId": "0x1234abcd...",
"chain": "ethereum"
}
}
}
}
```
The `payment.refunded` object includes the following fields:
* `amount`: The amount that was refunded
* `currency`: The currency of the refund
* `txId`: The on-chain transaction ID the refund was sent in
* `chain`: The blockchain where the refund transaction occurred
When you encounter this state, your application should:
1. Display an appropriate message to the user indicating that their payment was refunded
2. Provide the transaction ID (`txId`) so users can verify the refund on-chain
3. Prevent any further actions related to the order (such as delivery expectations)
4. Provide options for the user to place a new order if desired
This state typically occurs when there was an issue with processing the order after payment was received, such as insufficient liquidity for memecoin purchases or compliance issues.
# Delivery Phase
Source: https://docs.crossmint.com/payments/headless/guides/order-lifecycle/delivery-phase
Token delivery phase of the order lifecycle
When the payment phase is completed, the user is guaranteed to receive the items ordered or an automatic refund for any unfulfilled items. Upon payment completion you'll want to display an animation in the UI indicating that the delivery is in-progress. Then poll the GET order API to check on delivery status and update your application UI when delivery status is updated.
You can use client-side or server-side API keys to implement headless checkout. Check the code samples for the type
of API key you're using in your application.
We recommend a polling interval of about 1000ms and never below 500ms.
{/* Internally, we can support pings as low as 500ms. But we want to avoid overwhelming the API, so we suggest 1000ms externally */}
```tsx
const getOrderDeliveryStatus = async () => {
const apiUrl = "https://staging.crossmint.com/api/2022-06-09";
try {
const res = await fetch(`${apiUrl}/orders/${order.orderId}`, {
method: "GET",
headers: {
"Content-Type": "application/json",
"x-api-key": process.env.NEXT_PUBLIC_CROSSMINT_API_KEY,
authorization: clientSecret, // saved from response of create order call
},
});
const refreshedOrder = await res.json();
setOrder(refreshedOrder);
return refreshedOrder.lineItems[0].delivery.status;
} catch (e) {
console.error(e);
throw new Error("Failed to fetch order");
}
};
const pollDeliveryStatus = async () => {
const intervalId = setInterval(async () => {
try {
const status = await getOrderDeliveryStatus();
console.log("delivery status: ", status);
if (status === "completed") {
clearInterval(intervalId);
}
} catch (e) {
clearInterval(intervalId);
console.error("Error polling delivery status: ", e);
}
}, 2500);
// Set a timeout to stop polling after 60 seconds
setTimeout(() => {
clearInterval(intervalId);
console.log("Taking longer than expected...");
}, 60000);
};
```
The sample code below is from a NextJS application. The `component.tsx` file is simplified to only show the relevant
logic. The client-side component sends an API request to the application's backend, which then proxies the request
to Crossmint. This is because the example is using a server-side API key, which requires making requests from a
server environment.
```tsx component.tsx (client-side)
const getOrderDeliveryStatus = async () => {
try {
const res = await fetch(`/orders/${order.orderId}`, {
method: "GET",
headers: {
"Content-Type": "application/json",
},
});
const refreshedOrder = await res.json();
setOrder(refreshedOrder);
return refreshedOrder.lineItems[0].delivery.status;
} catch (e) {
console.error(e);
throw new Error("Failed to fetch order");
}
};
const pollDeliveryStatus = async () => {
const intervalId = setInterval(async () => {
const status = await getOrderDeliveryStatus();
console.log("delivery status: ", status);
if (status === "completed") {
clearInterval(intervalId);
}
}, 2500);
// Set a timeout to stop polling after 60 seconds
setTimeout(() => {
clearInterval(intervalId);
console.log("Taking longer than expected...");
}, 60000);
};
```
```typescript route.ts (server-side)
import { callCrossmintAPI } from "@/app/utils/crossmint";
import { NextRequest, NextResponse } from "next/server";
export async function GET(req: NextRequest, { params }: { params: { orderId: string } }) {
if (params.orderId) {
const order = await callCrossmintAPI(`/orders/${params.orderId}`, {
method: "GET",
});
return NextResponse.json(order, { status: 200 });
} else {
return NextResponse.json({ error: true, message: "Missing orderId" }, { status: 400 });
}
}
```
```typescript crossmint.ts
const crossmintBaseUrl = process.env.CROSSMINT_API_URL;
const crossmintAPIHeaders = {
accept: "application/json",
"content-type": "application/json",
"x-api-key": process.env.CROSSMINT_API_KEY!,
};
const callCrossmintAPI = async (endpoint: string, options: { method: string; body?: any; params?: any }) => {
const url = `${crossmintBaseUrl}/${endpoint}`;
const { body, method } = options;
const response = await fetch(url, {
body: body ? JSON.stringify(body) : null,
method,
headers: crossmintAPIHeaders,
});
const json = await response.json();
return json;
};
export { callCrossmintAPI };
```
### Error Handling
Once the payment has been confirmed, delivery is likely to complete successfully. Before accepting the payment Crossmint simulates the expected transaction, which means that most delivery issues will be prevented before payment is even accepted. Given a successful payment the delivery process will be retried until it completes successfully or determines that delivery is impossible.
The most common cause for a delivery failure is that the item is no longer available. In the case of primary sales this could mean that the collection is sold out. For secondary sales the reason could be that someone else bought the item first.
Your application should be aware of the potential for delivery to fail and provide information to the buyer on what to expect. In the case of multiple items purchased and partial delivery failure you'll need to indicate which items were successfully delivered and which items failed.
Be sure to let your buyer know that in the case of a failed delivery they will be refunded automatically. If they
have any questions or issues they can reach out to Crossmint support directly for assistance.
A receipt will be sent to the buyer as long as their email was included in the order. There are two ways to pass this information. If the recipient is set to an email address, it will be used to send the receipt. In the case that the recipient is set to a `walletAddress` you can include an optional `receiptEmail` property within the payment object.
```json Crypto Payment
{
"payment": {
"method": "base-sepolia",
"currency": "eth",
"payerAddress": "0xabcd1234...",
"receiptEmail": "user@example.com"
},
"recipient": {
"walletAddress": "0xabcd1234..."
}
}
```
```json Credit Card Payment
{
"payment": {
"method": "stripe-payment-element",
"currency": "usd"
},
"recipient": {
"email": "user@example.com"
}
}
```
# Quote Phase
Source: https://docs.crossmint.com/payments/headless/guides/order-lifecycle/quote-phase
Initial phase of the order lifecycle
The first phase of the headless checkout process is the quote phase. During this phase, you construct an order that consists of the items being purchased, payment method, locale, and recipient. This will ultimately yield a quote to purchase it.
It's possible for an order to go from the payment phase back to the quote phase if the quote expires.
You can initialize an order such that the quote phase is completed in a single API call. Alternatively, you can create a basic order and iteratively update it with locale, recipient, and payment method information. The only information you cannot edit on a quote is the `lineItems` array, which indicate the details of what is being purchased.
If you need to alter the `lineItems` in an order you must create a new order.
## Quote Statuses
* `requires-recipient`
* `requires-physical-address` - When purchasing physical items, a shipping address is required. The order will remain in this status until a valid physical address is provided, and `payment.preparation` parameters will not be present.
* `expired`
* `valid`
## Creating the Order
You will create the order via API call. The headless checkout offers support for both client-side or server-side API keys to enable you to build in a way that makes sense for your application.
Orders can be created using a client-side API key, but any subsequent fetches or updates will require passing the
`clientSecret` returned in the create-order API response as an `authorization` header. This guide is written with
the expectation of using a server-side API key.
For more information on using Crossmint APIs refer to [API keys](/introduction/platform/api-keys) documentation
page.
To create a minimal order, make a `POST` request to the `/api/2022-06-09/orders` endpoint (view [API reference](/api-reference/headless/create-order)). The required properties to create an order are: `payment` and `lineItems`.
```json Crypto Payment
{
"payment": {
"method": "base-sepolia",
"currency": "eth",
"payerAddress": "0x1234abcd..." // optional to create order, but required to proceed to payment phase
},
"lineItems": {
"collectionLocator": "crossmint:_YOUR_COLLECTION_ID_",
"callData": {
"totalPrice": "0.0001"
}
}
}
```
```json Credit Card Payment
{
"payment": {
"method": "stripe-payment-element",
"currency": "usd"
},
"lineItems": {
"collectionLocator": "crossmint:_YOUR_COLLECTION_ID_",
"callData": {
"totalPrice": "0.0001"
}
}
}
```
The `payment` object indicates the method and currency you intend to make the payment with. For crypto payments, this can be the same chain of the NFT or another chain that the buyer has liquidity on.
For example, buying an NFT on `BASE` chain with `BASE` `ETH`, buying an NFT on Solana with `SOL`, or any cross-chain combination of a [supported chain](/introduction/supported-chains) and currency.
The `payment.method` value for credit card checkouts is `stripe-payment-element` and the `payment.currency` can be any of the [supported fiat currencies](/payments/advanced/localization).
The `lineItems` object describes the NFTs being purchased.
For primary sales, each item must be available from the same `collectionId`. Currently, minting from multiple contracts in the same purchase is not supported.
Detailed guides on multi-line-item orders and marketplace (secondary sales) purchase are coming soon!
#### Collection Locator
The `collectionLocator` within `lineItems` is how you specify the collection within Crossmint. For primary sales where the NFTs are being minted for the first time, the contract will need to be registered in the Crossmint console. You can find your `collectionId` within the Token collections tab in the developer console.
#### Alternative: Token Locator
Alternatively, if this is a secondary sale, and your token is already minted and available on a supported marketplace, you instead use a `tokenLocator`, instead of a `collectionLocator`.
***Using a token locator means you do not need to register the collection in the Crossmint console.***
The `tokenLocator` for EVM Chains follows the format `blockchain:contractAddress:tokenId` and for Solana follows the format `blockchain:tokenAddress`.
More information on the `tokenLocator` can be found [on the buy API integration guide](/payments/headless/guides/marketplaces).
Remember, you can [view orders within the Developer
Console](/payments/advanced/testing-tips#reviewing-orders-in-the-developer-console) to help get insight into the
order process during testing and even after launch.
## Updating the Order
All orders require a recipient to progress to the payment phase. You can also optionally add a specific locale, which is used to indicate the language for the email receipt sent to the buyer.
The primary reason you'll update an existing order is when the buyer changes the payment method or currency they'd like to pay with in the UI that you build. To update the order, make a `PATCH` request to the `/api/2022-06-09/orders/` endpoint to make these changes and receive a response with updated payment details. View [API reference here](/api-reference/headless/edit-order).
You can update all of these fields at the same time or individually depending on what makes the most sense for your use case.
### Update the Recipient
First, take a look at how to add the recipient to an existing order. The `requires-recipient` state occurs when you initialize a minimal order and do not include a recipient value. Valid options for the recipient property are `email` or `walletAddress`.
When you set an email recipient, the token will be minted to a Crossmint custodial wallet that can be accessed via [www.crossmint.com](https://www.crosmint.com/) (or [staging.crossmint.com](https://staging.crossmint.com) during testing).
You can update the recipient for an existing order as follows:
`PATCH` `/api/2022-06-09/orders/`
```json
{
"recipient": {
"email": "buyer@example.com"
}
}
```
OR
```json
{
"recipient": {
"walletAddress": "0x1234abcd…"
}
}
```
The wallet address **must** be compatible with the chain the NFT is on. For example, a Solana NFT requries a Solana
wallet address and an NFT on an EVM chain requries a compatible EVM wallet address.
### Update Chain and/or Currency
To change details about how the buyer will pay for the NFTs you use the same API route as above and pass a new payment object.
```json Crypto Payment
{
"payment": {
"method": "ethereum-sepolia",
"currency": "usdc",
"payerAddress": "0x1234abcd..."
}
}
```
```json Credit Card Payment
{
"payment": {
"method": "stripe-payment-element",
"currency": "usd"
}
}
```
This will return a new response that can be used to prompt the buyer to complete the crypto payment.
Anytime you update the order you must ensure you use the newly returned `payment.preparation.serializedTransaction`
to construct the transaction.
### Update the Locale
As mentioned above, the `locale` is used to set the language and currency for the email receipt sent to your buyer. The default is `en-US`.
Below is an example of the body you'd pass to update the locale setting:
```json
{
"locale": "es-ES"
}
```
The available locale values are:
`en-US`, `de-DE`, `es-ES`, `fr-FR`, `it-IT`, `ja-JP`, `ko-KR`, `pt-PT`, `ru-RU` `th-TH` `tr-TR` `uk-UA` `vi-VN` `zh-CN` `zh-TW`, `Klingon`
## Quote Expiration
The time before expiration depends on the payment method chosen. Check the `quote.expiresAt` property to determine how long the quote is valid for. Additionally, the `quote.status` property will be set to `expired` if this timeframe is exceeded.
If your quote has expired you'll need to create a new order.
# Payment Methods
Source: https://docs.crossmint.com/payments/headless/guides/payment-methods
Understand the supported payment methods and how to implement them
## Cross-Chain + Crypto Payments
You can easily create or update an order to receive a price quote, enabling your user to pay with crypto they have on the same chain or even liquidity they have on other chains.
There are several considerations you need to keep in mind when building your app to support cross-chain payments. Some recommendations include the following:
* How to test the process out in staging/testnet and then move to production/mainnet
* Filtering down the list of tokens for which the connected wallet has enough balance to cover the purchase
* Ensuring the wallet is set to the same network as the selected payment chain
Refer to the [Order Lifecycle](/payments/headless/guides/order-lifecycle/quote-phase) docs for details about creating and updating orders based on user selections.
For a full list of supported crypto currencies, refer to the [supported
currencies](/payments/headless/guides/supported-currencies) page.
You'll need to build out a UI that enables your buyer to select from the supported currencies, and then update the existing order upon any changes.
Code example(s) coming soon!
## Credit Card Payments
The option of accepting credit card payments via headless checkout is also available. For detailed examples of creating and updating orders, refer to the [Order Lifecycle](/payments/headless/guides/order-lifecycle/quote-phase) docs.
### Test Price Limits and Test Credit Cards
When building your applications using the staging environment, you can use various test credit cards numbers to see the entire process end-to-end, without actually having to transact using a real credit card. Check out the Testing Tips page for more info on [price limits](/payments/advanced/testing-tips#limits-in-staging) and [test card numbers](/payments/advanced/testing-tips#test-credit-card-numbers).
### Accepting Credit Cards in Other Platforms
Part of what makes headless checkout so powerful is that it opens the possibility of accepting credit card payments with Crossmint outside of a browser environment by integrating the relevant Stripe Payment Element SDK. Using the `stripePublishableKey` returned in the `payment.preparation` response is the first step towards adding Crossmint checkout support in native mobile apps and more.
# Physical Product Purchases
Source: https://docs.crossmint.com/payments/headless/guides/physical-good-purchases
How to purchase physical products with crypto using Headless Checkout
Crossmint's Headless Checkout now supports purchasing physical products using a wallet's crypto balance through the `productLocator` parameter. This guide explains how to integrate physical product purchases and handle shipping requirements.
## Physical Address Requirement
When purchasing physical products, a shipping address is required (currently only US addresses are supported). You can provide this in two ways:
### 1. Include Address During Order Creation
```json
POST /api/2022-06-09/orders
{
"recipient": {
"email": "buyer@example.com",
"physicalAddress": {
"name": "John Doe", // required
"line1": "123 Main St", // required
"line2": "Apt 4B", // optional
"city": "San Francisco", // required
"state": "CA", // required for US addresses
"postalCode": "94105", // required
"country": "US" // required - only US is currently supported
}
}
}
```
### 2. Update Address After Order Creation
If you create an order without specifying a `physicalAddress`, the order's quote status will be `requires-physical-address`.
```json response
{
"order": {
"orderId": "...",
"quote": {
"status": "requires-physical-address"
}
}
}
```
To resolve this status, update the order with the physical address:
```json
PATCH /api/2022-06-09/orders/{orderId}
{
"recipient": {
"physicalAddress": {
"name": "John Doe", // required
"line1": "123 Main St", // required
"line2": "Apt 4B", // optional
"city": "San Francisco", // required
"state": "CA", // required for US addresses
"postalCode": "94105", // required
"country": "US" // required - only US is currently supported
}
}
}
```
After providing the physical address, the order status will update and include the necessary `payment.preparation` parameters to proceed with payment.
## Order Status Handling
Orders for physical products may enter the following statuses:
* `requires-physical-address` - The order requires a shipping address. During this status, `payment.preparation` parameters will not be present.
* `valid` - The order has all required information and is ready for payment.
## Supported Providers
### Amazon
Amazon products can be purchased using either their ASIN or product URL. See the [Amazon Integration Guide](/payments/headless/guides/providers/amazon) for details.
### Shopify
Shopify products can be purchased using the product URL and variant ID. See the [Shopify Integration Guide](/payments/headless/guides/providers/shopify) for details.
# Plan Your Solution
Source: https://docs.crossmint.com/payments/headless/guides/plan-your-solution
Detailed integration guide to build out a fully custom digital asset checkout experience
The Headless Checkout suite of APIs offers the most sophisticated tooling available to build fully custom experiences for your users. This guide will walk you through the entire integration process in a logical order. The first step is to take a few minutes to plan out your solution.
## Client or Server Approach
Depending on how your application is architected, you may want to use server-side or client-side API keys. Check out the [client or server guide](/payments/headless/guides/client-or-server) for more info.
## Decide on Payment Methods
The Headless Checkout supports cross-chain crypto payments and credit cards. Decide if you want to enable both credit card and crypto payments, and which cross-chain tokens should be available.
### Cross-Chain Payments
Enable your users to pay for digital assets directly with crypto or with liquidity they have available on other chains by leveraging the cross-chain payments support.
Check the [cross-chain payments](/payments/headless/guides/payment-methods#cross-chain-payments) section for more in-depth guidance.
### Credit Card Payments
You can also use headless checkout to initiate credit card orders for your buyers.
Check the [credit card payments](/payments/headless/guides/payment-methods#credit-card-payments) section for more in-depth guidance.
## Staging or Production
In most cases, it makes sense to start the integration process in the staging environment where all features are available and free to try. You can find more information about [Staging and Production environments here](/introduction/platform/staging-vs-production).
Headless checkout requires enablement by the Customer Success Engineering team in production. [Contact
Sales](https://www.crossmint.com/contact/sales) if your don't already have a CSE assigned.
## Create or Import Your Collection in the Console
For NFT's, you will need to have a collection that your user's can purchase NFTs from. You can deploy a collection directly from the Crossmint Developer Console or import a contract you've deployed elsewhere. Check these guides for more details on creating or importing collections.
* [Create a Collection](/payments/guides/create-collection)
* [Import a Collection](/payments/guides/register-collection)
Once you have a collection created or imported, you'll have a `collectionId`, which is necessary to create orders.
## Create Your API Key
With the above steps completed, you're ready to create an API key to use for your project.
1. Login to the developer console where your collection was created in the previous step
2. If you're on the collection detail view, navigate back to the home page of the console
3. Click the "Integrate" tab and select the "API Keys" section on top
Before creating an API key, you'll need to decide on server-side vs client-side implementation. You can find some more info in the [Client or Server Guide](/payments/headless/guides/client-or-server).
## Next Steps
You're ready to move on to implementing the Headless Checkout in your application!
# Amazon Integration
Source: https://docs.crossmint.com/payments/headless/guides/providers/amazon
How to enable crypto purchases of Amazon products using Headless Checkout
This guide explains how to integrate Amazon product purchases using the Headless Checkout API.
## Product Locator Format
When creating an order for an Amazon product, use the `productLocator` parameter with either the Amazon ASIN or product URL:
```json
// Amazon ASIN
{
"lineItems": [
{
"productLocator": "amazon:B01DFKC2SO"
}
]
}
// Amazon Product URL
{
"lineItems": [
{
"productLocator": "amazon:https://www.amazon.com/dp/B01DFKC2SO"
}
]
}
```
## Example Flow
* Specify the receipient's email
* Specify their shipping information
* Specify the payment method used
* Specify the product locator
For a full list of supported currencies, refer to the [supported
currencies](/payments/headless/guides/supported-currencies) page.
```json
POST /api/2022-06-09/orders
{
"recipient": {
"email": "buyer@example.com",
"physicalAddress": {
"name": "John Doe", // required
"line1": "123 Main St", // required
"city": "San Francisco", // required
"state": "CA", // required for US addresses
"postalCode": "94105", // required
"country": "US" // required - only US is currently supported
}
},
"payment": {
"method": "ethereum-sepolia",
"currency": "eth"
},
"lineItems": [
{
"productLocator": "amazon:B01DFKC2SO"
}
]
}
```
With all requied information provided, the order's response will include payment preparation details, as shown below.
```json
{
"order": {
"orderId": "...",
"quote": {
"status": "valid",
...
},
"payment": {
"preparation": {
... // Payment details will be present here
}
}
}
}
```
## Additional Information
* Monitor order statuses through the [Developer Console](https://www.crossmint.com/console)
* Review the [Order Lifecycle guide](/payments/headless/guides/order-lifecycle/quote-phase) for detailed status handling
* Check [this guide](/payments/headless/guides/payment-methods) for details on supported currencies and payment methods
# Shopify Integration
Source: https://docs.crossmint.com/payments/headless/guides/providers/shopify
How to enable crypto purchases of Shopify products using Headless Checkout
This guide explains how to integrate Shopify product purchases using the Headless Checkout API.
## Product Locator Format
When creating an order for a Shopify product, use the `productLocator` parameter with the Shopify product URL and variant ID:
```json
{
"lineItems": [
{
"productLocator": "shopify:https://www.gymshark.com/products/gymshark-arrival-5-shorts-black-ss22:39786362601674"
}
]
}
```
The format for the product locator is `shopify::`, where:
* `shopify:` is the prefix identifying this as a Shopify product
* `` is the full URL to the product page
* `` is the unique variant ID for the specific product option (size, color, etc.)
## Example Flow
* Specify the recipient's email
* Specify their shipping information
* Specify the payment method used
* Specify the product locator
For a full list of supported currencies, refer to the [supported
currencies](/payments/headless/guides/supported-currencies) page.
```json
POST /api/2022-06-09/orders
{
"recipient": {
"email": "buyer@example.com",
"physicalAddress": {
"name": "John Doe", // required
"line1": "123 Main St", // required
"city": "San Francisco", // required
"state": "CA", // required for US addresses
"postalCode": "94105", // required
"country": "US" // required - only US is currently supported
}
},
"payment": {
"method": "ethereum-sepolia",
"currency": "eth"
},
"lineItems": [
{
"productLocator": "shopify:https://www.gymshark.com/products/gymshark-arrival-5-shorts-black-ss22:39786362601674"
}
]
}
```
With all required information provided, the order's response will include payment preparation details, as shown below.
```json
{
"order": {
"orderId": "...",
"quote": {
"status": "valid",
...
},
"payment": {
"preparation": {
... // Payment details will be present here
}
}
}
}
```
## Additional Information
* Monitor order statuses through the [Developer Console](https://www.crossmint.com/console)
* Review the [Order Lifecycle guide](/payments/headless/guides/order-lifecycle/quote-phase) for detailed status handling
* Check [this guide](/payments/headless/guides/payment-methods) for details on supported currencies and payment methods
* **Note:** Delivery destinations are limited to regions supported by the Shopify store itself. The ability to ship to a specific address depends on the merchant's shipping configuration.
# Status Codes
Source: https://docs.crossmint.com/payments/headless/guides/status-codes
Guide to understanding the status codes returned from the Headless Checkout APIs
Crossmint's headless checkout includes status codes for multiple aspects of the checkout process. Using status codes lets you build detailed user experiences and UI's that inform about the status of the payment process and delivery of their purchase.
There is the top level `order.phase` and then there are sub-statuses for `quote`, `payment`, and `delivery`.
## Quote Statuses
1. **`quote:all-line-items-unavailable`** - No items in the order are available for purchase at the current time
2. **`quote:expired`** - The quote has expired and needs to be refreshed
3. **`quote:requires-physical-address`** - Order requires a physical shipping address. During this status, `payment.preparation` parameters will not be present. See [Physical Good Purchases guide](/payments/headless/guides/physical-good-purchases) for details.
## Payment Statuses
1. **`payment:requires-recipient`** - The order needs a recipient address to be specified before proceeding
2. **`payment:requires-crypto-payer-address`** - A crypto wallet address needs to be provided for the payment
3. **`payment:requires-kyc`** - User needs to complete KYC verification to proceed with the payment
4. **`payment:failed-kyc`** - KYC verification was rejected and the user cannot proceed
5. **`payment:manual-kyc`** - KYC verification requires manual review, the user will be notified via email of the outcome
6. **`payment:awaiting-payment`** - The order is ready to receive payment from the user
7. **`payment:failed`** - The payment attempt failed and needs to be retried
8. **`payment:in-progress`** - The payment is currently being processed
9. **`payment:completed`** - The payment has been successfully completed
## Delivery Statuses
1. **`delivery:in-progress`** - The NFT or physical item is being processed for delivery
2. **`delivery:failed`** - The delivery process failed and needs to be retried
3. **`delivery:completed`** - The NFT or physical item has been successfully delivered to the recipient
# Supporting Your Customers
Source: https://docs.crossmint.com/payments/headless/guides/supporting-your-customers
Support your customers facing issues with the checkout process
As an enterprise working with Crossmint, you receive priority customer support. Consequently, customer issues can be escalated to the Crossmint team.
## Information to pass onto Crossmint
When escalating customer issues to the Crossmint team, please ensure to pass on the following details, as it makes troubleshooting easier:
* **Email Address**: The email address they are using to purchase the digital asset.
* **Website URL**: The URL of the website they are trying to purchase the digital asset from.
* **Order Id**: The Order Id of the initiated payment.
* **Collection Id**: The Collection Id of the collection on Crossmint.
* **Project Id**: The Project Id of the project on Crossmint.
## Additional items to check
* You can review the **Orders tab** to check the status of the checkout.
* If you are the dev reporting the error, please share the sample code as well.
If nothing works and you are unable to troubleshoot the issue, you can redirect them to Crossmint's support
[here](https://help.crossmint.com/hc/en-us/requests/new/?utm_source=docs).
# Overview
Source: https://docs.crossmint.com/payments/headless/overview
Create fully custom checkout experiences
For general information about Crossmint's Payments product, see the [introduction](/payments/introduction). This guide will focus on the features specific to the headless checkout.
## When is the Headless Checkout the best fit?
* **You want to build the entire user experience**
* **You want to use Crossmint checkout outside of a browser environment** (e.g. native mobile app, game, VR headset, etc.)
* **You are okay spending more time developing your own UX**
## Introduction
Crossmint's headless checkout API is a set of REST APIs that allow you to integrate credit card and cross-chain crypto payments inside your app with full control of the user experience.
It is the most customizable version of the Crossmint suite of payments products, which allows anyone to buy digital assets with familiar payment methods (credit card, crypto on any chain independent on where the asset lives) with the same backend, but allowing full UI customizability and deep integration with your app's UX.
Wherever your imagination takes you...
## Get Started
Build a custom Pay with Crypto checkout experience for your digital assets
Build a custom credit-card checkout experience
Build a USDC checkout in 5 minutes (great for AI agents)
Sell memecoins quickly with a credit card checkout
Contact our sales team for advanced support.
## Advanced Topics
# Pay with Card - Memecoins
Source: https://docs.crossmint.com/payments/headless/quickstarts/credit-card-memecoin-cko
Create a fully customized memecoin checkout experience that accepts credit cards
export const CreateApiKey = ({client, scopes, useJwt}) => {
const scopeStr = (scope, index) => {
if (index === scopes.length - 1) {
return {scope};
} else {
return {scope}, ;
}
};
const localHostInAuthOrigin = client ? "http://localhost:3000" : "";
return
Navigate to the "Integrate" section on the left navigation bar, and ensure you're on the "API Keys" tab.
Within the {client ? "Client-side" : "Server-side"} keys section, click the "Create new key"
button in the top right.
{client ?
On the authorized origins section, enter http://localhost:3000 and click "Add origin".
: ""}
Next, check the scopes labeled {scopes.map((scope, index) => {scopeStr(scope, index)})}.
{useJwt ?
Check the "JWT Auth" box.
: ""}
Finally, create your key and save it for subsequent steps.
;
};
## Introduction
This guide will show you how to accept credit card payments using Crossmint's Embedded Checkout or Headless Checkout API for memecoin sales with [Checkout.com](https://www.checkout.com/docs) as the payment provider. You'll learn how to:
* Set up credit card payments for Solana memecoin purchases in JavaScript
* Implement a checkout UI using Checkout.com's Flow component
* Track order status and delivery
You can jump to the sections on the right toolbar to get integrate with either:
* **Option 1**, using Embedded Checkout, or
* **Option 2**, using Headless Checkout.
### Important Notes
Crossmint runs compliance checks on all tokens to ensure they do not qualify as securities or currencies under
applicable regulations. Transactions for tokens that are determined to be too similar to securities or
currencies will fail.
Currently, memecoin checkout only supports Solana network. If you're an enterprise customer, you can check which
tokens are supported by using the fungibleCheckoutAvailable endpoint, or reach out to support for an updated
list of supported tokens.
Memecoin checkout only delivers memecoins to EOAs (Externally Owned Accounts), not Crossmint supported delivery
solutions, such as [on-the-fly wallet creation](/payments/introduction#key-characteristics) (both Crossmint
custodial wallets and smart wallet), delivery Twitter handle, etc.
Crossmint remains the merchant of record for all transactions. Your buyers will still receive [delivery
receipts](/payments/headless/guides/order-lifecycle/delivery-phase#delivery-receipts) and transaction
confirmations from Crossmint.
## Prerequisites
Have a Solana wallet address ready to receive purchased memecoins
Get your API keys from the [Crossmint Console](https://www.crossmint.com/console/projects/apiKeys)
## Fungible Token Specification
To define which fungible token you'd like to purchase, you'll need to specify the tokenLocator in the tokenLocator format: `solana:${tokenMintHash}` (tokenMintHash is commonly known as contract address, CA, or mint hash).
## Option 1 - Embedded Memecoin Checkout
The fastest way to start selling memecoins is to adapt our [embedded checkout solution](/nft-checkout/embedded/quickstart) to use fungibles.
### Important Parameters
Before implementing the checkout, note these key parameters:
* `maxSlippageBps`: Optional slippage tolerance (default provided if not specified)
* `receiptEmail`: Required for delivering payment receipts
* `executionParameters.mode`: Set to "exact-in" for memecoin purchases (specifies exact USD amount to spend). Exact-out is for NFT's, exact-in is for fungibles.
### Memecoin Embedded Integration
Next, we will set up a project file with Crossmint's embedded checkout to accept memecoin purchases.
Create `.env.local` in your project root:
```sh
NEXT_PUBLIC_CLIENT_API_KEY="_YOUR_CLIENT_API_KEY_" # From API Keys page
NEXT_PUBLIC_TOKEN_ADDRESS="6p6xgHyF7AeE6TZkSmFsko444wqoP15icUSqi2jfGiPN" # Instead of a collectionId, we will use a token address. In this case, $trumps contract address
NEXT_PUBLIC_RECIPIENT_WALLET_ADDRESS="YOUR_SOLANA_WALLET_ADDRESS" # Add desired recipient wallet
NEXT_PUBLIC_RECEIPT_EMAIL="YOUR_EMAIL" # Add desired recipient email
```
Create `/src/app/page.tsx` with:
```tsx
"use client";
import { CrossmintProvider, CrossmintEmbeddedCheckout } from "@crossmint/client-sdk-react-ui";
export default function Home() {
const clientApiKey = process.env.NEXT_PUBLIC_CLIENT_API_KEY as string;
const tokenAddress = process.env.NEXT_PUBLIC_TOKEN_ADDRESS as string;
const recipientWalletAddress = process.env.NEXT_PUBLIC_RECIPIENT_WALLET_ADDRESS as string;
return (
);
}
```
Memecoin purchases are only supported in production, so pay with credit card in a small amount to test the flow.
Here's how your embedded checkout will look after implementation:

🎉 Congratulations! You've successfully set up your embedded memecoin checkout. Check out the [Next Steps](#next-steps) section below to learn how to customize your integration.
## Option 2 - Headless Memecoin Checkout
## Headless Memecoin Checkout
The headless checkout API allows complete control over your checkout experience, including:
* Custom UI components and styling
* Custom payment flow sequences
* Integrated analytics and tracking
* Custom error handling and retry logic
* Branded confirmation pages
### Create an Order
The first step in the headless checkout process is to create an order. An order is an object datastructure, that represents an intent to purchase in Crossmint's systems. This guide will create a basic order, and then update it with required info step-by-step.
You can also create the entire order in one API call if the necessary information is available at the time of order
creation. This can be used for custom "one-click-checkout" experiences, should you wish to make them.
`POST` `https://www.crossmint.com/api/2022-06-09/orders`
Refer to the complete **create order** API reference [here](/api-reference/headless/create-order).
Important: Memecoin purchases can only be processed in the production environment, not in staging.
Use the javascript code snippet below to create a starting point for your order.
Alternatively, use the API playground to explore and create your own order.
```javascript JavaScript
const apiKey = 'your-server-api-key'; // CHANGE THIS TO YOUR SERVER API KEY
const tokenId = 'solana:6p6xgHyF7AeE6TZkSmFsko444wqoP15icUSqi2jfGiPN'; // trump token
const deliveryAddress = 'your-solana-wallet-address'; // CHANGE THIS TO YOUR RECEIVING SOLANA WALLET ADDRESS
const receiptEmail = 'your-email@example.com'; // CHANGE THIS TO YOUR EMAIL
const options = {
method: 'POST',
headers: {
'X-API-KEY': apiKey,
'Content-Type': 'application/json'
},
body: JSON.stringify({
lineItems: {
tokenLocator: tokenId,
executionParameters: {
mode: "exact-in", // The execution method for the order. It also tells Crossmint to operate in buying fungibles mode
amount: "1", // default currency USD
maxSlippageBps: "500" // Optional, or else default autogenerated slippage will be applied
}
},
payment: {
method: "checkoutcom-flow", // Using Checkout.com as the payment processor
receiptEmail: receiptEmail
},
recipient: {
walletAddress: deliveryAddress
}
})
};
fetch('https://www.crossmint.com/api/2022-06-09/orders', options)
.then(response => response.json())
.then(response => console.log(JSON.stringify(response, null, 2)))
.catch(err => console.error(err));
```
```json JSON
{
"lineItems": {
"tokenLocator": "solana:tokenAddress",
"executionParameters": {
"mode": "exact-in",
"amount": "1",
"maxSlippageBps": "500"
}
},
"payment": {
"method": "checkoutcom-flow",
"receiptEmail": "receiptEmail"
},
"recipient": {
"walletAddress": "deliveryAddress"
}
}
```
```json
{
"clientSecret": "eyJhbGciOiJIUzI1NiIsInR5cCI6IkpXVCJ9.eyJvcmRlcklkZW50aWZpZXIiOiJlZDM0YTU3OS03ZmJjLTQ1MDktYjhkOC05ZTYxOTU0Y2Q1NTUiLCJpYXQiOjE3Mzk0MDI3NjEsImV4cCI6MTczOTQ4OTE2MX0.8AU0Y31lJhnQD2-vAXEZp3ZeMSyh_Wdm9An02Z5AW0M",
"order": {
"orderId": "ed34a579-7fbc-4509-b8d8-9e61954cd555",
"phase": "payment",
"locale": "en-US",
"lineItems": [
{
"chain": "solana",
"metadata": {
"name": "OFFICIAL TRUMP",
"description": "Token TRUMP from the contract: 6p6xgHyF7AeE6TZkSmFsko444wqoP15icUSqi2jfGiPN",
"imageUrl": "https://arweave.net/VQrPjACwnQRmxdKBTqNwPiyo65x7LAT773t8Kd7YBzw"
},
"quote": {
"status": "valid",
"charges": {
"unit": {
"amount": "35.73",
"currency": "usd"
}
},
"totalPrice": {
"amount": "1",
"currency": "usd"
},
"quantityRange": {
"lowerBound": "0.0265905",
"upperBound": "0.0293895"
}
},
"delivery": {
"status": "awaiting-payment",
"recipient": {
"locator": "solana:BuWmGweapdysxU5VuUdi1RGoc4ibDG7TNirWjRtqF995",
"walletAddress": "your-solana-wallet-address"
}
},
"executionMode": "exact-in",
"maxSlippageBps": "500",
"executionParams": {
"mintHash": "6p6xgHyF7AeE6TZkSmFsko444wqoP15icUSqi2jfGiPN",
"mode": "exact-in",
"amount": "1",
"maxSlippageBps": "500"
}
}
],
"quote": {
"status": "valid",
"quotedAt": "2025-02-12T23:26:00.397Z",
"expiresAt": "2025-02-12T23:26:30.397Z",
"totalPrice": {
"amount": "1",
"currency": "usd"
}
},
"payment": {
"status": "awaiting-payment",
"method": "checkoutcom-flow",
"currency": "usd",
"preparation": {
"checkoutcomPaymentSession": {
"id": "string",
"payment_session_secret": "pss_57d30246-c936-42ed-8bbd-b231da1b979e",
"payment_session_token": "mFzZTY0:eyJpZCI6InBzXzJ0OUEzNFJZaHVVc0xCYkt3TzI5NFN1UVFFdyIsImVudGl0eV9pZCI6Im1FzZTY0:eyJpZCI6InBzXzJ0OUEzNFJZaHVVc0xCYkt3TzI5NFN1UVFFdyIsImVudGl0eV9pZCI6Im..."
},
"checkoutcomPublicKey": "pk_test_51KIdg4..."
},
"receiptEmail": "test@example.com"
}
}
}
```
Note the following parameters in the request body:
* `maxSlippageBps`: Optional, or else default autogenerated slippage will be applied.
* `receiptEmail`: Required for credit card payments to deliver receipt
* `executionParameters.mode`: The execution method for the order. Exact-out is for NFT's, exact-in is for fungibles.
### Render the Checkout.com Flow Component
After creating an order, you'll need to render the Checkout.com Flow component to collect payment information. The Flow component is a pre-built UI that handles the payment collection process.
Checkout.com [docs for desktop](https://www.checkout.com/docs/payments/accept-payments/accept-a-payment-on-your-website/get-started-with-flow)
Checkout.com [docs for mobile](https://www.checkout.com/docs/payments/accept-payments/accept-a-payment-on-your-mobile-app/get-started-with-flow-for-mobile)
```javascript
import { useEffect, useState } from 'react';
import Script from 'next/script';
import Image from 'next/image';
import { Spinner } from '@/components/ui/spinner';
export function CheckoutComEmbedded({ embeddedCheckoutParameters }) {
const { createOrder, order } = useOrder();
const [isCheckoutReady, setIsCheckoutReady] = useState(false);
const [isScriptLoaded, setIsScriptLoaded] = useState(false);
useEffect(() => {
async function initiateOrder() {
try {
await createOrder(embeddedCheckoutParameters);
} catch (error) {
console.error("Failed to create order:", error);
}
}
initiateOrder();
}, [embeddedCheckoutParameters, createOrder]);
useEffect(() => {
if (order == null) { return };
console.log("order", order);
}, [order]);
useEffect(() => {
if (order == null) { return };
const initializeCheckout = async () => {
try {
if (typeof window.CheckoutWebComponents !== 'function') {
console.error('CheckoutWebComponents not loaded properly');
return;
}
const checkout = await window.CheckoutWebComponents({
appearance: {
colorBorder: "#FFFFFF",
colorAction: '#060735',
borderRadius: ["8px", "50px"],
},
publicKey: order.payment.preparation.checkoutcomPublicKey,
environment: "sandbox",
locale: "en-US",
paymentSession: order.payment.preparation.checkoutcomPaymentSession,
cors: {
mode: 'no-cors',
credentials: 'same-origin'
},
onReady: () => {
console.log("Flow is ready");
setIsCheckoutReady(true);
}, // checkout.com takes a second to load, so need to wait for it to render
onPaymentCompleted: (component, paymentResponse) => {
console.log("Payment completed with ID:", paymentResponse.id);
},
onChange: (component) => {
console.log(`Component ${component.type} validity changed:`, component.isValid());
},
onError: (component, error) => {
console.error("Payment error:", error, "Component:", component.type);
},
});
const flowComponent = checkout.create("flow");
const container = document.getElementById("flow-container");
if (container) {
flowComponent.mount(container);
}
} catch (error) {
console.error("Error initializing checkout:", error);
}
};
// Initialize checkout when the script is loaded and payment session exists
const scriptElement = document.querySelector('script[src*="checkout-web-components"]');
if (scriptElement) {
initializeCheckout();
}
}, [order]);
if (!order) {
return (