Introduction
This guide will show you how to quickly buy or sell any tokenized asset (NFT) with USDC, using Crossmint’s headless APIs.Prerequisites
From Crossmint
- Create a developer account in the Staging Console.
- Create a new collection or import yours into the console, and have your
collectionIdready.- Make sure you follow the maximum prices for collections set in staging outlined here.
- Create a server-side API key with the
orders.create,orders.update, andorders.readscopes enabled. More info on creating API keys here.
To integrate in production/mainnet, you'll also need to complete account and collection verification. More
information in the production launch guide.
External prerequisites
Wallet
Crypto wallet supporting USDC - Metamask, Phantom, Coinbase Wallet, etc.
Testnet Balance
A small balance of USDC testnet currency in your wallet on the Base-sepolia network.Get testnet USDC here:Adding USDC to MetaMask:
USDXM is a test token that represents USDC. It has the same behavior as USDC. In production, you’ll use real USDC instead.
- Import the token to MetaMask:
- Open MetaMask and click “Import tokens”
- For USDC: Use the official USDC contract address from Circle
0x036CbD53842c5426634e7929541eC2318f3dCF7e - For USDXM: Use the USDXM contract address
0x14196F08a4Fa0B66B7331bC40dd6bCd8A1dEeA9F - Click Import
- Refresh your wallet
Create an order and pay with USDC
Setup your environment
Clone the quickstart repo:Navigate to the project directory:Install the dependencies:
Set keys in .env
Set the following keys in the
.env file:CROSSMINT_API_KEY,COLLECTION_IDare found from the Developer Console. See PrerequisitesPAYER_ADDRESSis your wallet address that contains USDC.EMAIL_ADDRESSis where you’ll receive your NFT in a new Crossmint wallet that you can access later.
Create order with USDC payment
Run the application:This will:
- Create an order that is waiting for a USDC payment on the Base-sepolia network
- Return the serializedTransaction, which will be used in the next step
- Poll the status of the order until it is complete
Receive Payment
- Copy the
serializedTransactionreturned in the previous step and paste it below - Connect to your USDC wallet that was specified in the
.envfile - Send the transaction
Access your NFT
Once the order is complete, you will receive an email with a link to the purchased item, which can be viewed in the Crossmint website.You can also access your NFT by logging in to your Crossmint wallet at
crossmint.com with the email address you specified in the
.env
file.Understanding the code
Creating an order
The order creation process involves sending a POST request to Crossmint’s API with the necessary payment and recipient details. Let’s break down the key components:src/createOrder.ts
Key parameters explained
-
recipient: Specifies where to deliver the tokenized asset
email: The email address where the tokenized asset will be delivered in a Crossmint wallet. Instead of an email, awalletAddressfield can be used to deliver the asset to a specific wallet address.
-
payment: Defines how the payment will be made
method: The blockchain network (base-sepoliafor testnet)currency: The payment currency (usdc)payerAddress: The wallet address that will send the USDC payment
-
lineItems: Specifies what is being purchased
collectionLocator: Identifies the collection
API request
src/createOrder.ts
- Sends a POST request to Crossmint’s order endpoint
- Includes your API key for authentication
- Sends the order data as JSON in the request body
Response handling
src/createOrder.ts
clientSecret: A unique token used for authenticating subsequent requests for this orderorder: The order details including the order ID and status
Polling an order
The order status polling process involves periodically checking the order’s status until it’s completed. Let’s examine how this works:src/getOrder.ts
Get order function explained
- Takes
orderIdas parameter - Makes a GET request to fetch the current state of the order
- Uses API key for authentication
- Returns the order details as JSON
src/getOrder.ts
Poll order function explained
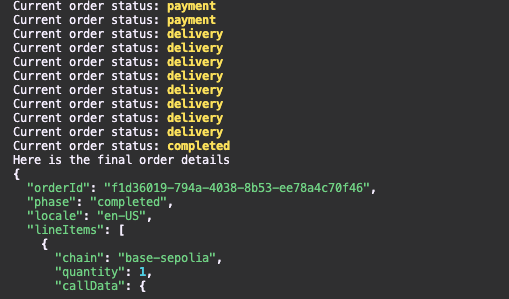
- Continuously checks the order status every 3 seconds.
- Prints the current phase of the order
- Possible order phases include:
payment: Waiting for or processing paymentdelivery: NFT is being deliveredcompleted: Order is successfully completed
- Returns the final order details when completed