Enterprise feature. Contact us for access.
Introduction
This guide will show you how to accept credit card payments using Crossmint’s Embedded Checkout for memecoin sales. You’ll learn how to:- Set up credit card payments for Solana memecoin purchases in JavaScript
- Implement an embedded checkout UI using Crossmint’s React components
- Track order status and delivery
Important Notes
Compliance Checks
Crossmint runs compliance checks on all tokens to ensure they do not qualify as securities or currencies under
applicable regulations. Transactions for tokens that are determined to be too similar to securities or
currencies will fail.
Supported Tokens
Memecoin checkout supports the Solana and Base networks. You can check which tokens are supported by using
the fungibleCheckoutAvailable endpoint. A more in depth guide on token
support is here.
Delivery to External Wallets Only
Memecoin checkout only delivers memecoins to EOAs (Externally Owned Accounts), not Crossmint supported delivery
solutions, such as on-the-fly wallet creation (both Crossmint
custodial wallets and smart wallet), delivery to Twitter handle, etc.
Merchant of Record
Crossmint remains the merchant of record for all transactions. Your buyers will still receive delivery
receipts and transaction
confirmations from Crossmint.
Prerequisites
1
Solana Wallet
Have a Solana wallet address ready to receive purchased memecoins
2
Get API Keys
Get your API keys from the Crossmint Console
- Client-side
- Server-side (Headless Checkout Only)
Fungible Token Specification
To define which fungible token you'd like to purchase, you'll need to specify the tokenLocator in the format:-
For Solana:
solana:${tokenMintHash}- Example:
solana:6p6xgHyF7AeE6TZkSmFsko444wqoP15icUSqi2jfGiPN tokenMintHash: The token mint hash (commonly known as contract address, CA, or mint hash)
- Example:
-
For EVM chains (Ethereum, Polygon, Arbitrum, Base, etc.):
<chain>:<contractAddress>- Example:
ethereum:0x1234567890123456789012345678901234567890 chain: The chain name (ethereum, polygon, arbitrum, base, etc.)contractAddress: The contract address corresponding to the ERC20 token contract (40 hexadecimal characters, beginning with0x)
- Example:
Embedded Memecoin Checkout
The fastest way to start selling memecoins is to use our embedded checkout solution adapted for fungible tokens.Important Parameters
Before implementing the checkout, note these key parameters:receiptEmail: Optional. If the buyer pays with Apple Pay or Google Pay, Crossmint obtains the email automatically. Providing it improves fraud signal quality.executionParameters.mode: Set to “exact-in” for memecoin purchases (specifies exact USD amount to spend). “exact-out” is for NFTs, while “exact-in” is for fungible tokens.maxSlippageBps: Optional slippage tolerance (default is typically 500 BPS or 5% if not specified)
Testing in Staging? Use the XMEME test token:
solana:7EivYFyNfgGj8xbUymR7J4LuxUHLKRzpLaERHLvi7Dgu. Production tokens will not work in the staging environment.Integration Steps
This guide will start from scratch with an empty Next.js application. You'll install the required@crossmint/client-sdk-react-ui dependency and add the embedded checkout component. To get started:
Set up the Project
1
Create a new Next.js application
y and press Enter to proceed:2
Name your app `crossmint-embedded-checkout-demo` and accept the default options
3
Change into the directory created in previous steps
4
Install @crossmint/client-sdk-react-ui
5
Open the project in your preferred code editor
Memecoin Embedded Integration
Next, we will set up a project file with Crossmint’s embedded checkout to accept memecoin purchases.1
Add environment variables
Create
.env.local in your project root:2
Create the checkout page
Create For more details on tokenLocator formatting and other item selection options, see our embedded item selection guide.
/src/app/page.tsx with:3
Run your app
http://localhost:3000) to see your checkout!4
Test your app
Test purchases in staging using test credit cards, like
4242424242424242 (Visa). More information on testing can be found here.For production launch with live memecoin tokens, contact the Crossmint sales team — production Checkout requires a signed Order Form and successful KYB. See the production launch guide for the full sequence.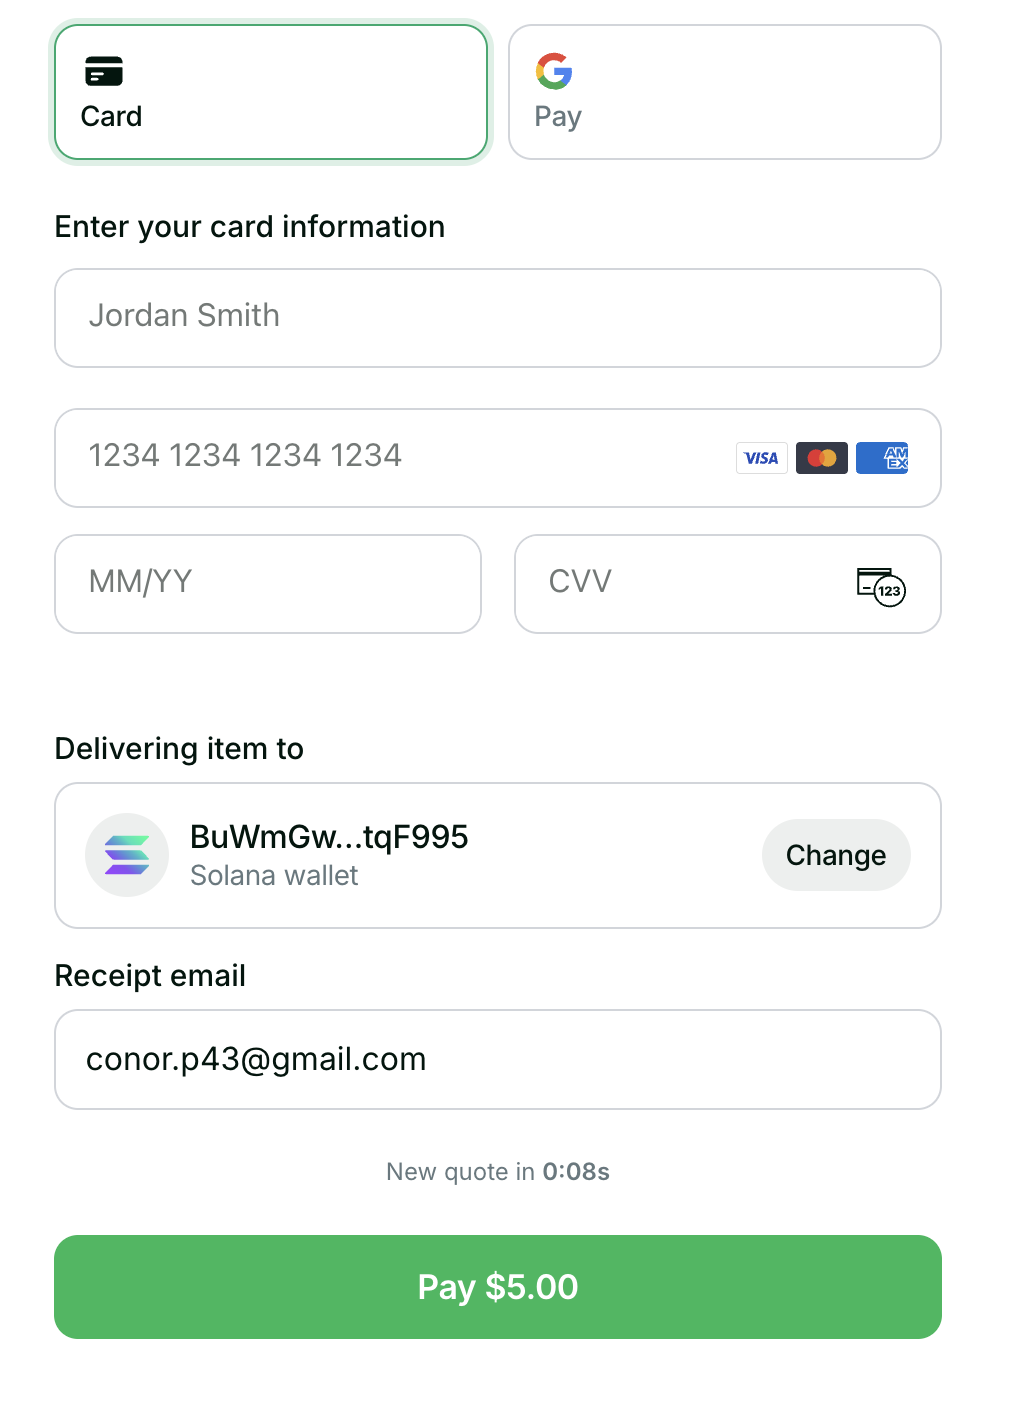
Understanding the Code
Quote Expiration
Price quotes are valid for 1 minute. After expiration, you'll need to request a new quote from the embedded
checkout component
Slippage
Crossmint applies the slippage specified in your
executionParameters.maxSlippageBps. If not provided,
Crossmint will use the default slippage configuration (typically 500 BPS or 5%) from Crossmint's providerNext Steps
Customize UI
Learn how to customize the embedded checkout experience
Handle Webhooks
Implement webhook handling for order updates
Order Lifecycle
The order goes through several phases: Learn more about order phases in the headless checkout guide or embedded checkout guide A summary of the phases is below:-
Quote Phase (1-minute validity)
- Initial price quote generated
- Requires recipient information to proceed
-
Payment Phase
- Collect payment information
- Handle payment completion and errors
-
Delivery Phase
- Purchase memecoin with USDC
- Apply specified slippage tolerance
- Send transfer transaction to recipient wallet
-
Completion
- Order marked as completed
- Receipt email sent to recipient
- Memecoins have been delivered to the recipient wallet
If the quote expires (after 1 minute), the embedded checkout will automatically refresh the quote. You can
customize this behavior using the checkout hooks.
FAQ
Is there a UI Crossmint provides?
Is there a UI Crossmint provides?
Yes, you can use our embedded checkout or hosted checkout options. Contact our sales team to learn more about these solutions and find the best fit for your needs.
Do I need to complete KYC to purchase memecoins?
Do I need to complete KYC to purchase memecoins?
Crossmint KYC is currently disabled for memecoin purchases.
This means that if your buyers typically have high risk profiles, their transaction may be declined.
To increase conversion, please read the improving conversion guide.
What happens if my transaction fails?
What happens if my transaction fails?
When a user attempts a purchase, Crossmint puts a hold on their credit card. Only if the blockchain transaction succeeds, funds are captured. If the blockchain transaction fails, funds are released and the user is never charged.
What are the transaction limits?
What are the transaction limits?
The default transaction limit is 1,000 USD per user.
A single wallet address is subject to a daily limit of 1,000 USD per user, the same as for NFT purchases.
If you need a higher limit, speak to your Crossmint representative.
Is there a limit on how much of a single token I can sell in a day?
Is there a limit on how much of a single token I can sell in a day?
Yes, there is a volume limit of 1,000,000 USD worth of credit card purchases per day. This limit resets daily at 11:59 PM EST.
What do the order creation parameters mean?
What do the order creation parameters mean?
The order creation request includes several important parameters:Payment Object
method: Set tocardfor credit card paymentscurrency: Set tousdfor US Dollar paymentsreceiptEmail: Optional. If the buyer pays with Apple Pay or Google Pay, Crossmint obtains the email automatically. Providing it improves fraud signal quality.
tokenLocator: Specifies the memecoin token address in the formatsolana:tokenAddressexecutionParameters:mode: Set to "exact-in" for memecoin purchases (specifies exact USD amount to spend)amount: Amount to purchase in USDmaxSlippageBps: Set to "500" for 5% slippage tolerance. If not provided, the default slippage will be applied from the available liquidity provider.
clientSecret and an order object with an orderId. Pass these to the Crossmint Embedded Checkout component to collect payment from the user.